A8.Spring Security简明教程与微服务的融合实践
前言
这是一个基于Java 21 的 六边形架构与领域驱动设计的一个通用项目,并且结合现有的最新版本技术架构实现了 领域驱动设计模式和六边形架构模式组件定义. 并且结合微服务,介绍了领域层,领域事件,资源库,分布式锁,序列化,安全认证,日志等,并提供了实现功能. 并且我会以日常发布文章和更新代码的形式来完善它.
简介
安全是所有系统都需要考虑的, 其处理安全的解决方案有很多,也有自己实现一套, 其中 Spring Security 是一个开源的安全解决方案,它提供了一套完整的安全解决方案,包括身份认证、授权、加密、会话管理等功能。
本篇介绍部分都处在 sample-spring-security 模块之中。
Spring Security
初探
Spring Security 中文参考文档: https://www.iokays.com/spring-security/index.html
首先我们来一个简单的例子,只需要Spring Boot Web项目中引入 spring-boot-starter-security 依赖, 添加一个请求的 /ping , 最后启动项目,在日志打印中就可以可以默认用户(user)的密码,登录即可。
Using generated security password: d18f7c55-53f5-492a-b6b7-b87457401224
我们在这里尽早的知道下这两个HTTP状态码。
-
HTTP 401 Unauthorized表示身份验证失败.
-
HTTP 403 Forbidden表示授权失败.
自定义默认配置
在默认的身份验证中,默认的 AuthenticationProvider 会使用默认自动配置的 UserDetailsService, PasswordEncoder用来查找用户并检查他们的密码.
-
其中UserDetailsService 契约的对象管理关于用户的详细信息。其默认实现是 InMemoryUserDetailsManager.
-
而 PasswordEncoder 有两个作用 1. 将密码进行编码; 2. 验证密码是否与现有编码项匹配。
@Configuration
@EnableWebSecurity
public class MyDefaultSecurityConfig {

    @Bean
    public UserDetailsService userDetailsService() {
        var result = new InMemoryUserDetailsManager();

        var user = User.withUsername("user").password("123456").authorities("READ").build();
        result.createUser(user);

        return result;
    }

    @Bean
    public PasswordEncoder passwordEncoder() {
        return NoOpPasswordEncoder.getInstance();
    }
}
这样,我们就能用自定义使用user,123456登录了。
用户体系
我们看到主要是管理 username, password 字段。对应两个字段,我们可以做一些自定义的操作,比如,我们可以通过 Spring Security 已定义的 UserDetailsService 接口来自定义。来获取我们业务系统的用户信息,大家可以查看 JdbcUserDetailsManager, CachingUserDetailsService 并结合本系统的业务来获取用户信息。
密码体系
获取到用户信息后,就需要验证密码, 那么对于password 我们可以指定特定加密的方法,同时我们也可以兼容多套密钥组件,来兼容旧密码。做法是我们将 PasswordEncoder 的注入为基于策略的 DelegatingPasswordEncoder. 替代默认注入的PasswordEncoder。
package com.iokays.sample;

import org.junit.jupiter.api.Assertions;
import org.junit.jupiter.api.Test;
import org.springframework.security.crypto.argon2.Argon2PasswordEncoder;
import org.springframework.security.crypto.bcrypt.BCryptPasswordEncoder;
import org.springframework.security.crypto.password.*;
import org.springframework.security.crypto.scrypt.SCryptPasswordEncoder;

import java.util.HashMap;

class DelegatingPasswordEncoderTest {

    /**
     * 测试指定加密方式和自定义匹配器
     */
    @Test
    void testCustom() {
        final var encoders = new HashMap<String, PasswordEncoder>();
        encoders.put("bcrypt", new BCryptPasswordEncoder());
        encoders.put("noop", NoOpPasswordEncoder.getInstance());
        encoders.put("pbkdf2", Pbkdf2PasswordEncoder.defaultsForSpringSecurity_v5_5());
        encoders.put("pbkdf2@SpringSecurity_v5_8", Pbkdf2PasswordEncoder.defaultsForSpringSecurity_v5_8());
        encoders.put("scrypt", SCryptPasswordEncoder.defaultsForSpringSecurity_v4_1());
        encoders.put("scrypt@SpringSecurity_v5_8", SCryptPasswordEncoder.defaultsForSpringSecurity_v5_8());
        encoders.put("argon2", Argon2PasswordEncoder.defaultsForSpringSecurity_v5_2());
        encoders.put("argon2@SpringSecurity_v5_8", Argon2PasswordEncoder.defaultsForSpringSecurity_v5_8());
        encoders.put("sha256", new StandardPasswordEncoder());

        final var passwordEncoder = new DelegatingPasswordEncoder("noop", encoders);

        //使用默认的加密方式进行加密
        Assertions.assertEquals("{noop}123456", passwordEncoder.encode("123456"));

        //使用指定的加密方式进行匹配, 数据库的密码添加上前缀{},并不会对密码本身泄密,只是知道加密方式而已.
        Assertions.assertTrue(passwordEncoder.matches("123456", "{noop}123456"));

    }

}
登录补充
现在我们登录,不仅仅传入用户名和密码。 我们可能会加一些其他验证参数,比如验证码。 我们看到很多的实现都是对 UsernamePasswordAuthenticationToken 下手,继承它并重写里面的实现. 这样破坏了封装, 我们可以通过组件插拔的模式,来增强登录的功能。其实在Spring Security 中,就显示了使用过滤器的方式来处理这个问题。 添加自定义过滤器 . 用例也提供了类似的方式:
package com.iokays.sample.captcha;

import jakarta.servlet.FilterChain;
import jakarta.servlet.ServletException;
import jakarta.servlet.http.HttpServletRequest;
import jakarta.servlet.http.HttpServletResponse;
import org.slf4j.Logger;
import org.slf4j.LoggerFactory;
import org.springframework.core.log.LogMessage;
import org.springframework.security.authentication.AuthenticationServiceException;
import org.springframework.security.web.util.matcher.AntPathRequestMatcher;
import org.springframework.web.filter.OncePerRequestFilter;

import java.io.IOException;

/**
 * 验证码过滤器
 */
public class UsernameCaptchaAuthenticationFilter extends OncePerRequestFilter {

    private static final Logger log = LoggerFactory.getLogger(UsernameCaptchaAuthenticationFilter.class);

    private static final AntPathRequestMatcher requiresAuthenticationRequestMatcher = new AntPathRequestMatcher("/login", "POST");
    private boolean postOnly = true;

    @Override
    protected void doFilterInternal(HttpServletRequest request, HttpServletResponse response, FilterChain filterChain) throws ServletException, IOException {
        if (!requiresAuthentication(request, response)) {
            filterChain.doFilter(request, response);
            return;
        }

        log.info("----验证码过滤----");

        if (this.postOnly && !request.getMethod().equals("POST")) {
            throw new AuthenticationServiceException("Authentication method not supported: " + request.getMethod());
        }
        String username = request.getParameter("username");
        username = (username != null) ? username.trim() : "";

        String captcha = request.getParameter("captcha");
        captcha = (captcha != null) ? captcha : "";

        log.info("验证码校验 username: {}, captcha: {}", username, "XXXXX");
        filterChain.doFilter(request, response);
    }

    protected boolean requiresAuthentication(HttpServletRequest request, HttpServletResponse response) {
        if (this.requiresAuthenticationRequestMatcher.matches(request)) {
            return true;
        }
        if (this.logger.isTraceEnabled()) {
            this.logger.trace(LogMessage.format("Did not match request to %s", this.requiresAuthenticationRequestMatcher));
        }
        return false;
    }
}
package com.iokays.sample
import com.iokays.sample.captcha.UsernameCaptchaAuthenticationFilter
import org.slf4j.LoggerFactory
import org.springframework.context.ApplicationEventPublisher
import org.springframework.context.annotation.Bean
import org.springframework.context.annotation.Configuration
import org.springframework.security.authentication.AuthenticationEventPublisher
import org.springframework.security.authentication.AuthenticationManager
import org.springframework.security.authentication.DefaultAuthenticationEventPublisher
import org.springframework.security.authentication.ProviderManager
import org.springframework.security.authentication.dao.DaoAuthenticationProvider
import org.springframework.security.config.Customizer
import org.springframework.security.config.annotation.web.builders.HttpSecurity
import org.springframework.security.config.annotation.web.configuration.EnableWebSecurity
import org.springframework.security.core.userdetails.User
import org.springframework.security.core.userdetails.UserDetailsService
import org.springframework.security.crypto.password.NoOpPasswordEncoder
import org.springframework.security.crypto.password.PasswordEncoder
import org.springframework.security.provisioning.InMemoryUserDetailsManager
import org.springframework.security.web.SecurityFilterChain
import org.springframework.security.web.authentication.UsernamePasswordAuthenticationFilter
@Configuration
@EnableWebSecurity
class MyDefaultSecurityConfig {
@Bean
@Throws(Exception::class)
fun securityFilterChain(http: HttpSecurity, authenticationManager: AuthenticationManager?): SecurityFilterChain {
http
.sessionManagement { session -> session.maximumSessions(1) }
.formLogin(Customizer.withDefaults())
.authorizeHttpRequests(Customizer { auth ->
auth
.requestMatchers("/login").permitAll()
.requestMatchers("/ping").hasAuthority("ADMIN")
.anyRequest().authenticated()
})
.addFilterBefore(UsernameCaptchaAuthenticationFilter(), UsernamePasswordAuthenticationFilter::class.java)
//添加 oauth2Login 支持
http.oauth2Login(Customizer.withDefaults())
return http.build()
}
@Bean
fun userDetailsService(): UserDetailsService {
val result = InMemoryUserDetailsManager()
result.createUser(User.withUsername("admin").password("123456").authorities("ADMIN").build())
result.createUser(User.withUsername("user").password("123456").authorities("READ").build())
return result
}
@Bean
fun passwordEncoder(): PasswordEncoder {
return NoOpPasswordEncoder.getInstance();
}
@Bean
fun authenticationEventPublisher(applicationEventPublisher : ApplicationEventPublisher): AuthenticationEventPublisher {
return DefaultAuthenticationEventPublisher(applicationEventPublisher);
}
@Bean
fun authenticationManager(userDetailsService: UserDetailsService, passwordEncoder: PasswordEncoder): AuthenticationManager {
//验证用户密码
val authenticationProvider = DaoAuthenticationProvider();
authenticationProvider.setUserDetailsService(userDetailsService);
authenticationProvider.setPasswordEncoder(passwordEncoder);
val providerManager = ProviderManager(authenticationProvider);
providerManager.setEraseCredentialsAfterAuthentication(false);
return providerManager;
}
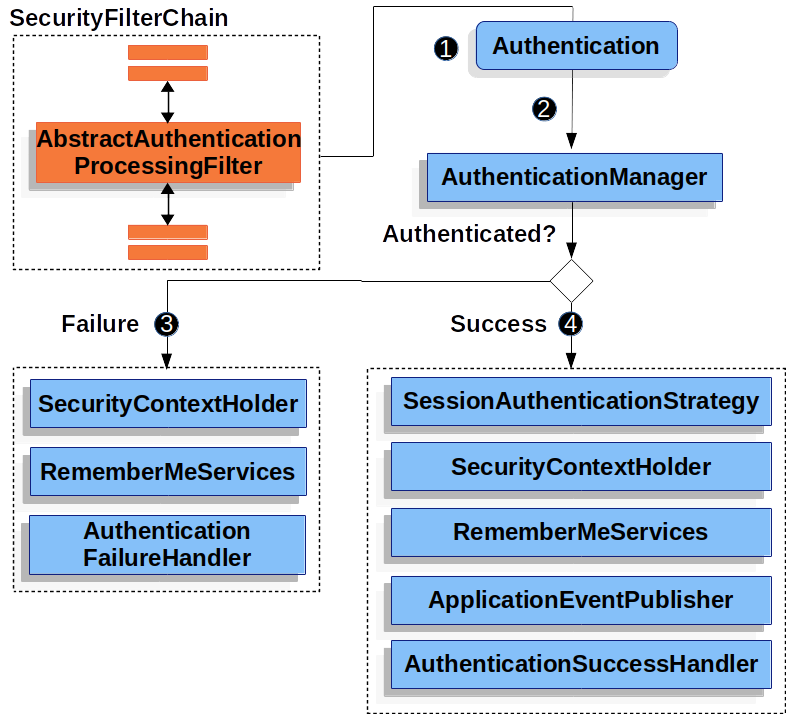
}如想了解更多表单登录的原理,可以从 UsernamePasswordAuthenticationFilter 过滤器并结合下面的图,进行分析。

权限
从上面的例子,我们看到了一些URL(/login, /ping)的访问权限控制,当非业务性的接口和不可编辑的接口,我们可以通过这样的配置来控制。 如果是自己编写的业务性的接口,比如增删改查,我们可以通过注解的方式( @PreAuthorize("hasAuthority('users::write')") )来控制。 然后我们建立用户-角色-权限的映射,基本就能满足我们的需求.
Oauth2
通用
使用 Oauth2 的方式,在最新版的Spring Security 中,先添加依赖,然后只需要开启 OAuth2登录( ` http.oauth2Login(Customizer.withDefaults())` )和配置授权服务器的配置,即可实现 Oauth2 的登录。
server:
  port: 8082
spring:
  security:
    oauth2:
      client:
        registration:
          google:
            client-id: XXXXXXXXXXXXX
            client-secret: XXXXXXXXXXXXXXXXXXXXX
          github:
            client-id: YYYYYYYYYY
            client-secret: YYYYYYYYYYYYYYYYYYYYY
          local:
            client-id: login-client
            client-secret: openid-connect
            authorization-grant-type: authorization_code
            scope: openid,profile
            redirect-uri: "{baseUrl}/{action}/oauth2/code/{registrationId}"
        provider:
          local:
            authorization-uri: http://127.0.0.1:8081/oauth2/authorize
            token-uri: http://127.0.0.1:8081/oauth2/token
            jwk-set-uri: http://127.0.0.1:8081/oauth2/jwks
            user-info-uri: http://127.0.0.1:8081/userinfo
            user-name-attribute: sub
最后访问任意地址: http://localhost:8082, 会跳转到登录页面,登录页面分为两部分, 上面部分为表单登录,下部分为Oauth2 登录。 因为我们配置了多个认证方式, 所以我们选择指定的认证方式,比如: 就可以跳转到Google OAuth2 认证。 这样知道就我们做到了表单登录和Oauth2认证共存。
其中google代表我们配置的registrationId. 我们配置了2个,两者并存。 也可以替换为github试试。
自定义
上面介绍了Spring Security Oauth2 的通用用法,如果Oauth2 Service 是我们自己搭建或者对方不是一个标准的Oauth2 Provider,我们需要怎么处理呢?
首先我们可以启动一个Oauth2 认证服务, 详细查看:sample-spring-authorization-server 模块。
spring:
  security:
    oauth2:
      client:
        registration:
          local:
            client-id: login-client
            client-secret: openid-connect
            authorization-grant-type: authorization_code
            scope: openid,profile
            redirect-uri: "{baseUrl}/{action}/oauth2/code/{registrationId}"
        provider:
          local:
            authorization-uri: http://127.0.0.1:8081/oauth2/authorize
            token-uri: http://127.0.0.1:8081/oauth2/token
            jwk-set-uri: http://127.0.0.1:8081/oauth2/jwks
            user-info-uri: http://127.0.0.1:8081/userinfo
            user-name-attribute: sub
配置完, 跳转到登录页面就会一个 local Oauth2登录认证的选项, 完成后续的登录过程。
如果是本机(localhost)验证,如果我们配置认证服务器使用 127.0.0.1 如上访问,那么Oauth客户端使用 localhost 访问。 这样能避免覆盖cookie, 导致出现 authorization_request_not_found 这个问题.
因为浏览器来说,cookie是区分域,不区分端口的,在一个ip地址下多个端口的cookie是共享的。
|