Ajax 简明教程
AJAX - Send POST Requests
POST 请求将数据从网页发送到 Web 服务器。在此请求中,数据以与 URL 分离的请求正文形式发送。您无法缓存和书签 POST 请求。此外,使用 POST 请求,您可以获得任何长度的数据。
The POST request sends data from a web page to a web server. In this request, the data is sent in the request body that is separated from the URL. You cannot cache and bookmark Post requests. Also using POST request you can data of any length.
Syntax
open('POST', url, true)此方法需要三个参数,它们是:
Where this method takes three parameters and they are −
-
POST − It is used to send data to the web server.
-
url − It represents the file url which will be opened on the web server.
-
true − For asynchronous connection set this parameter’s value to true. Or for synchronous connection set the value to false. The default value of this parameter is true.
How to use POST Request
要使用 POST 请求,我们需要执行以下步骤:
To use the POST request we need to follow the following steps −
Step 1 − 创建 XMLHttpRequest 对象。
Step 1 − Create an object of XMLHttpRequest.
var variableName = new XMLHttpRequest()Step 2 − 创建 XMLHttpRequest 对象后,我们现在必须定义一个回调函数,该函数将在从 Web 服务器得到响应后触发。
Step 2 − After creating XMLHttpRequest an object, now we have to define a callback function which will trigger after getting a response from the web server.
XMLHttpRequestObjectName.onreadystatechange = function(){
   // Callback function body
}
Step 3 − 现在我们使用 open() 函数。在 open() 函数中,我们传入一个 POST 请求以及要向其发送数据的 URL。
Step 3 − Now we use open() functions. Inside the open() function we pass a POST request along with the URL to which we have to send data.
XMLHttpRequestObjectName.open("POST", url, async)
XMLHttpRequestObjectName.setRequestHeader('Content-type', 'application/json')
Step 4 − 使用 setRequestHeader() 设置 HTTP 标头请求。它总是先调用 open() 方法后调用 send() 方法。这里内容类型标头设置为“application/json”,表示要以 JSON 格式发送数据。
Step 4 − Set the HTTP header request using setRequestHeader(). It always calls after the open() method but before send() method. Here the content-type header is set to "application/json" which indicates that the data is going to send in JSON format.
Step 5 − 最后,我们使用 stringify() 方法将 JSON 数据转换为字符串,然后使用 send() 方法将其发送到 Web 服务器。
Step 5 − At last, we convert the JSON data into the string using stringify() method and then send it to the web server using send() method.
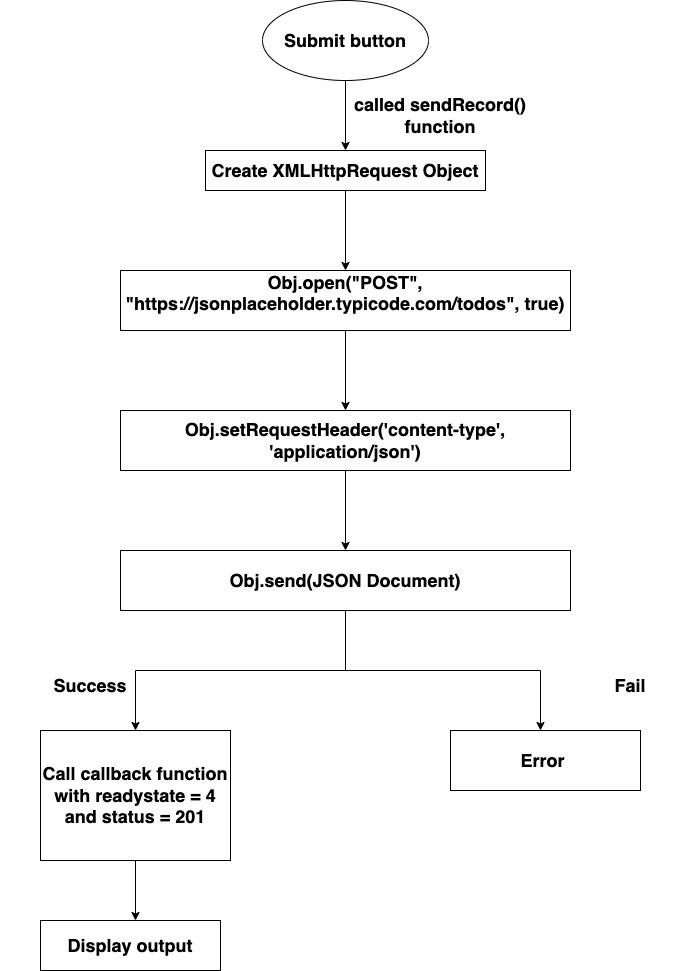
XMLHttpRequestObjectName.send(JSON.stringify(JSONdata))以下流程图将显示下方代码的工作原理 −
The following flow chart will show the working of the below code −
Example
<!DOCTYPE html>
<html>
<body>
<script>
   function sendRecords() {
      // Creating XMLHttpRequest object
      var zhttp = new XMLHttpRequest();

      // JSON document
      const mParameters = {
         title: document.querySelector('#Utitle').value,
         userid: document.querySelector('#UId').value,
         body: document.querySelector('#Ubody').value
      }
      // Creating call back function
      zhttp.onreadystatechange = function() {
         if (this.readyState == 4 && this.status == 201) {
            document.getElementById("example").innerHTML = this.responseText;
            console.log("Data Posted Successfully")
         }
         console.log("Error found")
      };
      // Post/Add JSON document on the given API
      zhttp.open("POST", "https://jsonplaceholder.typicode.com/todos", true);

      // Setting HTTP request header
      zhttp.setRequestHeader('Content-type', 'application/json')

      // Sending the request to the server
      zhttp.send(JSON.stringify(mParameters));
   }
</script>

   <!--Creating simple form-->
   <h2>Enter data</h2>
   <label for="Utitle">Title</label>
   <input id="Utitle" type="text" name="title"><br>

   <label for="UId">UserId</label>
   <input id="UId" type="number" name="UserID"><br>

   <label for="Ubody">Body</label>
   <input id="Ubody" type="text" name="body"><br>

   <button type="button" onclick="sendRecords()">Submit</button>
   <div id="example"></div>
</body>
</html>
使用 HTTP POST 方法和服务器的 URL 初始化请求,即 "https://jsonplaceholder.typicode.com/todos" 。然后我们调用 setRequestHeader() 方法来将请求的内容类型设置为 JSON。在那之后,我们调用 send() 函数以字符串形式向服务器发送请求和 JSON 文档。
initialise the request with the HTTP POST method and the URL of the server which is "https://jsonplaceholder.typicode.com/todos". Then we call the setRequestHeader() method to set the content type of the request as JSON. After that, we call send() function to send the request along with a JSON document in the form of a string to the server.
因此,当服务器对请求做出响应时,“onreadystatechange”属性使用 XMLHttpRequest 对象的当前状态调用回调函数。如果“准备状态”属性设置为 4(这意味着请求已完成)并且“状态”属性设置为 201(这意味着服务器已成功创建新资源),则从“responseText”属性中提取响应数据,并借助示例元素的“innerHTML”属性显示 HTML 文档。
So when the server responds to the request, the "onreadystatechange" property calls the callback function with the current state of the XMLHttpRequest object. If the "ready state" property is set to 4(that means the request is completed) and the "status" property is set to 201(that means the server is successfully created a new resource), then the response data is extracted from the "responseText" property and display the HTML document with the help of "innerHTML" property of the example element.
此处使用 JSON.stringify() 方法将 JSON 文档转换为字符串。这是必需的,因为 XHR 请求只能发送文本数据。
Here is the JSON.stringify() method is used to convert JSON documents into a string. It is necessary because XHR requests can only send text data.
Difference between PUT and POST request
以下是 PUT 和 POST 请求的区别 −
Following is the difference between the PUT and the POST request −
PUT Request |
POST Request |
It is used to update the existing record. |
It is used to create a new record. |
It sends the entire resource as a payload. |
It only sends the part to be updated. |
It can be cached |
It cannot be cached |
It is idempotent |
It is non-idempotent |
If we send this request multiple times then multiple URLs will be created on the specified server. |
If we send this request multiple times then multiple URLs will be created on the specified server If we send this request multiple times, still it counted as a single modification request by the server. |