Spring Cloud 简明教程
Spring Cloud - Synchronous Communication with Feign
Introduction
在分布式环境中,服务需要彼此通信。通信可以同步或异步发生。在本节中,我们将了解服务如何通过同步 API 调用进行通信。
In a distributed environment, services need to communicate with each other. The communication can either happen synchronously or asynchronously. In this section, we will look at how services can communicate by synchronous API calls.
虽然这听起来很简单,但作为 API 调用的一部分,我们需要处理以下问题 −
Although this sounds simple, as part of making API calls, we need to take care of the following −
-
Finding address of the callee − The caller service needs to know the address of the service which it wants to call.
-
Load balancing − The caller service can do some intelligent load balancing to spread the load across callee services.
-
Zone awareness − The caller service should preferably call the services which are in the same zone for quick responses.
Netflix Feign 和 Spring RestTemplate (连同 Ribbon )是用于进行同步 API 调用的两个众所周知的 HTTP 客户端。在本教程中,我们将使用 Feign Client 。
Netflix Feign and Spring RestTemplate (along with Ribbon) are two well-known HTTP clients used for making synchronous API calls. In this tutorial, we will use Feign Client.
Feign – Dependency Setting
让我们使用我们在前面章节中使用的 Restaurant 案例。让我们开发一个包含餐厅所有信息的餐厅服务。
Let us use the case of Restaurant we have been using in the previous chapters. Let us develop a Restaurant Service which has all the information about the restaurant.
首先,让我们使用以下依赖更新服务的 pom.xml −
First, let us update the pom.xml of the service with the following dependency −
<dependencies>
      <dependency>
            <groupId>org.springframework.cloud</groupId>
            <artifactId>spring-cloud-starter-openfeign</artifactId>
      </dependency>
      <dependency>
         <groupId>org.springframework.cloud</groupId>
         <artifactId>spring-cloud-starter-netflix-eureka-client</artifactId>
      </dependency>
      <dependency>
         <groupId>org.springframework.boot</groupId>
         <artifactId>spring-boot-starter-web</artifactId>
      </dependency>
</dependencies>
然后,使用正确的注释(即 @EnableDiscoveryClient 和 @EnableFeignCLient)注释我们的 Spring 应用程序类
And then, annotate our Spring application class with the correct annotation, i.e., @EnableDiscoveryClient and @EnableFeignCLient
package com.tutorialspoint;
import org.springframework.boot.SpringApplication;
import org.springframework.boot.autoconfigure.SpringBootApplication;
import org.springframework.cloud.client.discovery.EnableDiscoveryClient;
import org.springframework.cloud.openfeign.EnableFeignClients;
@SpringBootApplication
@EnableFeignClients
@EnableDiscoveryClient
public class RestaurantService{
   public static void main(String[] args) {
      SpringApplication.run(RestaurantService.class, args);
   }
}
Points to note in the above code −
Points to note in the above code −
-
@ EnableDiscoveryClient − This is the same annotation which we use for reading/writing to the Eureka server.
-
@EnableFeignCLient − This annotation scans our packages for enabled feign client in our code and initializes it accordingly.
完成后,现在让我们简要了解一下我们定义 feign 客户端所需的 Feign 接口。
Once done, now let us look briefly at Feign Interfaces which we need to define the Feign clients.
Using Feign Interfaces for API calls
Using Feign Interfaces for API calls
只需在接口中定义 API 调用,Feign 就可以轻松设置 feign 客户端,以便用于构造调用 API 所需的样板代码。例如,考虑我们有两个服务 −
Feign client can be simply setup by defining the API calls in an interface which can be used in Feign to construct the boilerplate code required to call the APIs. For example, consider we have two services −
-
Service A − Caller service which uses the Feign Client.
-
Service B − Callee service whose API would be called by the above Feign client
调用者服务,即本例中的服务 A,需要为其打算调用的 API 创建一个接口,即服务 B。
The caller service, i.e., service A in this case needs to create an interface for the API which it intends to call, i.e., service B.
package com.tutorialspoint;
import org.springframework.cloud.openfeign.FeignClient;
import org.springframework.web.bind.annotation.PathVariable;
import org.springframework.web.bind.annotation.RequestMapping;
@FeignClient(name = "service-B")
public interface ServiceBInterface {
   @RequestMapping("/objects/{id}", method=GET)
   public ObjectOfServiceB getObjectById(@PathVariable("id") Long id);
   @RequestMapping("/objects/", method=POST)
   public void postInfo(ObjectOfServiceB b);
   @RequestMapping("/objects/{id}", method=PUT)
   public void postInfo((@PathVariable("id") Long id, ObjectOfBServiceB b);
}
Points to note -
Points to note −
-
The @FeignClient annotates the interfaces which will be initialized by Spring Feign and can be used by rest of the code.
-
Note that the FeignClient annotation needs to contain the name of the service, this is used to discover the service address, i.e., of service B from Eureka or other discovery platforms.
-
We can then define all the API function name which we plan to call from service A. This can be general HTTP calls with GET, POST, PUT, etc., verbs.
完成后,服务 A 可以简单地使用以下代码来调用服务 B 的 API -
Once this is done, service A can simply use the following code to call the APIs of service B −
@Autowired
ServiceBInterface serviceB
.
.
.
ObjectOfServiceB object = serviceB. getObjectById(5);
我们来看一个示例,以了解实际操作。
Let us look at an example, to see this in action.
Example – Feign Client with Eureka
Example – Feign Client with Eureka
假设我们要查找与客户所在城市相同的城市的餐厅。我们将使用以下服务 -
Let us say we want to find restaurants which are in the same city as that of the customer. We will use the following services −
-
Customer Service − Has all the customer information. We had defined this in Eureka Client section earlier.
-
Eureka Discovery Server − Has information about the above services. We had defined this in the Eureka Server section earlier.
-
Restaurant Service − New service which we will define which has all the restaurant information.
我们首先向我们的客户服务添加一个基本控制器 -
Let us first add a basic controller to our Customer service −
@RestController
class RestaurantCustomerInstancesController {
   static HashMap<Long, Customer> mockCustomerData = new HashMap();
   static{
      mockCustomerData.put(1L, new Customer(1, "Jane", "DC"));
      mockCustomerData.put(2L, new Customer(2, "John", "SFO"));
      mockCustomerData.put(3L, new Customer(3, "Kate", "NY"));
   }
   @RequestMapping("/customer/{id}")
   public Customer getCustomerInfo(@PathVariable("id") Long id) {
      return mockCustomerData.get(id);
   }
}
我们还将为上述控制器定义一个 Customer.java POJO 服务。
We will also define a Customer.java POJO for the above controller.
package com.tutorialspoint;
public class Customer {
   private long id;
   private String name;
   private String city;
   public Customer() {}
   public Customer(long id, String name, String city) {
      super();
      this.id = id;
      this.name = name;
      this.city = city;
   }
   public long getId() {
      return id;
   }
   public void setId(long id) {
      this.id = id;
   }
   public String getName() {
      return name;
   }
   public void setName(String name) {
      this.name = name;
   }
   public String getCity() {
      return city;
   }
   public void setCity(String city) {
      this.city = city;
   }
}
因此,一旦添加此项,我们重新编译项目并执行以下查询以启动 -
So, once this is added, let us recompile our project and execute the following query to start −
java -Dapp_port=8081 -jar .\target\spring-cloud-eureka-client-1.0.jarNote - 一旦启动 Eureka 服务器和此服务,我们应该能够看到在 Eureka 中注册的此服务的一个实例。
Note − Once the Eureka server and this service is started, we should be able to see an instance of this service registered in Eureka.
若要查看我们的 API 是否正常工作,让我们点击 [role="bare"] [role="bare"]http://localhost:8081/customer/1
To see if our API works, let’s hit [role="bare"]http://localhost:8081/customer/1
我们将获得以下输出 -
We will get the following output −
{
   "id": 1,
   "name": "Jane",
   "city": "DC"
}
这证明我们的服务运行良好。
This proves that our service is working fine.
现在,让我们开始定义 Restaurant 服务将用来获取客户所在城市的 Feign 客户端。
Now let us move to define the Feign client which the Restaurant service will use to get the customer city.
package com.tutorialspoint;
import org.springframework.cloud.openfeign.FeignClient;
import org.springframework.web.bind.annotation.PathVariable;
import org.springframework.web.bind.annotation.RequestMapping;
@FeignClient(name = "customer-service")
public interface CustomerService {
   @RequestMapping("/customer/{id}")
   public Customer getCustomerById(@PathVariable("id") Long id);
}
Feign 客户端包含服务名称和我们计划在 Restaurant 服务中使用的 API 调用。
The Feign client contains the name of the service and the API call we plan to use in the Restaurant service.
最后,让我们在 Restaurant 服务中定义一个使用上述接口的控制器。
Finally, let us define a controller in the Restaurant service which would use the above interface.
package com.tutorialspoint;
import java.util.HashMap;
import java.util.List;
import java.util.stream.Collectors;
import org.springframework.beans.factory.annotation.Autowired;
import org.springframework.web.bind.annotation.PathVariable;
import org.springframework.web.bind.annotation.RequestMapping;
import org.springframework.web.bind.annotation.RestController;
@RestController
class RestaurantController {
   @Autowired
   CustomerService customerService;
   static HashMap<Long, Restaurant> mockRestaurantData = new HashMap();
   static{
      mockRestaurantData.put(1L, new Restaurant(1, "Pandas", "DC"));
      mockRestaurantData.put(2L, new Restaurant(2, "Indies", "SFO"));
      mockRestaurantData.put(3L, new Restaurant(3, "Little Italy", "DC"));
}
   @RequestMapping("/restaurant/customer/{id}")
   public List<Restaurant> getRestaurantForCustomer(@PathVariable("id") Long
id) {
      String customerCity = customerService.getCustomerById(id).getCity();
      return mockRestaurantData.entrySet().stream().filter(
entry -> entry.getValue().getCity().equals(customerCity))
.map(entry -> entry.getValue())
.collect(Collectors.toList());
   }
}
此处最重要的行如下所示:
The most important line here is the following −
customerService.getCustomerById(id)这是我们之前定义的 Feign 客户端调用 API 的关键所在。
which is where the magic of API calling by Feign client we defined earlier happens.
让我们也定义 Restaurant POJO :
Let us also define the Restaurant POJO −
package com.tutorialspoint;
public class Restaurant {
   private long id;
   private String name;
   private String city;
   public Restaurant(long id, String name, String city) {
      super();
      this.id = id;
      this.name = name;
      this.city = city;
   }
   public long getId() {
      return id;
   }
   public void setId(long id) {
      this.id = id;
   }
   public String getName() {
      return name;
   }
   public void setName(String name) {
      this.name = name;
   }
   public String getCity() {
      return city;
   }
   public void setCity(String city) {
      this.city = city;
   }
}
定义了该内容之后,让我们使用以下 application.properties 文件创建一个简单的 JAR 文件:
Once this is defined, let us create a simple JAR file with the following application.properties file −
spring:
   application:
      name: restaurant-service
server:
   port: ${app_port}
eureka:
   client:
      serviceURL:
         defaultZone: http://localhost:8900/eureka
现在,让我们编译我们的项目,并使用以下命令执行该项目:
Now let us a compile our project and use the following command to execute it −
java -Dapp_port=8083 -jar .\target\spring-cloud-feign-client-1.0.jar总而言之,我们有以下各项运行:
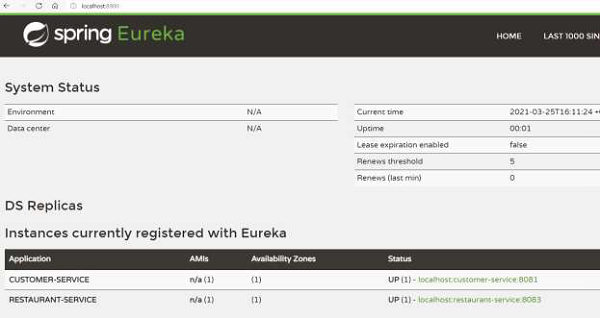
In all, we have the following items running −
-
Standalone Eureka server
-
Customer service
-
Restaurant service
我们可以从 [role="bare"] [role="bare"]http://localhost:8900/ 上的仪表板上确认上述各项是否正常工作。
We can confirm that the above are working from the dashboard on [role="bare"]http://localhost:8900/
现在,让我们尝试找到能够为 Jane 服务的所有餐厅,Jane 居住在华盛顿特区。
Now, let us try to find all the restaurants which can serve to Jane who is placed in DC.
为此,首先让我们访问对应的客户服务: [role="bare"] [role="bare"]http://localhost:8080/customer/1
For this, first let us hit the customer service for the same: [role="bare"]http://localhost:8080/customer/1
{
   "id": 1,
   "name": "Jane",
   "city": "DC"
}
然后,对 Restaurant 服务进行一次调用: [role="bare"] [role="bare"]http://localhost:8082/restaurant/customer/1
And then, make a call to the Restaurant Service: [role="bare"]http://localhost:8082/restaurant/customer/1
[
   {
      "id": 1,
      "name": "Pandas",
      "city": "DC"
   },
   {
      "id": 3,
      "name": "Little Italy",
      "city": "DC"
   }
]
正如我们所见,Jane 可以由华盛顿特区地区的两家餐厅提供服务。
As we see, Jane can be served by 2 restaurants which are in DC area.
此外,我们可以看到客户服务的日志中:
Also, from the logs of the customer service, we can see −
2021-03-11 11:52:45.745 INFO 7644 --- [nio-8080-exec-1]
o.s.web.servlet.DispatcherServlet : Completed initialization in 1 ms
Querying customer for id with: 1
总而言之,正如我们所见,无需编写任何样板代码甚至无需指定服务的地址,我们就可以对服务进行 HTTP 调用。
To conclude, as we see, without writing any boilerplate code and even specifying the address of the service, we can make HTTP calls to the services.
Feign Client – Zone Awareness
Feign 客户端还支持区域感知。假设我们收到一个针对服务的传入请求,我们需要选择应该为该请求服务的服务器。与其在位于远处的服务器上发送和处理该请求,不如选择同一区域中的服务器会更有成效。
Feign client also supports zone awareness. Say, we get an incoming request for a service and we need to choose the server which should serve the request. Instead of sending and processing that request on a server which is located far, it is more fruitful to choose a server which is in the same zone.
现在,让我们尝试设置一个区域感知的 Feign 客户端。为此,我们将使用上一个示例中的案例。我们将遵循以下步骤:
Let us now try to setup a Feign client which is zone aware. For doing that, we will use the same case as in the previous example. we will have following −
-
A standalone Eureka server
-
Two instances of zone-aware Customer service (code remains same as above, we will just use the properties file mentioned in “Eureka Zone Awareness”
-
Two instances of zone-aware Restaurant service.
现在,让我们首先启动分区感知的客户服务。重新回顾一下,以下为 application property 文件。
Now, let us first start the customer service which are zone aware. Just to recap, here is the application property file.
spring:
   application:
      name: customer-service
server:
   port: ${app_port}
eureka:
   instance:
      metadataMap:
         zone: ${zoneName}
   client:
      serviceURL:
         defaultZone: http://localhost:8900/eureka
在执行方面,我们将运行两个服务实例。为此,我们创建一个 shell,然后在该 shell 中执行以下命令 −
For execution, we will have two service instances running. To do that, let’s open two shells and then execute the following command on one shell −
java -Dapp_port=8080 -Dzone_name=USA -jar .\target\spring-cloud-eureka-client-
1.0.jar --spring.config.location=classpath:application-za.yml
并在另一个 shell 上执行以下命令:
And execute the following on the other shell −
java -Dapp_port=8081 -Dzone_name=EU -jar .\target\spring-cloud-eureka-client-
1.0.jar --spring.config.location=classpath:application-za.yml
现在,让我们创建分区感知的餐厅服务。为此,我们将使用以下 application-za.yml
Let us now create restaurant services which are zone aware. For this, we will use the following application-za.yml
spring:
   application:
      name: restaurant-service
server:
   port: ${app_port}
eureka:
   instance:
      metadataMap:
         zone: ${zoneName}
client:
   serviceURL:
      defaultZone: http://localhost:8900/eureka
在执行方面,我们将运行两个服务实例。为此,我们创建一个 shell,然后在该 shell 中执行以下命令:
For execution, we will have two service instances running. To do that, let’s open two shells and then execute the following command on one shell:
java -Dapp_port=8082 -Dzone_name=USA -jar .\target\spring-cloud-feign-client-
1.0.jar --spring.config.location=classpath:application-za.yml
在另一个 shell 中执行以下命令 −
And execute following on the other shell −
java -Dapp_port=8083 -Dzone_name=EU -jar .\target\spring-cloud-feign-client-
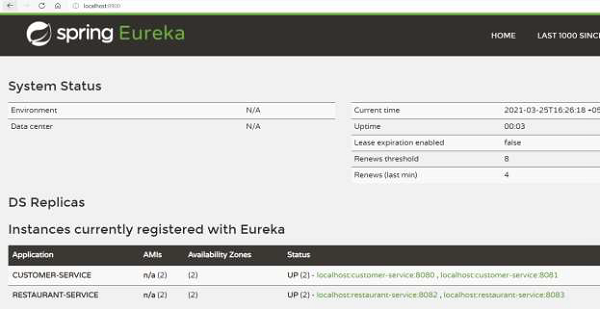
1.0.jar --spring.config.location=classpath:application-za.yml现在,我们已经以分区感知模式设置两个餐厅和客户服务的实例。
Now, we have setup two instances each of restaurant and customer service in zone-aware mode.
现在,让我们访问 [role="bare"] [role="bare"]http://localhost:8082/restaurant/customer/1 (访问美国分区)进行测试。
Now, let us test this out by hitting [role="bare"]http://localhost:8082/restaurant/customer/1 where we are hitting USA zone.
[
   {
      "id": 1,
      "name": "Pandas",
      "city": "DC"
   },
   {
      "id": 3,
      "name": "Little Italy",
      "city": "DC"
   }
]
但需要注意的一个更重要的问题是,会由美国分区中的客户服务提供服务,而不是欧盟分区中的服务。例如,如果我们访问同一 API 5 次,我们会看到美国分区中运行的客户服务在日志记录中有以下内容 −
But the more important point here to note is that the request is served by the Customer service which is present in the USA zone and not the service which is in EU zone. For example, if we hit the same API 5 times, we will see that the customer service which runs in the USA zone will have the following in the log statements −
2021-03-11 12:25:19.036 INFO 6500 --- [trap-executor-0]
c.n.d.s.r.aws.ConfigClusterResolver : Resolving eureka endpoints via
configuration
Got request for customer with id: 1
Got request for customer with id: 1
Got request for customer with id: 1
Got request for customer with id: 1
Got request for customer with id: 1
而欧盟分区中的客户服务不会提供任何服务。
While the customer service in EU zone does not serve any requests.