Pysimplegui 简明教程
PySimpleGUI - Introduction
Python GUIs for Humans
PySimpleGui 项目最初是 TKinter 包的包装器,该包捆绑在 Python 的标准库中,其目标是简化 GUI 构建过程。
The PySimpleGui project started as a wrapper around TKinter package, which is bundled with Python’s standard library, with the objective to simplify the GUI building process.
PySimpleGui 随后添加了基于 PySide 库(该库本身将最初用 C++ 编写的 Qt GUI 工具包移植到了 Python)和 WxPython(该库移植了另一个流行的 GUI 工具包 WxWidgets)设计桌面 GUI 的功能。这些库分别称为 PySimpleGUIQt 和 PySimpleGUIWx 。
PySimpleGui subsequently added the ability to design desktop GUIs based on PySide library (which itself ports Qt GUI toolkit, originally written in C++, to Python) and WxPython (which ports another popular GUI toolkit called WxWidgets). These libraries are called PySimpleGUIQt and PySimpleGUIWx respectively.
PySimpleGui 系列的最新成员是 PySimpleGUIWeb 包,该包使用 Remi(远程接口库)构建在网页中呈现的 GUI 设计。
The latest addition to the PySimpleGui family is the PySimpleGUIWeb package which uses the Remi (REMote Interface Library) to construct GUI design that is rendered in a web page.
PySimpleGui 组中的所有包都遵循类似的 API,这意味着 GUI 元素、它们的属性和方法在所有四个包中都是相同的。因此,只需替换导入语句(并保持代码其余部分不变),就可以获得相应的 GUI 设计渲染。这实际上是 PySimpleGui 最重要的特性。这就是它被称为 Python GUIs for Humans. 的原因
All the packages in the PySimpleGui group follow the similar API, which means the names of GUI elements, their properties and methods are same in all the four packages. As a result, just by replacing the import statement (and keeping the rest of the code unchanged), one can get the corresponding GUI design rendered. This is in fact the most important feature of PySimpleGui. That’s why, it is known as Python GUIs for Humans.
Comparison with other GUI Frameworks
Python 程序员可以从各种 GUI 框架中进行选择来开发 GUI 应用程序。TKinter 是正式包含在 Python 标准库中的一个。其他的,其中大多数都是开源的,必须显式安装。
A Python programmer has a variety of GUI frameworks to choose from, to develop a GUI application. TKinter is the one which is officially included in Python’s standard library. Others, most of them are open source, have to be explicitly installed.
Sr.No. |
Library & Description |
1 |
*TkInter*Included in Python standard library |
2 |
*PyQt*Python 3 bindings for the Qt application framework. |
3 |
*PySide*Qt for Python (formerly known as PySide) offers the official Python bindings for the Qt cross-platform application and UI framework. |
4 |
*PySimpleGUI*Wraps tkinter, Qt (pyside2), wxPython and Remi (for browser support) in a non-OOP API |
5 |
*wxPython*Supports Windows/Unix/Mac. Supports Python 2.7 and >=3.4. Wraps & extends the wxWidgets toolchain. |
6 |
*PyGObject*PyGObject is a Python package which provides bindings for GObject based libraries such as GTK Replacement for PyGtk. |
7 |
*PyForms*A Python framework to develop GUI application, which promotes modular software design and code reusability with minimal effort. |
PySimpleGUI - Environment Setup
PySimpleGui 支持 Python 3.x 版本和 Python 2.7 版本。主端口 PySimpleGui 没有任何外部依赖关系,因为它基于 Tkinter - Tkinter 是 Python 标准库的一部分 - 因此不必单独安装它。按如下步骤使用 PIP 安装程序在当前 Python3 环境中安装:
PySimpleGui supports both Python 3.x versions as well as Python 2.7 version. The main port, PySimpleGui doesn’t have any external dependencies, as Tkinter - on which it is based - is a part of Python’s standard library, and hence it needn’t be installed separately. Install it in the current Python3 environment by the PIP installer as follows
pip3 install PySimpleGUI要验证该库是否正确安装,请输入以下语句 -
To verify if the library is correctly installed, enter the following statement −
>>> import PySimpleGUI
>>> PySimpleGUI.version
'4.60.1 Released 22-May-2022'
如果 PIP 安装不起作用,您可以从 Github 存储库 (https://github.com/PySimpleGUI/PySimpleGUI) 下载 "pysimplegui.py",并将其与导入它的应用程序一同放置在文件夹中。
In case, the PIP installation doesn’t work, you can download "pysimplegui.py" from the Github repository (https://github.com/PySimpleGUI/PySimpleGUI) and place it in your folder along with the application that is importing it.
pysimplegui.py 文件具有 "main()" 函数。当从 Python 提示符调用时,它会生成以下窗口来肯定该程序包安装正确。
The pysimplegui.py file has the "main()" function. When called from Python prompt, it generates the following window to affirm that the package is correctly installed.
>>> import PySimpleGUI as psg
>>> psg.main()
Starting up PySimpleGUI Diagnostic & Help System
PySimpleGUI long version = 4.60.1 Released 22-May-2022
PySimpleGUI Version 4.60.1
tcl ver = 8.6 tkinter version = 8.6
Python Version 3.6.8 (tags/v3.6.8:3c6b436a57, Dec 24 2018,
00:16:47) [MSC v.1916 64 bit (AMD64)]
tcl detailed version = 8.6.6
PySimpleGUI.py location F:\python36\lib\sitepackages\PySimpleGUI\PySimpleGUI.py
GUI 窗口如下所示:
The GUI window appears as below:

如果您使用的是早于 3.4 的 Python3 版本,则可能需要安装 "typing" 模块,因为它没有包含在相应的标准库中
If you are using Python3 version earlier than 3.4, you may need to install the "typing" module since it is not shipped in the corresponding standard library
pip3 install typing对于 Python 2.7,将名称更改为 PySimpleGUI27。
For Python 2.7, change the name to PySimpleGUI27.
pip3 install PySimpleGUI27您可能还需要为 2.7 版安装 "future"
You may need to also install "future" for version 2.7
pip3 install future但是,需要注意的是,Python 软件基金会不正式地支持 Python 2.x 分支。
However, it is important to note that Python Software Foundation doesn’t officially support Python 2.x branches.
PySimpleGUI - Hello World
First Window using PySimpleGUI
要检查 PySimpleGUI 及其依赖关系是否已正确安装,请输入以下代码并使用任何 Python 感知编辑器将其保存为 "hello.py"。
To check whether PySimpleGUI along with its dependencies are properly installed, enter the following code and save it as "hello.py", using any Python-aware editor.
import PySimpleGUI as psg
layout = [[psg.Text(text='Hello World',
   font=('Arial Bold', 20),
   size=20,
   expand_x=True,
   justification='center')],
]
window = psg.Window('HelloWorld', layout, size=(715,250))
while True:
   event, values = window.read()
   print(event, values)
   if event in (None, 'Exit'):
      break
window.close()
上述代码构建一个窗口,其中包含一个文本元素(相当于 TKinter 中的标签),并在窗口的宽度上居中显示 "Hello World" 消息。
The above code constructs a window with a Text element (equivalent of a Label in TKinter) and displays the "Hello World" message placed centrally across the width of the window.
从命令终端运行此程序,如下所示 -
Run this program from the command terminal as −
Python hello.py该程序生成的 output 应该与下面显示的类似 -
The output generated by the program should be similar to the one displayed below −

Equivalent Tkinter Code
要使用纯 Tkinter 代码获得类似的输出,我们需要以下 Python 脚本 -
To obtain similar output using pure Tkinter code, we would require the following Python script −
from tkinter import *
window=Tk()
lbl=Label(window, text="Hello World",
   fg='white', bg='#64778D',
   font=("Arial Bold", 20))
lbl.place(x=300, y=15)
window.title('HelloWorld Tk')
window['bg']='#64778D'
window.geometry("715x250+10+10")
window.mainloop()
除了我们使用 waitress 模块中的 serve() 函数来启动 WSGI 服务器以外,所有其他功能都保持不变。在运行程序后访问浏览器中的 '/' 路由时,Hello World 消息会像以前一样显示。
All other functionalities remain same, except we use the serve() function off waitress module to start the WSGI server. On visiting the '/' route in the browser after running the program, the Hello World message is displayed as before.
可以将可调用类用作视图,而不要使用函数。可调用类是覆盖 call() 方法的那个类。
Instead of a function, a callable class can also be used as a View. A callable class is the one which overrides the call() method.
from pyramid.response import Response
class MyView(object):
   def __init__(self, request):
      self.request = request
   def __call__(self):
      return Response('hello world')
PySimpleGUIQt
PySimpleGUI API 的对象模型已与 PySide2 包(这是 Qt 图形工具包的 Python 移植)中定义的小部件兼容。PySimpleGui 的 Qt 版本称为 PySimpleGUIQt。它可以通过以下 PIP 命令进行类似安装:
The object model of PySimpleGUI API has been made compatible with the widgets as defined in PySide2 package (which is the Python port for Qt graphics toolkit). The Qt version of PySimpleGui is called PySimpleGUIQt. It can be similarly installed with following PIP command −
pip3 install PySimpleGUIQt由于此包依赖于 PySide2,因此也会安装它。
Since this package depends on PySide2, the same will also be installed.
>>> import PySide2
>>> PySide2.__version__
'5.15.2.1'
>>> import PySimpleGUIQt
>>> PySimpleGUIQt.version
'0.35.0 Released 6-Jun-2020'
如前所述,PySimpleGui 项目最重要的特性是,为一个包编写的代码与另一个包完全兼容。因此,较早使用的 hello.py 程序可以按原样用于 Qt 版本。唯一需要的更改是导入 PySimpleGUIQt 而不是 PySimpleGUI。
As mentioned earlier, the most important feature of PySimpleGui projects is that the code written for one package is completely compatible with the other. Hence, the hello.py program used earlier can be used as it is for the Qt version. The only change needed is import PySimpleGUIQt instead of PySimpleGui.
import PySimpleGUIQt as psg
layout = [[psg.Text(text='Hello World',
   font=('Arial Bold', 20),
   justification='center')],
]
window = psg.Window('HelloWorldQt', layout, size=(715,250))
while True:
   event, values = window.read()
   print(event, values)
   if event in (None, 'Exit'):
      break
window.close()
output 非常相似。
The output is fairly similar.

Equivalent PySide2 Code
实现相同结果的纯 PySide2 代码如下:
The pure PySide2 code to achieve the same result is as follows −
import sys
from PySide2.QtCore import *
from PySide2.QtGui import *
from PySide2.QtWidgets import *
def window():
   app = QApplication(sys.argv)
   w = QWidget()
   w.setStyleSheet("background-color: #64778D;")

   b = QLabel(w)
   b.setText("Hello World!")
   b.setFont(QFont('Arial Bold', 20))
   b.setAlignment(Qt.AlignCenter)
   b.setStyleSheet("color: white;")
   b.setGeometry(100, 100, 715, 250)
   b.move(50, 20)

   w.setWindowTitle("HelloWorldQt")
   w.show()
   sys.exit(app.exec_())
   if __name__ == '__main__':
      window()
它将产生相同的输出窗口。
It will produce the same output window.
PySimpleGUIWx
此模块封装了 WxPython 工具包中定义的 GUI 小部件的功能。WxPython 是针对广泛使用的 WxWidgets 库(最初用 C++ 编写)的 Python 端口。显然,PySimpleGUIWx 依赖于 WxPython 包,因此后者将通过以下 PIP 命令自动安装:
This module encapsulates the functionality of GUI widgets as defined in WxPython toolkit. WxPython is a Python port for the widely used WxWidgets library originally written in C++. Obviously, PySimpleGUIWx depends on WxPython package, and hence the latter will get automatically installed by the following PIP command −
pip3 install PySimpleGUIWx要确认 PySimpleGUIWx 和 WxPython 都已正确安装,请在 Python 终端中输入以下语句。
To confirm that both PySimpleGUIWx and WxPython are properly installed, enter following statements in Python terminal.
>>> import PySimpleGUIWx
>>> PySimpleGUIWx.version
'0.17.1 Released 7-Jun-2020'
>>> import wx
>>> wx.__version__
'4.0.7'
“hello.py”脚本中不需要太多更改。我们只需要在“import”语句中用 PySimpleGUIWx 模块替换 PySimpleGUI。
Not much of change is required in the "hello.py" script. We need to just replace PySimpleGUI with PySimpleGUIWx module in the "import" statement.
import PySimpleGUIWx as psg
layout = [[psg.Text(text='Hello World',
   font=('Arial Bold', 20),
   size=(500, 5),
   justification='center')],
]
window = psg.Window('HelloWorldWx', layout, size=(715, 250))
while True:
   event, values = window.read()
   print(event, values)
   if event in (None, 'Exit'):
      break
window.close()
它将生成以下 output :
It will produce the following output:

请注意,您需要更复杂的代码才能使用 pure WxPython code 获得类似输出,如下所示:
Note that you’ll need a little more complex code to obtain the similar output with pure WxPython code as follows −
import wx
app = wx.App()
window = wx.Frame(None, title="WxPython", size=(715, 250))
panel = wx.Panel(window)
panel.SetBackgroundColour((100, 119, 141))
label = wx.StaticText(panel, -1, style=wx.ALIGN_CENTER)
label.SetLabel("Hello World")
label.SetForegroundColour((255, 255, 255))
font = wx.Font()
font.SetFaceName("Arial Bold")
font.SetPointSize(30)
label.SetFont(font)
window.Show(True)
app.MainLoop()
它将显示一个带有文本标签且标题为 Hello World 的顶级窗口。
It will display a top level window with a text label having Hello World as the caption.
PySimpleGUIWeb
Remi(远程接口)是用于 Python 应用程序的 GUI 库,这些应用程序在 Web 浏览器中呈现。PySimpleGUIWeb 包将原始的 PySimpleGui 库移植到了 Remi,因此其应用程序可以在浏览器中运行。以下 PIP 命令在当前 Python 环境中同时安装 PySimpleGUIWeb 和 Remi:
Remi (REMote Interface) is a GUI library for Python applications that are rendered in a web browser. PySimpleGUIWeb package ports the original PySimpleGui library to Remi so that its apps can be run in a browser. Following PIP command installs both PySimpleGUIWeb and Remi in the current Python environment −
pip3 install PySimpleGUIWeb在编写应用程序之前,检查它们是否安装正确。
Check for their proper installation before writing an app.
>>> import PySimpleGUIWeb
>>> PySimpleGUIWeb.version
'0.39.0 Released 6-Jun-2020'
以下脚本是原始 Hello World 程序的 PySimpleGUIWeb 版本。
Following script is the PySimpleGUIWeb version of the original Hello World program.
import PySimpleGUIWeb as psg
layout = [[psg.Text(text='Hello World',
   font=('Arial Bold', 20),
   justification='center')]]
window = psg.Window('HelloWorldWeb', layout)
while True:
   event, values = window.read()
   print(event, values)
   if event in (None, 'Exit'):
      break
window.close()
要使用纯 Remi 库的功能获取类似输出,则比较复杂,如下代码所示:
To obtain similar output using pure Remi library’s functionality is a little complex, as the following code shows:
import remi.gui as gui
from remi import start, App
class HelloWeb(App):
   def __init__(self, *args):
      super(HelloWeb, self).__init__(*args)
   def main(self):
      wid = gui.VBox(style={"background-color": "#64778D"})
      self.lbl = gui.Label('Hello World', width='100%', height='100%',
      style={ "color":"white",
         "text-align": "center",
         "font-family": "Arial Bold",
         "font-size": "20px"}
      )
      wid.append(self.lbl)
      return wid
      if __name__ == "__main__":
         start(HelloWeb, debug=True, address='0.0.0.0', port=0)
当我们运行这些程序时,Remi 服务器启动,浏览器窗口自动打开并显示 Hello World 消息。
When we run these programs, the Remi server starts, a browser window automatically opens and the Hello World message is displayed.

在这里,我们看到了使用 PySimpleGUI、PySimpleGUIQt、PySimpleGUIWx 和 PySimpleGUIWeb 库编写的 Hello World 程序。我们可以看到小部件库保持不变。此外,相同的 Hello World 程序,当分别用纯 Tkinter、PySide、WxPython 和 Remi 编写时,比 PySimpleGUI 版本复杂且繁琐得多。
Here we have seen the Hello World program written in the PySimpleGUI, PySimpleGUIQt, PySimpleGUIWx and PySimpleGUIWeb libraries. We can see that the widget library remains the same. Moreover, the same Hello world program, when written in pure Tkinter, PySide, WxPython and Remi respectively, becomes far more complex and tedious than the PySimpleGUI versions.
PySimpleGUI - Popup Windows
PySimpleGUI 模块中以弹出窗口*前缀开头的函数会生成具有预定义外观的窗口。弹出窗口函数的名称表示其目的是否在其中提供按钮的配置。这些弹出窗口仅使用一行代码创建。每个弹出窗口都有特定的目的,然后立即关闭。
A function in PySimpleGUI module that start with the prefix popup* generates window of a predefined appearance. The name of the popup function indicates is purpose and configuration of buttons present on it. These popups are created with just one line of code. Each popup serves a certain purpose, and then closes immediately.
popup() 函数创建了一个最基本的弹出窗口。它可以像 print() 函数一样使用,在窗口上显示多个参数和一个“确定”按钮。它就像一个消息框,按“确定”按钮后立即消失
A most basic popup is created by the *popup()*function. It can be used like a print() function to display more than one parameters on the window, and an OK button. It acts like a message box, that disappears immediately on pressing the OK button
>>> import PySimpleGUI as psg
>>> psg.popup("Hello World")
它显示一个带有 Hello World 文本和“确定”按钮的弹出窗口。请注意,可以显示多个字符串。提供具有不同按钮配置的以下弹出窗口 −
It displays a popup window with Hello World text and OK button. Note that more than one strings can be displayed. Following popups with different button configurations are available −
-
popup_ok − Display Popup with OK button only
-
popup_ok_cancel − Display popup with OK and Cancel buttons
-
popup_cancel − Display Popup with "cancelled" button text
-
popup_yes_no − Display Popup with Yes and No buttons
-
popup_error − Popup with colored button and 'Error' as button text
这些函数返回用户按下的按钮的文本。例如,如果用户按下确定取消弹出窗口的“确定”按钮,它将返回“确定”,这可以在进一步的编程逻辑中使用。
These functions return the text of the button pressed by the user. For example, if the user presses OK button of the ok-cancel popup, it returns Ok which can be used in further programming logic.
以下弹出窗口以文本形式接受用户输入,或允许用户从选择器中选择文件/文件夹/日期。
Following popups accept input from the user in the form of text or let the user select file/folder/date from the selectors.
-
popup_get_text − Display Popup with text entry field. Returns the text entered or None if closed / cancelled
-
popup_get_file − Display popup window with text entry field and browse button so that a file can be chosen by user.
-
popup_get_folder − Display popup with text entry field and browse button so that a folder can be chosen.
-
popup_get_date − Display a calendar window, get the user’s choice, return as a tuple (mon, day, year)
当用户完成选择并按下确定按钮时,弹出窗口的返回值为文本,可以在程序中进一步使用。
When user has made the selection and Ok button is pressed, the return value of the popup is the text, which can be used further in the program.
以下脚本显示了如何使用上述一些弹出窗口 −
Following script shows the use of some of the above popups −
import PySimpleGUI as psg
text = psg.popup_get_text('Enter your name', title="Textbox")
print ("You entered: ", text)
file=psg.popup_get_file('Select a file',  title="File selector")
print ("File selected", file)
folder=psg.popup_get_folder('Get folder', title="Folder selector")
print ("Folder selected",folder)
ch = psg.popup_yes_no("Do you want to Continue?",  title="YesNo")
print ("You clicked", ch)
ch = psg.popup_ok_cancel("Press Ok to proceed", "Press cancel to stop",  title="OkCancel")
if ch=="OK":
   print ("You pressed OK")
if ch=="Cancel":
   print ("You pressed Cancel")
psg.popup_no_buttons('You pressed', ch, non_blocking=True)
psg.popup_auto_close('This window will Autoclose')
Output − 下面显示了上述代码生成的弹出窗口 −
Output − The popups generated by the above code are shown below −

Python console 上显示以下 output −
The following output is displayed on the Python console −
You entered: Tutorialspoint
File selected F:/python36/hello.png
Folder selected F:/python36/Scripts
You clicked Yes
You pressed Cancel
所有类型弹出窗口都是继承自弹出窗口类的各个类的对象。它们都具有相同的一组属性。这些属性具有特定的默认值,并可用于自定义弹出窗口对象的外观和行为。下表列出了通用参数 −
All types of popups are objects of respective classes inherited from popup class. All of them have a common set of properties. These properties have a certain default value, and can be used to customize the appearance and behaviour of the popup objects. Following table lists the common parameters −
Type |
Parameter |
Description |
Any |
*args |
Values to be displayed on the popup |
Str |
title |
Optional title for the window. |
(str, str) or None |
button_color |
Color of the buttons shown (text color, button color) |
Str |
background_color |
Window’s background color |
Str |
text_color |
text color |
Bool |
auto_close |
If True the window will automatically close |
Int |
auto_close_duration |
time in seconds to keep window open before closing it automatically |
Bool |
non_blocking |
If True then will immediately return from the function without waiting for the user’s input. |
Tuple[font_name, size, modifiers] |
font |
specifies the font family, size, etc. Tuple or Single string format 'name size styles'. |
Bool |
grab_anywhere |
If True can grab anywhere to move the window. |
(int, int) |
Location |
Location on screen to display the top left corner of window. Defaults to window centered on screen |
Bool |
keep_on_top |
If True the window will remain above all current windows |
Bool |
modal |
If True, then makes the popup will behave like a Modal window. Default = True |
Scrolled Popup
popup_scrolled() 函数生成一个弹出窗口,其中包含一个可滚动的文本框。使用此文本框可以显示大量文本,其中包含很多行的文本,这些行的字符数多于宽度。
The popup_scrolled() function generates a popup with a scrollable text box in it. Use this to display a large amount of text, consisting of many lines with number of characters more than the width.
size 属性是一个元组 (w, h),“w”表示一行中的字符数,“h”表示一次显示的行数。如果字符数/文本行数多于“w”或“h”,文本框的水平/垂直滚动条将激活。
The size property is a tuple (w, h) with "w" being the number of characters in one line, and "h" being the lines displayed at a time. The horizontal/vertical scrollbar to the text box will become active if the number of characters/no of lines of text are more than "w" or "h".
在以下示例中,一个大文件 zen.txt 显示在带有可滚动文本框的弹出窗口中。该文件包含 Python 的设计原则,称为“Python 之禅”。
In the following example, a big file zen.txt is displayed in a popup with scrollable text box. The file contains the design principles of Python called the "Zen of Python".
import PySimpleGUI as psg
file=open("zen.txt")
text=file.read()
psg.popup_scrolled(text, title="Scrolled Popup", font=("Arial Bold", 16), size=(50,10))
它将生成以下 output −
It will produce the following output −

Progress Meter
“one_line_progress_meter”是一个弹出窗口,用于显示正在进行的长进程的直观表示,例如循环。它显示某个参数的瞬时值、完成进程的估计时间和已用时间。
The "one_line_progress_meter" is a popup that displays the visual representation of an ongoing long process, such as a loop. It shows the instantaneous value of a certain parameter, estimated time to complete the process, and the elapsed time.
在以下示例中,一个文本文件逐个字符进行读取。进度指示器以进度条的形式显示进程的进度、完成所需估计时间和计数的瞬时值。
In the following example, a text file is read character by character. The Progress meter shows the progress of the process in the form of a progress bar, estimated time required for completion, and the instantaneous value of the count.
import PySimpleGUI as psg
import os
size = os.path.getsize('zen.txt')
file=open("zen.txt")
i=0
while True:
   text=file.read(1)
   i=i+1
   if text=="":
      file.close()
      break
   print (text,end='')
   psg.one_line_progress_meter(
      'Progress Meter', i, size,
      'Character Counter'
   )
它将生成以下 output 窗口 −
It will produce the following output window −

Debug Popup
在程序运行期间,通常需要跟踪某些变量的中间值,虽然后续的输出中不需要这些值。可以使用 PySimpleGUI 库中的 Print() 函数来实现此目的。
During the execution of a program, it is usually required to keep track of intermediate values of certain variables, although not required in the following output. This can be achieved by the Print() function in PySimpleGUI library.
Note − 与 Python 的内置 print() 函数不同,此函数中的“P”为大写。
Note − Unlike Python’s built-in print() function, this function has "P" in uppercase).
当程序第一次遇到此函数时,将显示调试窗口并在其中回显后续的所有打印内容。此外,我们可以使用 EasyPrint 或 eprint ,它们也具有相同的效果。
As the program encounters this function for the first time, the debug window appears and all the subsequent Prints are echoed in it. Moreover, we can use EasyPrint or eprint that also have same effect.
以下程序计算用户输入数字的阶乘值。在 for 循环内,我们希望跟踪每次迭代中 f(阶乘)的值。这是通过 Print 函数完成的,并在调试窗口中显示。
The following program computes the factorial value of the number input by the user. Inside the for loop, we want to keep track of the values of f (for factorial) on each iteration. That is done by the Print function and displayed in the debug window.
import PySimpleGUI as psg
f=1
num=int(psg.popup_get_text("enter a number: "))
for x in range(1, num+1):
   f=f*x
   psg.Print (f,x)
print ("factorial of {} = {}".format(x,f))
假设用户输入 5,调试窗口会显示以下 output −
Assuming that the user inputs 5, the debug window shows the following output−

PySimpleGUI - Window Class
弹出式窗口拥有按钮、文本标签和文本输入域的预定义配置。Window 类允许你设计出更加灵活的 GUI。除了这些元素,还提供其他元素,比如列表框、复选框、单选按钮等。你还可以向 GUI 提供菜单系统。某些专门的小部件,例如进度条、滑块等,也可以用来使设计更加有效。
Popups have a predefined configuration of buttons, text labels and text input fields. The Window class allows you to design a GUI of more flexible design. In addition to these elements, other elements like listbox, checkbox, radio buttons, etc., are available. You can also provide a menu system to the GUI. Certain specialized widgets such as spinner, sliders, etc., can also be used to make the design more effective.
窗口可以是非持久性窗口,类似于弹出式窗口。它会阻塞程序流,直至用户点击客户端区域上的按钮或标题栏上的关闭 (X) 按钮将其关闭。
A window can be a non-persistent window, similar to the popups. It blocks the program flow till the user closes it by clicking a button on the client area or the close (X) button in the title bar.
另一方面,持久性窗口会一直保持可见,直至导致其关闭的事件发生。异步窗口是一种其内容会定期更新的窗口。
A persistent window on the other hand continues to be visible till the event causing it to be closed occurs. The asynchronous window is the one whose contents are periodically updated.
Layout Structure
窗口的客户端区域中元素或小部件放置由列表对像列表控制。每个列表元素对应于窗口界面上的一行,并且可以包含 PySimpleGUI 库中提供的一个或多个 GUI 元素。
The placement of elements or widgets in the window’s client area is controlled by list of list objects. Each list element corresponds to one row on the window surface, and may contain one or more GUI elements available in PySimpleGUI library.
第一步是通过如下方式进行绘制,可视化元素的放置位置:
The first step is to visualize the placement of elements by making a drawing as follows −

窗口上的元素被放置在四行中。前三行包含一个 Text 元素(显示静态文本)和一个 InputText 元素(其中用户可以输入)。最后一行包含两个按钮,Ok 和 Cancel。
The elements on the window are placed in four rows. First three rows have a Text element (displays a static text) and an InputText element (in which user can enter). Last row has two buttons, Ok and Cancel.
这在列表列表中以如下方式表示:
This is represented in the list of lists as below −
import PySimpleGUI as psg
layout = [
   [psg.Text('Name '),psg.Input()],
   [psg.Text('Address '), psg.Input()],
   [psg.Text('Email ID '), psg.Input()],
   [psg.OK(), psg.Cancel()]
]
此列表对象用作 Window 类构造函数的 layout 参数值。
This list object is used as the value of layout parameter for the constructor of the Window class.
window = psg.Window('Form', layout)这将显示所需的窗口。用户输入存储在名为 values 的字典中。随着用户按下 Ok 按钮,Window 类的 read() 方法被调用,并且窗口立即关闭。
This will display the desired window. The user inputs are stored in a dictionary named as values. The read() method of Window class is called as the user presses the Ok button, and the window closes immediately.
用于呈现窗口的完整代码如下:
The complete code to render the window is as follows −
import PySimpleGUI as psg
psg.set_options(font=('Arial Bold', 16))
layout = [
   [psg.Text('Name ', size=(15,1)),psg.Input(expand_x=True)],
   [psg.Text('Address ', size=(15,1)), psg.Input(expand_x=True)],
   [psg.Text('Email ID ', size=(15,1)), psg.Input(expand_x=True)],
   [psg.OK(), psg.Cancel()]
]
window = psg.Window('Form', layout, size=(715,207))
event, values = window.read()
print (event, values)
window.close()
以下是如何 output 显示的:
Here is the output as displayed −

如所示输入数据并按下“OK”按钮。值会按如下方式打印:
Enter the data as shown and press the "OK" button. The values will be printed as below −
OK {0: 'Kiran Gupta', 1: 'Mumbai', 2: 'kiran@gmail.com'}如果在填写数据后,你按下“Cancel”按钮,打印结果将是:
If, after filling the data, you press the "Cancel" button, the result printed will be −
Cancel {0: 'Kiran Gupta', 1: 'Mumbai', 2: 'kiran@gmail.com'}Persistent Window
请注意,此窗口在点击任何按钮(或标题栏中的“X”按钮)后会立即关闭。若要在按下名为 Exit 的特殊类型的按钮或通过按下“X”关闭窗口时保持窗口处于活动状态,则将 read() 方法放入一个无限循环中,该循环允许在 WIN_CLOSED 事件(在按下 Exit 按钮时)或 Exit 事件(在按下“X”按钮时)发生时中断。
Note that this window gets closed as soon as any button (or the "X" button in the title bar) is clicked. To keep the window alive till a special type of button called Exit is pressed or if the window is closed by pressing "X", the read() method is placed in an infinite loop with provision to break when WIN_CLOSED event occurs (when Exit button is pressed) or Exit event occurs (when "X" button is pressed).
让我们在上面的代码中将 Cancel 按钮更改为 Exit 按钮。
Let us change the Cancel button in the above code with Exit button.
import PySimpleGUI as psg
layout = [
   [psg.Text('Name '), psg.Input()],
   [psg.Text('Address '), psg.Input()],
   [psg.Text('Email ID '), psg.Input()],
   [psg.OK(), psg.Exit()]
]
window = psg.Window('Form', layout)
while True:
   event, values = window.read()
   if event == psg.WIN_CLOSED or event == 'Exit':
      break
   print (event, values)
window.close()
窗口的外观将与之前类似,只是它不再具有 Cancel 按钮,而是 Exit 按钮。
The appearance of the window will be similar as before, except that instead of Cancel, it has Exit button.

输入的数据将以元组的形式打印。第一个元素是事件,即按钮标题,第二个元素是字典,其键是增量数字,值是输入的文本。
The entered data will be printed in the form of a tuple. First element is the event, i.e., the caption of button, and second is a dictionary whose key is incrementing number and value is the text entered.
OK {0: 'kiran', 1: 'Mumbai', 2: 'kiran@gmail.com'}
OK {0: 'kirti', 1: 'Hyderabad', 2: 'kirti@gmail.com'}
OK {0: 'karim', 1: 'Chennai', 2: 'karim@gmail.com'}
Window Methods
Window 类中定义的重要方法是 read() 方法,用于收集所有输入元素中输入的值。Window 类还有其他方法来自定义外观和行为。它们如下所列:
The important method defined in the Window class is the read() method, to collect the values entered in all input elements. The Window class has other methods to customize the appearance and behaviour. They are listed below −
Sr.No. |
Method & Description |
1 |
*AddRow*Adds a single row of elements to a window’s "self.Rows" variable |
2 |
*AddRows*Loops through a list of lists of elements and adds each row, list, to the layout. |
3 |
*close*Closes the window so that resources are properly freed up. |
4 |
*disable*Disables window from taking any input from the user |
5 |
*disappear*Causes a window to "disappear" from the screen, but remain on the taskbar. |
6 |
*enable*Re-enables window to take user input |
7 |
*fill*Fill in elements that are input fields with data provided as dictionary. |
8 |
*find_element *Find element object associated with the provided key. It is equivalent to "element = window[key]" |
9 |
*get_screen_dimensions *Get the screen dimensions. |
10 |
*hide*Hides the window from the screen and the task bar |
11 |
*load_from_disk*Restore values from a Pickle file created by the "SaveToDisk" function |
12 |
*layout*Populates the window with a list of widget lists. |
13 |
*read*Get all of your data from your Window. Pass in a timeout (in milliseconds) to wait. |
14 |
*reappear*Causes a disappeared window to display again. |
15 |
*save_to_disk*Saves the values contained in each of the input elements to a pickle file. |
16 |
*set_title *Change the title of the window in taskbar |
Update Window with Key
用户在窗口布局的不同输入元素中输入的数据将以字典格式存储。字典键(从 0 开始)编号,与从左到右和从上到下的输入元素对应。我们可以通过字典运算符来引用输入数据。这意味着第一个元素中的数据由“values[0]”返回。
The data entered by the user in different input elements on the window layout is stored in the dictionary format. The dictionary keys are numbered (starting from 0) corresponding to input elements from left to right and top to bottom. We can refer to the input data by dictionary operator. That means, the data in the first element is returned by "values[0]".
values = {0: 'kiran', 1: 'Mumbai', 2: 'kiran@gmail.com'}
data = [values[k] for k in values.keys()]
print (data)
它将在控制台上打印以下内容:
It will print the following on the console −
['kiran', 'Mumbai', 'kiran@gmail.com']但是,如果要以编程方式操作元素的值,则必须将元素初始化为将其键参数指定为唯一的字符串值。元素的键类似于变量或标识符的名称,这使得以编程方式方便地处理读取或向其分配值。
However, if you want to manipulate the value of an element programmatically, the element must be initialized by assigning a unique string value to its key parameter. The key of an element is like the name of the variable or identifier, which makes it convenient to handle reading or assigning a value to it programmatically.
键参数应为字符串。惯例是它应该是大写字符串,前面和后面都跟着一个“-”字符(示例:“- 名称 -”)。然而,任何字符串都可以使用。
The key parameter should be a string. The convention is that it should be an uppercase string preceded and followed by a "-" character (Example: "- NAME-"). However, any string can be used.
让我们如下所示将键分配给上面的示例中的输入元素 −
Let us assign keys to the Input elements in the above example as shown below −
layout = [
   [psg.Text('Name '),psg.Input(key='-NM-')],
   [psg.Text('Address '), psg.Input(key='-AD-')],
   [psg.Text('Email ID '), psg.Input(key='-ID-')],
   [psg.OK(), psg.Exit()],
]
结果,在 read() 方法之后返回的 values 字典将包含键标识符而非之前的整数。
As a result, the values dictionary returned after the read() method will contain the key identifiers instead of integers previously.
OK {'-NM-': 'Kiran', '-AD-': 'Mumbai', '-ID-': 'kiran@gmail.com'}现在,values[-NM-'] 将获取“Kiran”。可以将键分配给任何元素,而不仅仅是输入元素。可以使用相同的键对元素调用更新。我们可以使用窗口对象的“find_element(key)”或使用 window['key'] 引用该元素。
Now, values[-NM-'] will fetch 'Kiran'. The key can be assigned to any element and not just the input element. You can use the same key to call Update on an element. We can use "find_element(key)" of the Window object, or use window['key'] to refer to the element.
让我们扩展先前的示例,在“确定”和“取消”按钮之前添加一行,并添加一个具有“-OUT-”键的空文本元素。在“确定”事件中,此文本标签将显示在具有“-NM-”、“-AD-”和“-ID-”键的三个输入元素中输入的数据的连接。
Let us extend our previous example to add a row before the Ok and Cancel buttons and have an empty Text element with "-OUT-" key. On the OK event, this Text label shows the concatenation of data entered in three input elements having keys "-NM-", "-AD-" and "-ID-"
import PySimpleGUI as psg
psg.set_options(font=('Arial Bold', 16))
layout = [
   [psg.Text('Name ', size=(15, 1)),
   psg.Input(key='-NM-', expand_x=True)],
   [psg.Text('Address ', size=(15, 1)),
   psg.Input(key='-AD-', expand_x=True)],
   [psg.Text('Email ID ', size=(15, 1)),
   psg.Input(key='-ID-', expand_x=True)],
   [psg.Text('You Entered '), psg.Text(key='-OUT-')],
   [psg.OK(), psg.Exit()],
]
window = psg.Window('Form', layout, size=(715, 200))
while True:
   event, values = window.read()
   print(event, values)
   out = values['-NM-'] + ' ' + values['-AD-'] + ' ' + values['-ID-']
   window['-OUT-'].update(out)
   if event == psg.WIN_CLOSED or event == 'Exit':
      break
window.close()
运行上述代码,在三个输入元素中输入文本并按“确定”。-OUT- 文本标签将按此处所示进行更新 −
Run the above code, enter text in three input elements and press OK. The -OUT- text label will be updated as shown here −

在下面提供了键属性的另一个使用示例。向输入元素分配关键参数 -FIRST- 和 -SECOND-。有两个按钮加号和减号。文本元素显示根据按下的按钮加或减两个数字。
Another example of use of key attribute is given below. To Input elements are assigned key parameters -FIRST- and -SECOND-. There are two buttons captioned Add and Sub. The Text element displays addition or subtraction of two numbers depending on the button pressed.
import PySimpleGUI as psg
import PySimpleGUI as psg
psg.set_options(font=('Arial Bold', 16))
layout = [
   [psg.Text('Enter a num: '), psg.Input(key='-FIRST-')],
   [psg.Text('Enter a num: '), psg.Input(key='-SECOND-')],
   [psg.Text('Result : '), psg.Text(key='-OUT-')],
   [psg.Button("Add"), psg.Button("Sub"), psg.Exit()],
]
window = psg.Window('Calculator', layout, size=(715, 180))
while True:
   event, values = window.read()
   print(event, values)
   if event == "Add":
      result = int(values['-FIRST-']) + int(values['-SECOND-'])
   if event == "Sub":
      result = int(values['-FIRST-']) - int(values['-SECOND-'])
   window['-OUT-'].update(result)
   if event == psg.WIN_CLOSED or event == 'Exit':
      break
window.close()
以下屏幕截图显示了按下“添加”按钮时的结果。
The following screenshot shows the result when the "Add" button is pressed.

Borderless Window
默认情况下,应用程序窗口在客户端区域上方创建标题栏,其中所有其他元素都放置在布局中。标题栏在左侧包含窗口标题,在右侧包含控件按钮(最小化、还原/最大化和关闭)。但是,特别对于类似信息亭的应用程序,不需要标题栏。可以通过将窗口对象的“no_titlebar”属性设置为“True”来摆脱标题栏。
By default, the application window is created with a title bar above the client area wherein all other elements are placed in the layout. The titlebar consists of a window title on the left, and the control buttons (minimize, restore/maxmimize and close) on the right. However, particularly for a kiosk-like application, there is no need of a title bar. You can get rid of the title bar by setting the "no_titlebar" property of the Window object to "True".

要终止此类应用程序,必须在退出按钮事件发生时终止事件循环。
To terminate such an application, the event loop must be terminated on the occurrence of Exit button event.
Window with Disabled Close
如果你希望阻止用户最小化应用程序窗口,则应将窗口对象的“disable_minimize”属性设置为 True。类似地,对“disable_close”属性设置为 True,则关闭按钮显示,但它不会创建 WINDOW_CLOSED 事件。
If you wish to prevent the user to minimize the application window, the "disable_minimize" property of the Window object should be set to True. Similarly, the True value to "disable_close" property the Close button is displayed but it doesn’t create the WINDOW_CLOSED event.

Transparent Window
窗口对象的“alpha_channel”属性决定了窗口的透明度。它的值在 0 到 1 之间。默认值为 0,这意味着窗口显示为不透明。将其设置为 1 以使其完全透明。0 到 1 之间的任何浮点数使透明度成比例。
The "alpha_channel" property of the Window object decides the transparency of the window. Its value is between 0 to 1. By default, it is 0, which means that the window appears as opaque. Set it to 1 to make it completely transparent. Any float value between 0 to 1 makes the transparency proportional.

Multiple Windows
PySimpleGUI 允许同时显示多个窗口。PySimpleGUI 模块中的静态函数在调用时读取所有活动窗口。要激活窗口,必须对其进行最终确定。该函数返回一个(窗口、事件、值)结构的元组。
PySimpleGUI allows more than one windows to be displayed simultaneously. The static function in PySimpleGUI module reads all the active windows when called. To make the window active, it must be finalized. The function returns a tuple of (window, event, values) structure.
window, event, values = PySimpleGUI.read_all_windows()如果没有打开窗口,其返回值为 (None, WIN_CLOSED, None)
If no window is open, its return value is (None, WIN_CLOSED, None)
在以下代码中,两个函数 “win1()” 和 “win2()” 在调用时各创建一个窗口。从第一个窗口开始,标题为“窗口-2”的按钮打开另一个窗口,以便两者都处于活动状态。当第一个窗口上发生 CLOSED 事件时,两者都关闭,程序结束。如果按下第二个窗口上的“X”按钮,则标记为已关闭,保留第一个窗口处于打开状态。
In the following code, two functions "win1()" and "win2()" create a window each when called. Starting with the first window, the button captioned Window-2 opens another window, so that both are active. When CLOSED event on first window takes place, both are closed and the program ends. If the "X" button on second window is pressed, it is marked as closed, leaving the first open.
import PySimpleGUI as psg
def win1():
   layout = [
      [psg.Text('This is the FIRST WINDOW'), psg.Text('', key='-OUTPUT-')],
      [psg.Text('popup one')],
      [psg.Button('Window-2'), psg.Button('Popup'), psg.Button('Exit')]
   ]
   return psg.Window('Window Title', layout, finalize=True)
   def win2():
      layout = [
         [psg.Text('The second window')],
         [psg.Input(key='-IN-', enable_events=True)],
         [psg.Text(size=(25, 1), key='-OUTPUT-')],
         [psg.Button('Erase'), psg.popup('Popup two'), psg.Button('Exit')]]
         return psg.Window('Second Window', layout, finalize=True)
window1 = win1()
window2 = None
while True:
   window, event, values = psg.read_all_windows()
   print(window.Title, event, values)
   if event == psg.WIN_CLOSED or event == 'Exit':
      window.close()
   if window == window2:
      window2 = None
   elif window == window1:
      break
   elif event == 'Popup':
      psg.popup('Hello Popup')
   elif event == 'Window-2' and not window2:
      window2 = win2()
   elif event == '-IN-':
      window['-OUTPUT-'].update('You entered {}'.format(values["-IN-"]))
   elif event == 'Erase':
      window['-OUTPUT-'].update('')
      window['-IN-'].update('')
window.close()
它将生成以下 output 窗口:
It will produce the following output windows:

Asynchronous Window
窗口类的 read() 方法具有以下附加参数 −
The read() method of the Window class has the following additional parameters −
window.read(timeout = t, timeout_key=TIMEOUT_KEY, close=False)timeout 参数允许你的 GUI 在非阻塞读取情况下使用。这是设备在返回之前可以等待的毫秒数。它创建一个定期运行的窗口。
The timeout parameter lets your GUIs to use in a non-blocking read situation. It is the miliseconds your device can wait before returning. It makes a window that runs on a periodic basis.
你能够添加到超时值的时间越长,你占用的 CPU 时间就越少。在超时时间内,你正在“产生”处理器以执行其他任务。如果使用的是非阻塞读取,你的 GUI 将比以往更加响应。
The longer you’re able to add to the timeout value, the less CPU time you’ll be taking. During the timeout time, you are "yielding" the processor to do other tasks. your GUI will be more responsive than if you used a nonblocking read.
timeout_key 参数有助于确定在规定时间内是否进行了任何用户操作。timeout_key 的默认值是“ timeout ”。
The timeout_key parameter helps in deciding whether there has been any user action within the stipulated time. The default value of "timeout_key" is "timeout".
while True:
   event, value = window.read(timeout=10)
   if event == sg.WIN_CLOSED:
      break
   if event == sg.TIMEOUT_KEY:
      print("Nothing happened")
若要使窗口可移动,可将窗口对象的“grab_anywhere”属性设置为真。如果将“keep_on_top”属性设置为真,则窗口将始终位于当前窗口之上。
To make the window movable, set the "grab_anywhere" property of the Window object to true. If the "keep_on_top" property is set to True, the window will remain above the current windows.
PySimpleGUI - Element Class
PySimpleGUI 库包含许多 GUI 小组件,可将其放置在窗口对象之上。例如,我们在上述示例中使用的按钮或文本框。所有这些小组件实际上都是此库中定义的类的对象,其中 Element 类充当所有其他小组件类的基础。
The PySimpleGUI library consists of a number of GUI widgets that can be placed on top of the Window object. For instance, the buttons or the textboxes that we have used in the above examples. All these widgets are in fact objects of classes defined in this library, in which Element class acts as the base for all other widget classes.
这种 Element 类对象永远不会显式声明。它定义了诸如大小、颜色等通用属性。以下是可用小组件(也称为元素)的列表
An object of this Element class is never declared explicitly. It defines the common properties like size, color, etc. Here is the list of the available widgets (also called elements)
Sr.No. |
Widget & Description |
1 |
Text ElementDisplay some text in the window. Usually this means a single line of text. |
2 |
Input ElementDisplay a single text input field. |
3 |
*Multiline Element*Display and/or read multiple lines of text. This is both an input and output element. |
4 |
Combo ElementA combination of a single-line input and a drop-down menu. |
5 |
*OptionMenu Element*Similar to Combo. Only on TKinter port |
6 |
Checkbox ElementDisplays a checkbox and text next to it. |
7 |
Radio ElementUsed in a group of other Radio Elements to provide user with ability to select only one choice in a list of choices. |
8 |
Spin ElementA spinner with up/down buttons and a single line of text. |
9 |
*Button Element*Defines all possible buttons. The shortcuts such as Submit, FileBrowse, … each create a Button |
10 |
*ButtonMenu element *Creates a button that when clicked will show a menu similar to right click menu. |
11 |
Slider ElementHorizontal or vertical slider to increment/decrement a value. |
12 |
Listbox ElementProvide a list of values for the user to choose one or more of. Returns a list of selected rows when a window.read() is executed. |
13 |
Image ElementShow an image in the window. Should be a GIF or a PNG only. |
14 |
Graph ElementCreates area to draw graph |
15 |
Canvas ElementAn area to draw shapes |
16 |
ProgressBar ElementDisplays a colored bar that is shaded as progress of some operation is made. |
17 |
Table ElementDisplay data in rows and columns |
18 |
Tree ElementPresents data in a tree-like manner, much like a file/folder browser. |
19 |
*Sizer Element*This element is used to add more space. |
20 |
*StatusBar Element*A StatusBar Element creates the sunken text-filled strip at the bottom. |
21 |
Frame ElementThe Frame element is a container object that holds on or more elements of other types. |
22 |
Column ElementIt is very useful if you want to design the GUI window elements represented in one or more vertical columns. |
23 |
Tab ElementThe use of Tab elements makes the design very convenient, effective and easy for the user to navigate. Tab element is also a container element such as Frame or Column. |
Properties of Element Class
以下是元素类的属性 −
Following are the properties of the Element Class −
Sr.No. |
Property & Description |
1 |
size(w=characters-wide, h=rows-high) |
2 |
*font*specifies the font family, size |
3 |
*background_color*color of background |
4 |
*text_color*element’s text color |
5 |
*key*Identifies an Element |
6 |
*visible*set visibility state of the element (Default = True) |
Methods of Element Class
以下是元素类的方法 −
Following are the methods of the Element Class −
Sr.No. |
Method & Description |
1 |
*set_tooltip()*Called by application to change the tooltip text for an Element |
2 |
*set_focus()*Sets the current focus to be on this element |
3 |
*set_size()*Changes the size of an element to a specific size |
4 |
*get_size()*Return the size of an element in Pixels |
5 |
*expand()*Causes the Element to expand to fill available space in the X and Y directions |
6 |
*set_cursor()*Sets the cursor for the current Element |
7 |
*set_right_click_menu()*Sets right click menu to be invoked when clicked |
PySimpleGUI - Events
任何 GUI 应用程序都是事件驱动的,它有能力响应 GUI 元素上发生的各种可能的事件。在 PySimpleGUI 中,事件处理在 GUI 设计的结构下面一个无限循环中完成,不断检查是否发生了事件并根据事件执行动作。
Any GUI application is event driven, having the ability to respond to the various possible events occurring on the GUI elements. In PySimpleGUI, the event handling is done inside an infinite loop below the constitution of GUI design, continuously checking whether an event occurs and perform the actions based on the event.
有两种类型的事件 −
There are two types of events −
-
Window events, and
-
Element events.
窗口事件默认启用,包括按钮事件(当单击任何按钮时发生)和标题栏上“X”按钮的事件。
The window events are enabled by default, and include the button events (occur when any button is clicked) and the event of the "X" button on the titlebar clicked.
元素事件默认不会启用。只有当在创建元素时将“enable_events”参数设置为 True 时,才能检测到特定于元素的事件。
The element events are not enabled by default. Element-specific events can be detected only when the "enable_events" parameter is set to True when an element is created.
Window Closed Event
一个无限事件循环使 PySimpleGUI 窗口持久存在,当用户按下“X”按钮或执行 Window 类的 close() 方法时,该循环将终止。终止循环的标准方法如下 −
The infinite event loop that makes the PySimpleGUI window persistent, is terminated when the user presses the "X" button, or the close() method of Window class is executed. The standard way of terminating the loop is as follows −
import PySimpleGUI as psg
...
while True:
 ...

   if event == psg.WIN_CLOSED:
      break
 ...
window.close()
如果此参数设置为 True,Widow 类还将发出 “enable_close_attempted_event”。当在循环内部检测到时,调用是/否弹出窗口是一种好习惯。
The Widow class also emits an "enable_close_attempted_event" if this parameter is set to True. It is a good practice to call yes-no popup when it is detected inside the loop.
window = psg.Window('Calculator', layout,  enable_close_attempted_event=True)
while True:
   event, values = window.read()
   print(event, values)
   if event == "Add":
      result = int(values['-FIRST-']) + int(values['-SECOND-'])
   if event == "Sub":
      result = int(values['-FIRST-']) - int(values['-SECOND-'])
   window['-OUT-'].update(result)
   if event == psg.WINDOW_CLOSE_ATTEMPTED_EVENT and psg.popup_yes_no('Do you really want to exit?') == 'Yes':
      break
   if event == psg.WIN_CLOSED or event == 'Exit':
      break
在这种情况下,当按下“X”按钮时,带有是/否按钮的弹出窗口将出现,当单击“是”按钮时程序将退出。
In this case, as the "X" button is pressed, the Popup with Yes/No button appears and the program exits when the "Yes" button is clicked.
它将生成以下输出窗口 −
It will produce the following output window −

事件值还返回“-WINDOW CLOSE ATTEMPTED-”值。
The event value also returns the "-WINDOW CLOSE ATTEMPTED-" value.
-WINDOW CLOSE ATTEMPTED- {'-FIRST-': '200', '-SECOND-': '300'}Button Events
按钮单击事件默认启用。要禁用,请使用“Button.update(disabled=True)”。您还可以在按钮的构造函数中设置“enable_events=True”,它将启用 Button Modified 事件。当有内容“写入”到按钮时触发此事件。
The button click event is enabled by default. To disable, use "Button.update(disabled=True)". You can also set "enable_events=True" in Button’s constructor, it will enable the Button Modified event. This event is triggered when something 'writes' to a button.
当我们读取窗口的内容(使用“window.read()”)时,按钮值将是其标题(如果未设置键)或已设置则为键。
When we read the contents of the window (using "window.read()"), the button value will be either its caption (if key is not set) or key if it is set.
在上述示例中,由于未在 Add 和 Sub 按钮上设置键参数,因此在读取窗口时将返回它们的标题。
In the above example, since the key parameter is not set on the Add and Sub buttons, their captions are returned when the window is read.
Add {'-FIRST-': '200', '-SECOND-': '300'}在程序中向 Add 和 Sub 按钮添加键参数。
Add key parameters to Add and Sub buttons in the program.
import PySimpleGUI as psg
layout = [
   [psg.Text('Enter a num: '), psg.Input(key='-FIRST-')],
   [psg.Text('Enter a num: '), psg.Input(key='-SECOND-')],
   [psg.Text('Result : '), psg.Text(key='-OUT-')],
   [psg.Button("Add", key='-ADD-'), psg.Button("Sub", key='- SUB-'), psg.Exit()],
]
window = psg.Window('Calculator', layout)
while True:
   event, values = window.read()
   print(event, values)

   if event == "-ADD-":
      result = int(values['-FIRST-']) + int(values['-SECOND-'])

   if event == "-SUB-":
      result = int(values['-FIRST-']) - int(values['-SECOND-'])

   window['-OUT-'].update(result)

   if event == psg.WIN_CLOSED or event == 'Exit':
      break
window.close()
read() 方法返回的元组现在将显示按下的按钮的键。
The tuple returned by the read() method will now show the key of button pressed.
-ADD- {'-FIRST-': '200', '-SECOND-': '300'}Events of Other Elements
当发生某种类型的用户交互时,许多元素会发出事件。例如,当移动滑块或从列表中选择一个项目或单击单选按钮时。
Many of the elements emit events when some type of user interaction takes place. For example, when a slider is moved, or an item from the list is selected on or a radio button is clicked on.
与 Button 或 Window 不同,这些事件默认不会启用。要为元素启用事件,请将参数“enable_events=True”设置为。
Unlike Button or Window, these events are not enabled by default. To enable events for an Element, set the parameter "enable_events=True".
下表显示了元素及其生成的事件。
The following table shows the elements and the events generated by them.
Name |
Events |
InputText |
any key pressed |
Combo |
item selected |
Listbox |
selection changed |
Radio |
selection changed |
Checkbox |
selection changed |
Spinner |
new item selected |
Multiline |
any key pressed |
Text |
Clicked |
Status Bar |
Clicked |
Graph |
Clicked |
Graph |
Dragged |
Graph |
drag ended (mouse up) |
TabGroup |
tab clicked |
Slider |
slider moved |
Table |
row selected |
Tree |
node selected |
ButtonMenu |
menu item chosen |
Right click menu |
menu item chosen |
PySimpleGUI - Menubar
大多数桌面应用程序都具有菜单系统,以根据用户在菜单中选择的选项触发不同的操作。在典型的应用程序窗口中,菜单栏位于标题栏的正下方,并且处于窗口客户端区域的上方。
Most of the desktop applications have a menu system to trigger different operations based on user’s choice of options in the menu. In a typical application window, the menu bar is placed just below the title bar and above the client area of the window.
菜单栏是一个由可点击按钮组成的水平栏。当单击其中任何按钮时,它将生成下拉选项按钮列表。此类选项按钮触发可在事件循环中处理的单击事件。
A menubar is a horizontal bar consisting of clickable buttons. When any of these buttons is clicked it generates a pull down list of option buttons. Such an option button triggers a click event which can be processed inside an event loop.
菜单系统就像所指定的窗口布局一样进行设计。它也是列表的列表。每个列表包含一个或多个字符串。第一级列表的起始字符串是出现在水平菜单栏中的按钮标题。其后是下拉菜单中选项按钮的标题字符串列表。这些选项标题位于第一级列表中的列表中。
The menu system is designed just as the window layout is specified. It is also a list of lists. Each list has one or more strings. The starting string of the list at the first level is the caption for the button appearing in the horizontal menu bar. It is followed by a list of caption strings for the option buttons in the drop down menu. These option captions are in a list inside the first level list.
在选项按钮下方可以有子菜单,在这种情况下,标题将被放入第三级列表中。同样,标题可以嵌套到任何级别。
You may have a sub-menu under an option button, in which case the captions are put in a third level list. Likewise, the captions can be nested up to any level.
菜单定义的一般格式如下:
The general format of a menu definition is as follows:
menu_def = [
   ['Memu1', ['btn1', 'btn2', 'btn3', 'btn4',]],
   ['menu2', ['btn5', 'btn6','btn7', 'btn8'],],
]
要将菜单系统附加到 PysimpleGUI 窗口的主布局,请将 Menu 对象放置在布局的第一行。
To attach the menu system to the main layout of PysimpleGUI window, place the Menu object in the first row of the layout.
Menu 构造函数以 menu_def 列表作为参数提供。菜单对象的所在行后面可能会出现主布局的其他行。
The Menu constructor is given the menu_def list as the argument. Other rows of the main layout may be given after the row having Menu object.
layout= [[psg.Menu(menu_def),[..], [..]]在下面给出的代码中,我们有一个带有文件、编辑和帮助菜单的菜单栏,每个菜单栏在各自的菜单栏中都有一些菜单按钮。
In the code given below, we have a menu bar with File, Edit and Help menus, each having a few menu buttons in respective menu bar.
import PySimpleGUI as psg
menu_def = [['File', ['New', 'Open', 'Save', 'Exit', ]], ['Edit', ['Cut', 'Copy', 'Paste', 'Undo'], ],  ['Help', 'About...'], ]
layout = [[psg.Menu(menu_def)],
   [psg.Multiline("", key='-IN-',
   expand_x=True, expand_y=True)],
   [psg.Multiline("", key='-OUT-',
   expand_x=True, expand_y=True)],
   [psg.Text("", key='-TXT-',
   expand_x=True, font=("Arial Bold", 14))]
]
window = psg.Window("Menu", layout, size=(715, 300))
while True:
   event, values = window.read()
   print(event, values)

   if event != psg.WIN_CLOSED:
      window['-TXT-'].update(values[0] + "Menu Button Clicked")
   if event == 'Copy':
      txt = window['-IN-'].get()
   if event == 'Paste':
      window['-OUT-'].update(value=txt)
   if event == psg.WIN_CLOSED:
      break
window.close()
在菜单栏下方,放置了两个多行元素。最后一行有一个文本元素。
Below the Menubar, two Multiline elements are placed. The last row has a Text element.
单击任何菜单选项按钮时,生成的事件是按钮的标题。此标题显示在最后一行中的 Text 标签上。参考下图 -
When any menu option button is clicked, the event so generated is the caption of the button. This caption is displayed on the Text label in the last row. Refer to the following figure −

当 Copy 事件发生时,带有 -INkey 的上部多行方框中的文本存储在 txt 变量中。此后,当按下 Paste 按钮时,-OUT- 框会使用 txt 的值进行更新。
When the Copy event occurs, the text in the upper multiline box with -INkey is stored in a txt variable. Afterwards, when Paste button is pressed, the -OUT- box is updated with the value of txt.

Menu button with Hot Key
要在菜单按钮和键盘上的键之间建立映射,请在所需的字符前放置一个与符号 &。例如,在 File 前面加上 &,使字符串为“&File”。通过此操作,可以通过按 "Alf+F" 键来访问 File 菜单。此处“F”键被称为热键。
To map a menu button with a key on the keyboard, put an ampersand & character before the desired character. For example, put & before File so that the string is '&File'. By doing so, the File menu can be accessed by pressing "Alf+F" key. Here "F" key is said to be a hot key.
将热键添加到菜单定义中的菜单按钮。
Add hot keys to the menu buttons in our menu definition.
menu_def = [
   ['&File', ['&New', '&Open', '&Save', 'E&xit',]],
   ['&Edit', ['C&ut', '&Copy','&Paste', '&Undo'],],
   ['&Help', '&About...'],
]
运行代码时,菜单中的热键将显示为带下划线的形式。
When the code is run, the hot keys in the menu are shown as underlined.

Right-click Menu
此菜单从位于应用程序窗口顶部的菜单栏中分离出来。每当用户按下鼠标右键按钮时,此菜单都会在单击发生的位置弹出。
This menu is detached from the menubar which is at the top of the application window. Whenever the user presses the right click button of the mouse, this menu pops up at the same position where the click takes place.
在上面定义的菜单栏中,每个列表都是单个菜单的定义。这样的单个菜单定义可以通过构造函数中的 right_click_menu 参数附加到任何元素。在构造主 Window 对象时,也可以传递此参数。
In the menubar defined above, each list is a definition of a single menu. Such single menu definition can be attached to any element by the right_click_menu parameter in the constructor. This parameter can also be passed while constructing the main Window object.
让我们使用 rightclick 作为与 Edit 菜单相对应的列表的变量。
Let us use rightclick as a variable for the list corresponding to the Edit menu.
rightclick=['&Edit', ['C&ut', '&Copy','&Paste', '&Undo']]
menu_def = [
   ['&File', ['&New', '&Open', '&Save', 'E&xit',]], rightclick,
   ['&Help', '&About...'],
]
在 Window 构造函数中将其用作 right_click_menu 参数的值。请参阅以下代码段 -
Use it as the value of right_click_menu parameter in the Window constructor. See the following snippet −
window=psg.Window("Menu", layout, size=(715, 300), right_click_menu=rightclick)进行这些更改并运行代码。单击窗口中的任意位置。菜单会弹出,如下所示 -
Make these changes and run the code. Click anywhere in the window. The menu pops up as shown −

ButtonMenu
此菜单类似于右键菜单,只是它附加到一个按钮,并在单击该按钮时弹出。
This menu is similar to the right click menu, except that it is attached to a button and pops up when the button is clicked.
在主布局的最后一行中,我们添加一个 ButtonMenu 元素,并使用 rightclick 列表作为其布局。
In the last row of the main layout, we add a ButtonMenu element and use the rightclick list as its layout.
layout= [
   [psg.Menu(menu_def)],
   [psg.Multiline("", key='-IN-', expand_x=True, expand_y=True)],
   [psg.Multiline("", key='-OUT-', expand_x=True, expand_y=True)],
   [psg.Text("", key='-TXT-', expand_x=True, font=("Arial Bold", 14)),
   psg.ButtonMenu('ButtonMenu', rightclick, key='-BMENU-')]
]
单击右下角的按钮时,菜单会弹出,如下所示 -
When the button at the lower right is clicked, the menu comes up as can be seen in the following figure −

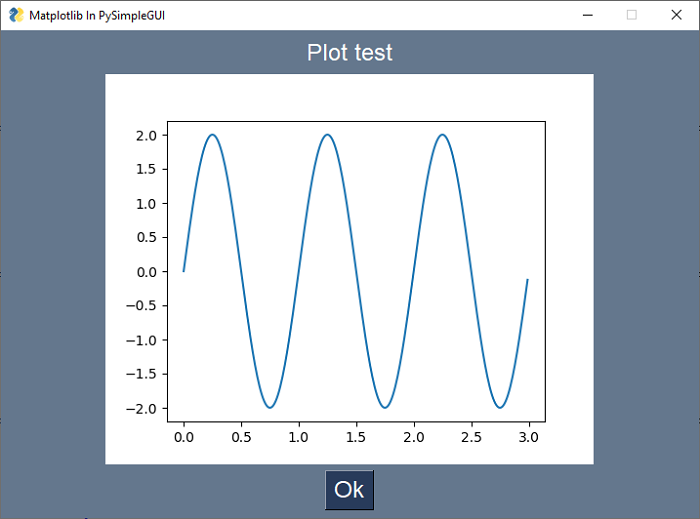
PySimpleGUI - Matplotlib Integration
当在 Python shell 中使用 Matplotlib 时,图表将显示在一个默认窗口中。 backend_tkagg 模块可用于将图表嵌入到 Tkinter 中。
When Matplotlib is used from Python shell, the plots are displayed in a default window. The backend_tkagg module is useful for embedding plots in Tkinter.
PySimpleGUI 中的 Canvas 元素具有返回原始 TKinter Canvas 对象的 TKCanvas 方法。在 backend_tkagg 模块中将其提供给 FigureCanvasTkAgg() 函数以绘制图形。
The Canvas element in PySimpleGUI has TKCanvas method that returns original TKinter’s Canvas object. It is given to the FigureCanvasTkAgg() function in the backend_tkagg module to draw the figure.
首先,我们需要使用 Figure() 类和一个绘图创建一个图形对象。我们将绘制一个显示正弦波的简单图表。
First, we need to create the figure object using the Figure() class and a plot to it. We shall draw a simple plot showing sine wave.
fig = matplotlib.figure.Figure(figsize=(5, 4), dpi=100)
t = np.arange(0, 3, .01)
fig.add_subplot(111).plot(t, 2 * np.sin(2 * np.pi * t))
定义一个函数,在画布上绘制 matplotlib 图形对象
Define a function to draw the matplotlib figure object on the canvas
def draw_figure(canvas, figure):
   figure_canvas_agg = FigureCanvasTkAgg(figure, canvas)
   figure_canvas_agg.draw()
   figure_canvas_agg.get_tk_widget().pack(side='top', fill='both', expand=1)
   return figure_canvas_agg
通过调用其 TkCanvas 属性,从 PySimpleGUI.Canvas 对象获取画布。
Obtain the Canvas from PySimpleGUI.Canvas object by calling its TkCanvas property.
layout = [
   [psg.Text('Plot test')],
   [psg.Canvas(key='-CANVAS-')],
   [psg.Button('Ok')]
]
调用上述函数绘制图形。将画布对象和图形对象传递给它。
Draw the figure by calling the above function. Pass the Canvas object and fifure object to it.
fig_canvas_agg = draw_figure(window['-CANVAS-'].TKCanvas, fig)Example: Draw a Sinewave Line graph
以下是完整代码 −
The complete code is given below −
import matplotlib.pyplot as plt
import numpy as np
from matplotlib.backends.backend_tkagg import
FigureCanvasTkAgg
import PySimpleGUI as sg
import matplotlib
matplotlib.use('TkAgg')
fig = matplotlib.figure.Figure(figsize=(5, 4), dpi=100)
t = np.arange(0, 3, .01)
fig.add_subplot(111).plot(t, 2 * np.sin(2 * np.pi * t))
def draw_figure(canvas, figure):
   tkcanvas = FigureCanvasTkAgg(figure, canvas)
   tkcanvas.draw()
   tkcanvas.get_tk_widget().pack(side='top', fill='both', expand=1)
   return tkcanvas
layout = [[sg.Text('Plot test')],
   [sg.Canvas(key='-CANVAS-')],
   [sg.Button('Ok')]]
window = sg.Window('Matplotlib In PySimpleGUI', layout, size=(715, 500), finalize=True, element_justification='center', font='Helvetica 18')

# add the plot to the window
tkcanvas = draw_figure(window['-CANVAS-'].TKCanvas, fig)
event, values = window.read()
window.close()
生成的图表如下 −
The generated graph is as follows −
PySimpleGUI - Working with PIL
Python Imaging Library 是 Python 编程语言的一个免费、跨平台开源库,它具有打开、处理和保存许多不同图像文件格式的功能。
Python Imaging Library is a free, cross-platform and open-source library for the Python programming language that has the functionality for opening, manipulating, and saving many different image file formats.
要安装此应用,使用 PIP 命令,如下所示 −
To install it, use the PIP command as follows −
pip3 install pillow在以下示例中,我们使用 PIL 函数获取 PNG 图像的字节值,然后在 PySimpleGUI 窗口上的图像元素中显示相同的字节值。
In the following example, we obtain the byte value of the PNG image with PIL function and display the same in Image element on a PySimpleGUI window.
import PySimpleGUI as sg
import PIL.Image
import io
import base64
def convert_to_bytes(file_or_bytes, resize=None):
   img = PIL.Image.open(file_or_bytes)
   with io.BytesIO() as bio:
      img.save(bio, format="PNG")
      del img
      return bio.getvalue()

imgdata = convert_to_bytes("PySimpleGUI_logo.png")
layout = [[sg.Image(key='-IMAGE-', data=imgdata)]]
window = sg.Window('PIL based Image Viewer', layout,resizable=True)
while True:
   event, values = window.read()
   if event == sg.WIN_CLOSED:
      break
window.close()
它将生成以下 output 窗口 −
It will produce the following output window −

PySimpleGUI - Debugger
除了大多数 IDE(例如 PyCharm 或 VS Code)内置的调试器以外,PySimpleGUI 还提供自有的调试器。在代码运行时,此调试器可让你“查看”代码并与之交互。
In addition to the built-in debugger that most IDEs such as PyCharm or VS Code have, PySimpleGUI offers its own debugger. This debugger provides you the ability to "see" and interact with your code, while it is running.
若要有效使用调试器服务,应异步重新着色窗口,即应向 read() 函数提供超时。
To use the debugger service effectively, the window should be red asynchronously, i.e., you should provide a timeout to the read() function.
通过按如下所示在程序内的任意位置调用 show_debugger_window() 函数来调用调试器窗口 -
The debugger window is invoked by calling show_debugger_window() function anywhere inside the program as shown below −
import PySimpleGUI as sg
sg.show_debugger_window(location=(10,10))
window = sg.Window('Debugger Demo',
   [[sg.Text('Debugger'),
   sg.Input('Input here'),
   sg.Button('Push Me')]]
)
while True:
   event, values = window.read(timeout=500)
   if event == sg.TIMEOUT_KEY:
      continue
   if event == sg.WIN_CLOSED:
      break
   print(event, values)
window.close()
此外,PySimpleGUI 调试器窗口会出现在指定的屏幕位置。
The PySimpleGUI debugger window appears at the specified screen location.

此窗口将显示两个选项卡:变量和 REPL。单击变量选项卡。将显示要自动监视的变量列表,在此处选中那些你希望在程序执行期间查看的变量。
The window shows two tabs Variables and REPL. Click on the Variables tab. A list of variables to auto-watch is shown Check the ones that you want to watch during the execution of the program.

有关 REPL 的帮助选项卡提供了一个 Python 交互式控制台,可在程序环境中执行,以便你可以检查代码中所需变量的值。
The second tab about REPL gives a Python interactive console to be executed around your program’s environment so that you can inspect the values of desired variables in the code.

PySimpleGUI - Settings
Global Settings
全局设置是可在整个应用程序范围内使用的应用程序设置。这些设置控制 Element 类用于应用于应用程序中所有元素的各种属性。
Global settings are the application settings available application wide. These settings control the various properties of the Element class to be applied to all the Elements in the application.
这些设置以分级方式起作用。如果这些设置针对窗口提供了其他值,则全局设置将被覆盖。反过来,Window 对象中定义的设置针对特定元素提供了不同的值。
These settings work in hierarchical manner. The global settings are overridden if those settings are given different value for a window. In turn the settings defined in Window object are given different value for a specific element.
例如,如果在全局范围内将字号设置为 16,则所有元素的文本都将相应显示。但是,如果布局中定义了具有 16 以外大小的字体属性的特定文本或输入元素,则它将相应更改外观。
For example, if the font size is set to 16 globally, the text of all elements is displayed accordingly. However, if a specific Text or Input element with Font property with size other than 16 is defined in the layout, it will change the appearance accordingly.
set_options 函数用于更改在全局范围内应用的设置。如果这是应用于 Windows 的设置,则该设置不仅适用于你创建的 Windows,还适用于弹出式 Windows。
The function set_options is used to change settings that will apply globally. If it’s a setting that applies to Windows, then that setting will apply not only to Windows that you create, but also to popup Windows.
import PySimpleGUI as sg
sg.set_options(font=('Arial Bold', 16))
User Settings
“用户设置”是一个自动写入到硬盘的字典。用户设置存储在 Python 字典中,并保存到磁盘并从磁盘中加载。因此,各个设置是放入字典中的键。
"User settings" is a dictionary that is automatically written to your hard drive. User settings are stored in a Python dictionary which is saved to and loaded from the disk. Individual settings are thus keys into a dictionary.
用户设置函数列表 -
List of user setting functions −
Sr.No. |
Function & Description |
1 |
*user_settings*Returns settings as a dictionary |
2 |
*user_settings_delete_entry*Deletes a setting |
3 |
*user_settings_delete_filename*Deletes the settings file |
4 |
*user_settings_file_exists*Returns True if settings file specified exists |
5 |
*user_settings_filename*Returns full path and filename of settings file |
6 |
*user_settings_get_entry*Returns value for a setting. If no setting found, then specified default value is returned |
7 |
*user_settings_load*Loads dictionary from the settings file. |
8 |
*user_settings_save *Saves settings to current or newly specified file. |
9 |
*user_settings_set_entry*Sets an entry to a particular value |
10 |
*user_settings_write_new_dictionary*Writes a specified dictionary to settings file |
创建用户设置对象。
Create the User Settings object.
settings = sg.UserSettings()使用词典样式的 [ ] 语法来读取一项设置。如果该项名称为 '- item-',那么,通过写入来读取值
Use the dictionary-style [ ] syntax to read a setting. If the item’s name is '- item-', then reading the value is achieved by writing
item_value = settings['-item-']以下陈述用于写入设置。
Following sttement is used to Write the setting.
settings['-item-'] = new_value要删除一项,请再次使用词典样式语法。
To delete an item, again the dictionary style syntax is used.
del settings['-item-']您还可以调用 delete_entry 方法来删除该项。
You can also call the delete_entry method to delete the entry.
settings.delete_entry('-item-')以下简单程序演示了用户设置的加载/保存
The following simple program demonstrates load/saving of user settings
import PySimpleGUI as sg
import json
sg.set_options(font=('Arial Bold', 16))
layout = [
   [sg.Text('Settings', justification='left')],
   [sg.Text('User name', size=(10, 1), expand_x=True),
   sg.Input(key='-USER-')],
   [sg.Text('email ID', size=(10, 1), expand_x=True),
   sg.Input(key='-ID-')],
   [sg.Text('Role', size=(10, 1), expand_x=True),
   sg.Input(key='-ROLE-')],
   [sg.Button("LOAD"), sg.Button('SAVE'), sg.Button('Exit')]
]
window = sg.Window('User Settings Demo', layout, size=(715, 200))
# Event Loop
while True:
   event, values = window.read()
   if event in (sg.WIN_CLOSED, 'Exit'):
      break
   if event == 'LOAD':
      f = open("settings.txt", 'r')
      settings = json.load(f)
      window['-USER-'].update(value=settings['-USER-'])
      window['-ID-'].update(value=settings['-ID-'])
      window['-ROLE-'].update(value=settings['-ROLE-'])
   if event == 'SAVE':
      settings = {'-USER-': values['-USER-'],
      '-ID-': values['-ID-'],
      '-ROLE-': values['-ROLE-']}
      f = open("settings.txt", 'w')
      json.dump(settings, f)
      f.close()
window.close()
在输入框中输入数据并单击“保存”按钮。
Enter the data in the input boxes and click the "Save" button.

系统将保存一个 JSON 文件。要加载之前保存的设置,请单击“加载”按钮。
A JSON file will be saved. To load the previously saved settings, click the "Load" button.