Arduino 简明教程
Arduino - Humidity Sensor
在本节,我们将学习如何将 Arduino 电路板与不同的传感器连接。我们将讨论以下传感器 −
In this section, we will learn how to interface our Arduino board with different sensors. We will discuss the following sensors −
-
Humidity sensor (DHT22)
-
Temperature sensor (LM35)
-
Water detector sensor (Simple Water Trigger)
-
PIR SENSOR
-
ULTRASONIC SENSOR
-
GPS
Humidity Sensor (DHT22)
DHT-22(也称为 AM2302)是一种数字输出、相对湿度和温度传感器。它使用电容式湿度传感器和热敏电阻来测量周围空气,并在数据引脚上发送数字信号。
The DHT-22 (also named as AM2302) is a digital-output, relative humidity, and temperature sensor. It uses a capacitive humidity sensor and a thermistor to measure the surrounding air, and sends a digital signal on the data pin.
在这个例子里,你将学习如何将该传感器与 Arduino UNO 一起使用。房间温度和湿度将打印到串行监视器中。
In this example, you will learn how to use this sensor with Arduino UNO. The room temperature and humidity will be printed to the serial monitor.
The DHT-22 Sensor
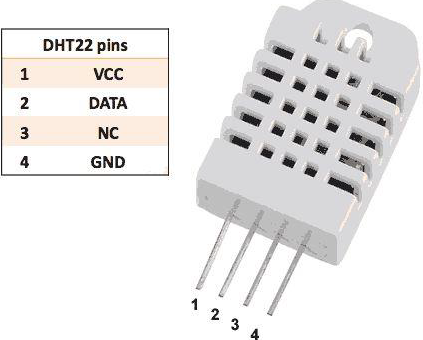
连接很简单。最左边的第一个引脚为 3-5V 电源,第二个引脚为数据输入引脚,最右边的引脚为地线。
The connections are simple. The first pin on the left to 3-5V power, the second pin to the data input pin and the right-most pin to the ground.
Technical Details
-
Power − 3-5V
-
Max Current − 2.5mA
-
Humidity − 0-100%, 2-5% accuracy
-
Temperature − 40 to 80°C, ±0.5°C accuracy
Components Required
您将需要以下组件:
You will need the following components −
-
1 × Breadboard
-
1 × Arduino Uno R3
-
1 × DHT22
-
1 × 10K ohm resistor
Procedure
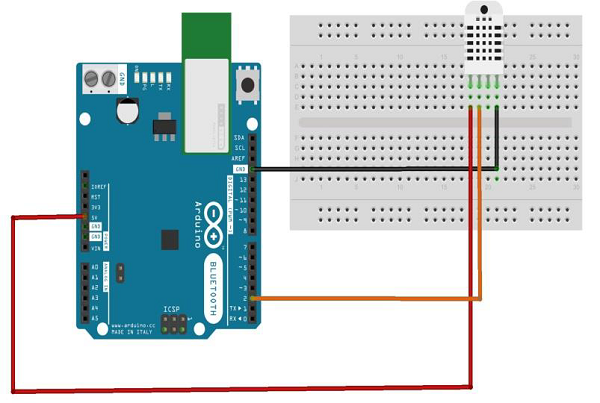
按照电路图,按照以下图片所示将组件连接到面包板上。
Follow the circuit diagram and hook up the components on the breadboard as shown in the image below.

Sketch
在计算机上打开 Arduino IDE 软件。使用 Arduino 语言进行编码将控制您的电路。单击“新建”以新建一个草图文件。
Open the Arduino IDE software on your computer. Coding in the Arduino language will control your circuit. Open a new sketch File by clicking New.

Arduino Code
// Example testing sketch for various DHT humidity/temperature sensors

#include "DHT.h"
#define DHTPIN 2 // what digital pin we're connected to
// Uncomment whatever type you're using!
//#define DHTTYPE DHT11 // DHT 11
#define DHTTYPE DHT22 // DHT 22 (AM2302), AM2321
//#define DHTTYPE DHT21 // DHT 21 (AM2301)
// Connect pin 1 (on the left) of the sensor to +5V
// NOTE: If using a board with 3.3V logic like an Arduino Due connect pin 1
// to 3.3V instead of 5V!
// Connect pin 2 of the sensor to whatever your DHTPIN is
// Connect pin 4 (on the right) of the sensor to GROUND
// Connect a 10K resistor from pin 2 (data) to pin 1 (power) of the sensor
// Initialize DHT sensor.
// Note that older versions of this library took an optional third parameter to
// tweak the timings for faster processors. This parameter is no longer needed
// as the current DHT reading algorithm adjusts itself to work on faster procs.
DHT dht(DHTPIN, DHTTYPE);

void setup() {
   Serial.begin(9600);
   Serial.println("DHTxx test!");
   dht.begin();
}

void loop() {
   delay(2000); // Wait a few seconds between measurements
   float h = dht.readHumidity();
   // Reading temperature or humidity takes about 250 milliseconds!
   float t = dht.readTemperature();
   // Read temperature as Celsius (the default)
   float f = dht.readTemperature(true);
   // Read temperature as Fahrenheit (isFahrenheit = true)
   // Check if any reads failed and exit early (to try again).
   if (isnan(h) || isnan(t) || isnan(f)) {
      Serial.println("Failed to read from DHT sensor!");
      return;
   }

   // Compute heat index in Fahrenheit (the default)
   float hif = dht.computeHeatIndex(f, h);
   // Compute heat index in Celsius (isFahreheit = false)
   float hic = dht.computeHeatIndex(t, h, false);
   Serial.print ("Humidity: ");
   Serial.print (h);
   Serial.print (" %\t");
   Serial.print ("Temperature: ");
   Serial.print (t);
   Serial.print (" *C ");
   Serial.print (f);
   Serial.print (" *F\t");
   Serial.print ("Heat index: ");
   Serial.print (hic);
   Serial.print (" *C ");
   Serial.print (hif);
   Serial.println (" *F");
}
Code to Note
DHT22 传感器有四个端子(Vcc、DATA、NC、GND),其连接到电路板的方式如下 −
DHT22 sensor has four terminals (Vcc, DATA, NC, GND), which are connected to the board as follows −
-
DATA pin to Arduino pin number 2
-
Vcc pin to 5 volt of Arduino board
-
GND pin to the ground of Arduino board
-
We need to connect 10k ohm resistor (pull up resistor) between the DATA and the Vcc pin
硬件连接完成后,你需要将 DHT22 库添加到你的 Arduino 库文件中,如前所述。
Once hardware connections are done, you need to add DHT22 library to your Arduino library file as described earlier.