Arduino 简明教程
Arduino - Keyboard Message
在此示例中,当按下按钮时,一个文本字符串将作为键盘输入被发送到计算机。该字符串报告按钮被按下的次数。一旦对 Leonardo 进行了编程并将其连接好,打开您最喜欢的文本编辑器查看结果。
In this example, when the button is pressed, a text string is sent to the computer as keyboard input. The string reports the number of times the button is pressed. Once you have the Leonardo programmed and wired up, open your favorite text editor to see the results.
Warning − 在您使用 Keyboard.print() 命令时,Arduino 接管了您的电脑键盘。为了确保在使用此功能运行草图时不丢失对您电脑的控制,在调用 Keyboard.print() 之前设置一个可靠的控制系统。此草图包含一个按钮,用于切换键盘,因此只有在按下按钮后才运行此草图。
Warning − When you use the Keyboard.print() command, the Arduino takes over your computer’s keyboard. To ensure you do not lose control of your computer while running a sketch with this function, set up a reliable control system before you call Keyboard.print(). This sketch includes a pushbutton to toggle the keyboard, so that it only runs after the button is pressed.
Components Required
您将需要以下组件:
You will need the following components −
-
1 × Breadboard
-
1 × Arduino Leonardo, Micro, or Due board
-
1 × momentary pushbutton
-
1 × 10k ohm resistor
Procedure
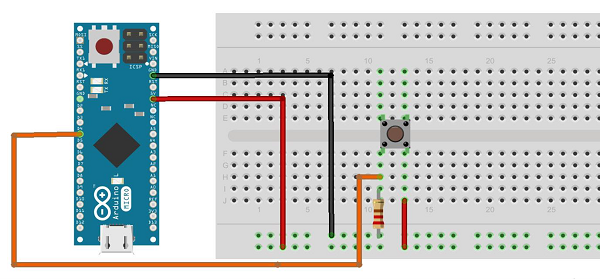
按照电路图并将组件连接到面包板上,如下图所示。
Follow the circuit diagram and hook up the components on the breadboard as shown in the image given below.

Sketch
在计算机上打开 Arduino IDE 软件。使用 Arduino 语言进行编码将控制您的电路。单击“新建”以新建一个草图文件。
Open the Arduino IDE software on your computer. Coding in the Arduino language will control your circuit. Open a new sketch File by clicking New.

Arduino Code
/*
   Keyboard Message test For the Arduino Leonardo and Micro,
      Sends a text string when a button is pressed.
   The circuit:
   * pushbutton attached from pin 4 to +5V
   * 10-kilohm resistor attached from pin 4 to ground
*/

#include "Keyboard.h"
const int buttonPin = 4; // input pin for pushbutton
int previousButtonState = HIGH; // for checking the state of a pushButton
int counter = 0; // button push counter

void setup() {
   pinMode(buttonPin, INPUT); // make the pushButton pin an input:
   Keyboard.begin(); // initialize control over the keyboard:
}

void loop() {
   int buttonState = digitalRead(buttonPin); // read the pushbutton:
   if ((buttonState != previousButtonState)&& (buttonState == HIGH)) // and it's currently pressed: {
      // increment the button counter
      counter++;
      // type out a message
      Keyboard.print("You pressed the button ");
      Keyboard.print(counter);
      Keyboard.println(" times.");
   }
   // save the current button state for comparison next time:
   previousButtonState = buttonState;
}
Code to Note
将按钮的一个端子连接到 Arduino 上的针脚 4。将另一个端子连接到 5V。通过将电阻连接成从针脚 4 到接地的下拉电阻,提供一个接地参考。
Attach one terminal of the pushbutton to pin 4 on Arduino. Attach the other pin to 5V. Use the resistor as a pull-down, providing a reference to the ground, by attaching it from pin 4 to the ground.
一旦对电路板进行编程,请拔下 USB 电缆,打开一个文本编辑器,并将文本光标放置在输入区域。通过 USB 再次将电路板连接到您的计算机,然后按下按钮在文档中写入。
Once you have programmed your board, unplug the USB cable, open a text editor and put the text cursor in the typing area. Connect the board to your computer through USB again and press the button to write in the document.