Configuring Well-Known OpenID Connect Providers
本文档解释了如何配置知名社交 OIDC 和 OAuth2 提供程序。
This document explains how to configure well-known social OIDC and OAuth2 providers.
Introduction
如果您使用 OpenID Connect Authorization Code Flow 保护 Quarkus 端点,那么您需要配置 Quarkus 来告诉它如何连接到 OpenID Connect 提供者,如何对这些提供者进行身份验证,要使用的作用域,等等。
If you use OpenID Connect Authorization Code Flow to protect Quarkus endpoints, then you need to configure Quarkus to tell it how to connect to OpenID Connect providers, how to authenticate to such providers, which scopes to use, and so on.
有时,您需要使用配置来解决某些提供者尚未完全实现 OpenID Connect 或它们实际上是 OAuth2 providers only 的问题。
Sometimes you need to use the configuration to work around the fact that some providers do not implement OpenID Connect completely or when they are in fact OAuth2 providers only.
此类提供程序的配置可能变得复杂、技术性很强以及难以理解。
The configuration of such providers can become complex, very technical and difficult to understand.
quarkus.oidc.provider 配置属性已被引入以引用众所周知的 OpenID Connect 和 OAuth2 提供者。该属性可用于引用诸如 github 的提供者,只需最少数量的自定义,通常,帐户特定的 client id、client secret 并且必须设置一些属性来完成配置。
quarkus.oidc.provider configuration property has been introduced to refer to well-known OpenID Connect and OAuth2 providers. This property can be used to refer to a provider such as github with only a minimum number of customizations required, typically, an account specific client id, client secret and some properties have to be set to complete the configuration.
该属性可用于 application.properties 中,如果必须配置多个提供者则使用 multi-tenant 设置(例如,请参见 ` Quarkus Renarde security documentation),如果租户配置是动态创建的,则在自定义 `TenantConfigResolvers 中使用。
This property can be used in application.properties, in multi-tenant set-ups if more than one provider has to be configured (for example, see Quarkus Renarde security documentation), in custom TenantConfigResolvers if the tenant configurations are created dynamically.
Well Known Providers
Apple
为了为 Apple 设置 OIDC,您需要创建一个开发者帐户并注册 99€/年的计划,但是您无法像大多数其他 OIDC 提供者那样在 localhost 上测试您的应用程序:您需要通过 HTTPS 运行它并使其公开可访问,因此,出于开发目的,您可能希望使用像 [role="bare"]https://ngrok.com 这样的服务。
In order to set up OIDC for Apple you need to create a developer account, and sign up for the 99€/year program, but you cannot test your application on localhost like most other OIDC providers:
you will need to run it over HTTPS and make it publicly accessible, so for development purposes
you may want to use a service such as [role="bare"]https://ngrok.com.
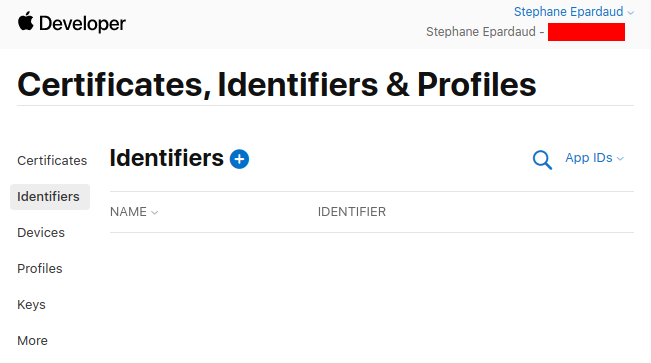
转至 ` Create a new identifier` 并按 +
Go to Create a new identifier and press +
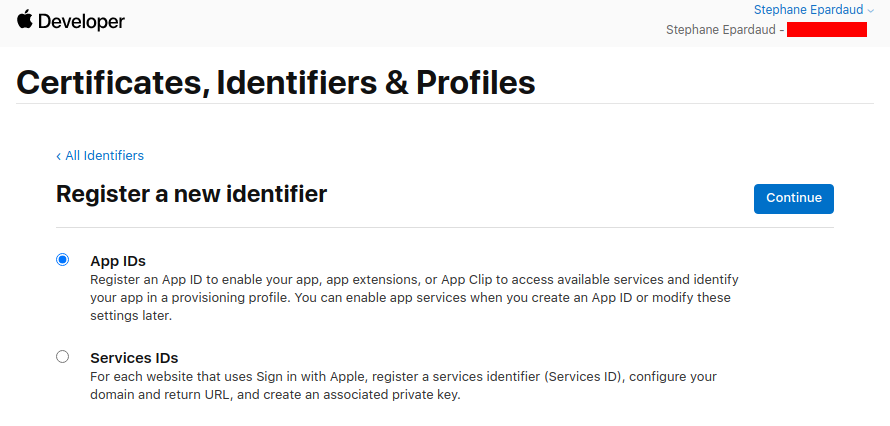
不要碰任何东西,保持 App IDs 选中,然后按 Continue:
Don’t touch anything, keep App IDs selected, and press Continue:
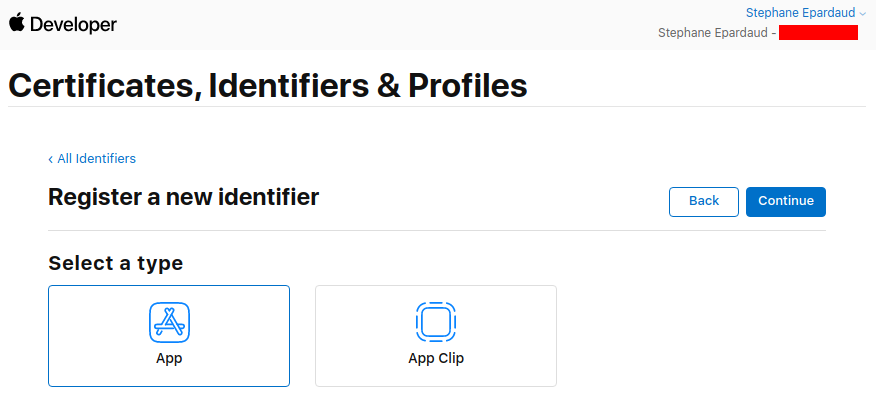
不要碰任何东西,保持 App 选中,然后按 Continue:
Don’t touch anything, keep App selected, and press Continue:
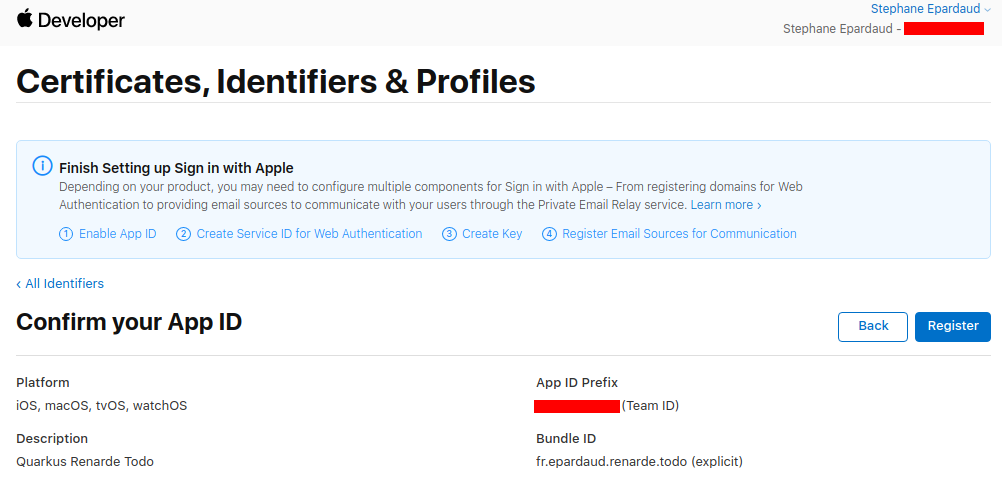
输入描述和包 ID(使用您的应用程序包名称):
Enter a description and a Bundle ID (use your application package name):
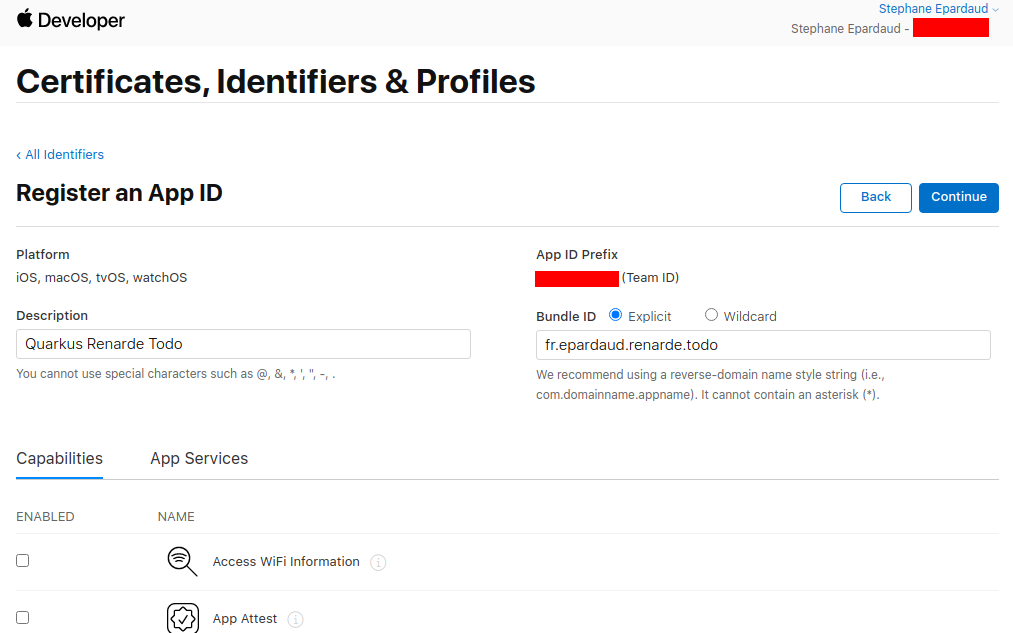
然后向下滚动以查找 Sign in with Apple 功能,选择它,然后按 Continue:
Then scroll down to find the Sign in with Apple Capability, select it, and press Continue:
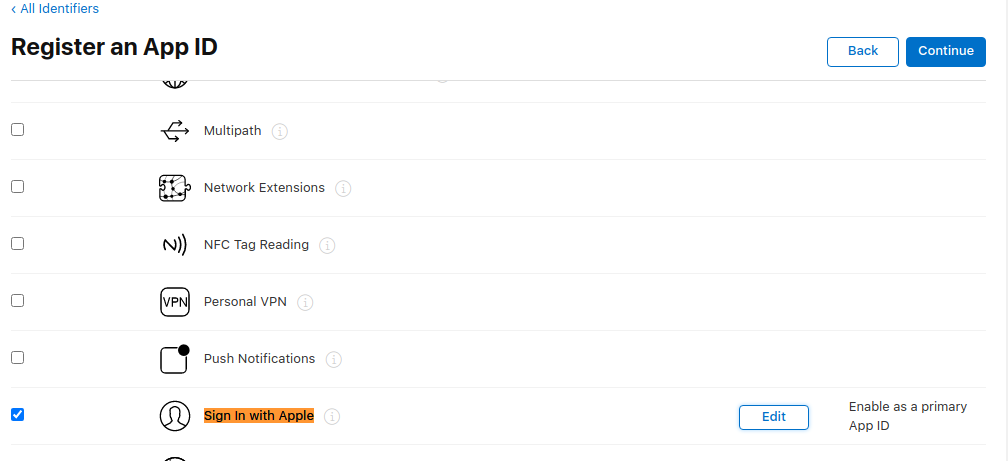
记下您的应用程序 ID 前缀,然后按 Register:
Write down your App ID Prefix, then press Register:
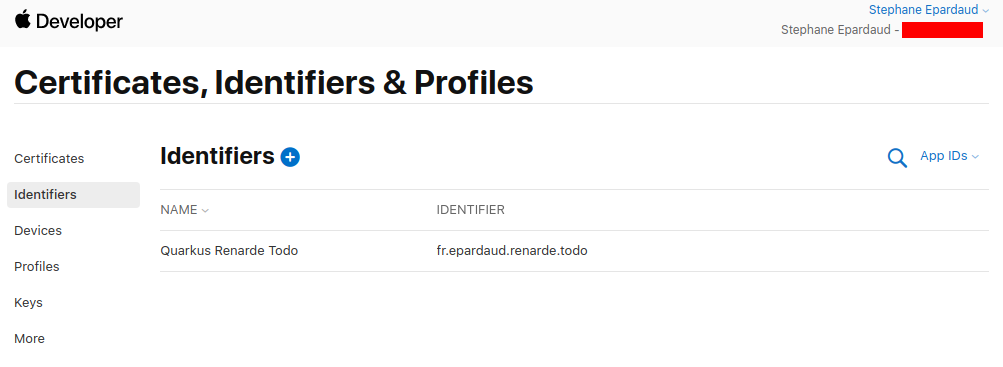
回到 Identifiers 页面,按 +:
Back on the Identifiers page, press +:
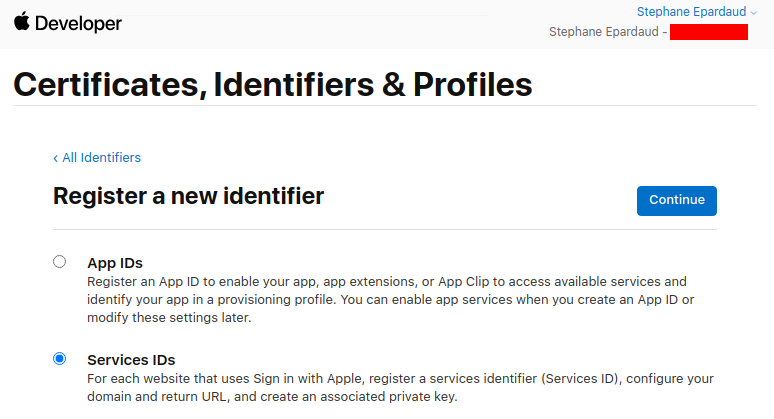
选择 Service IDs 并按 Continue:
Select Service IDs and press Continue:
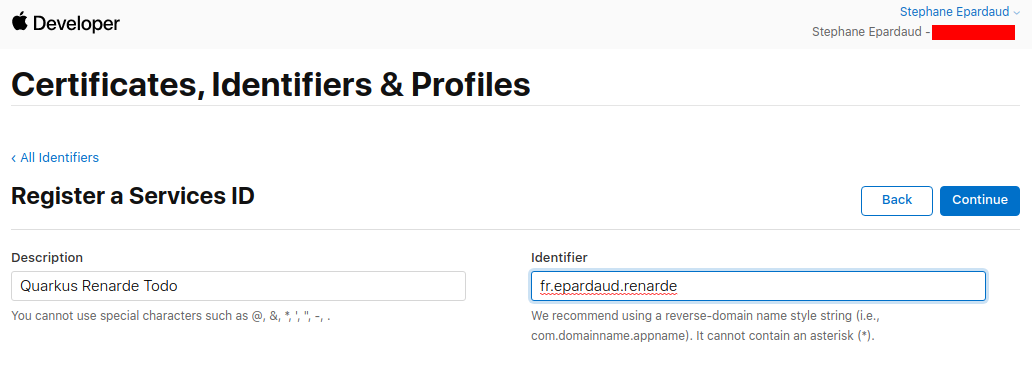
输入描述和包 ID(使用您的应用程序包名称),然后按 Continue:
Enter a description and Bundle ID (use your application package name), then press Continue:
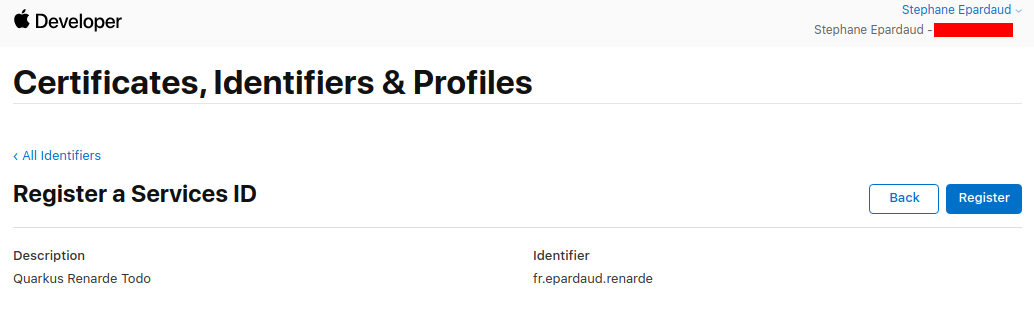
现在按 Register:
Now press Register:
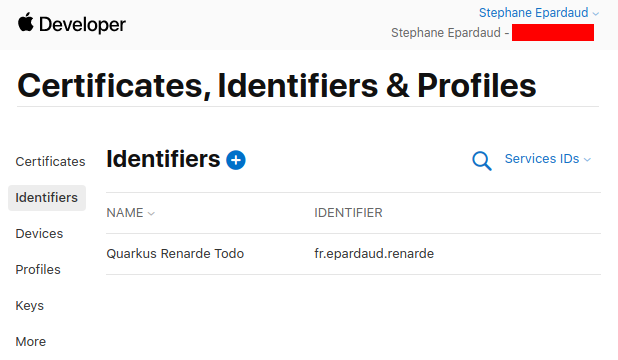
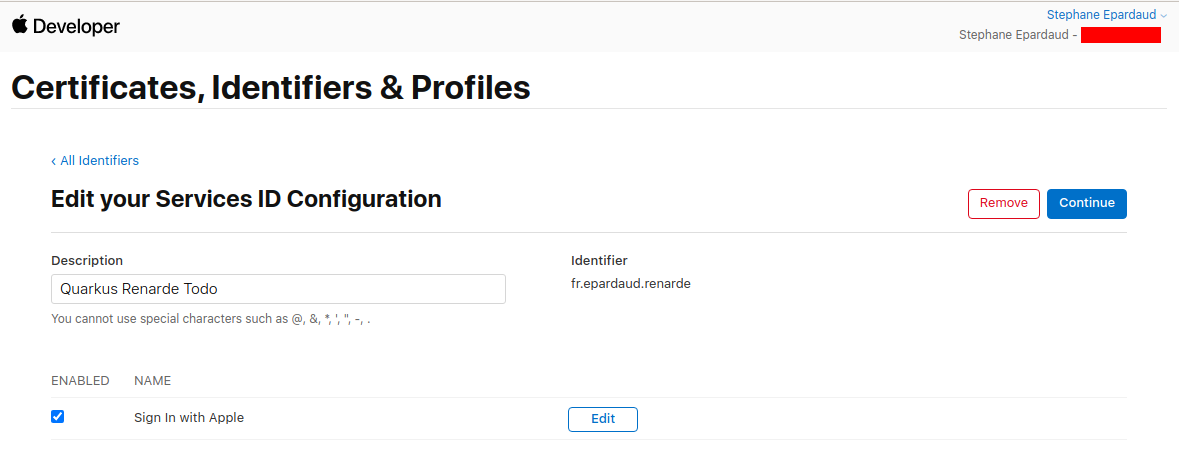
回到服务列表,单击您新创建的服务:
Back on the service list, click on your newly created service:
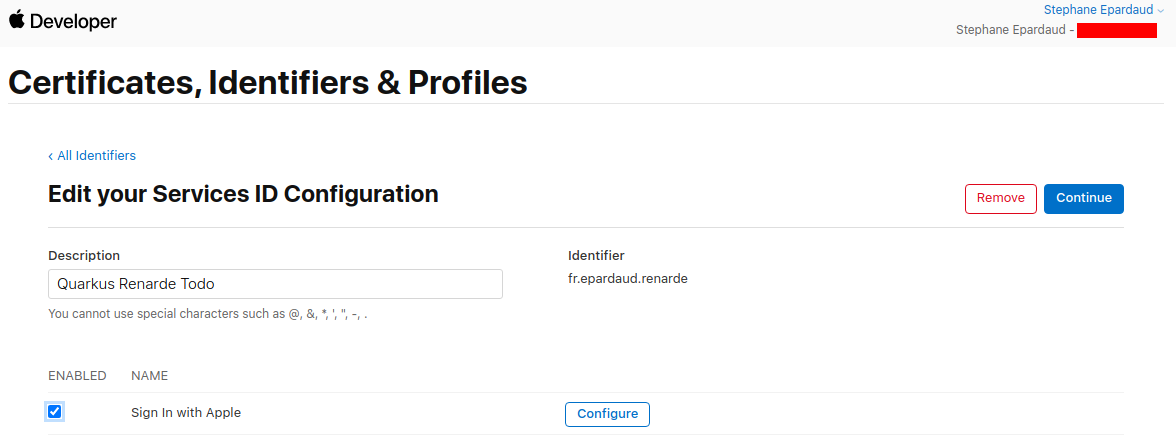
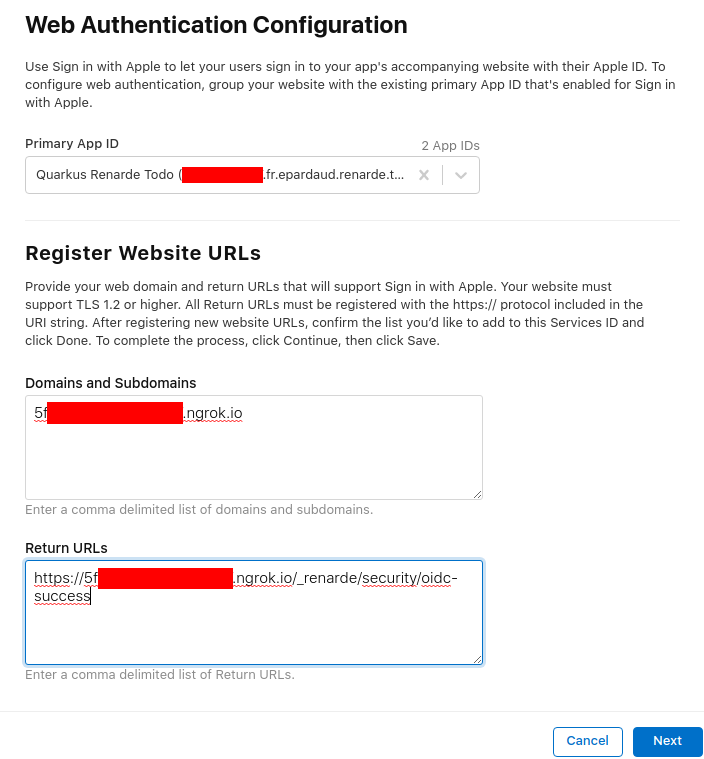
启用 Sign in with Apple 并按 Configure:
Enable Sign in with Apple and press Configure:
添加您的域名和返回 URL(设置为 <host>/_renarde/security/oidc-success)并按 Next:
Add your domain and return URL (set to <host>/_renarde/security/oidc-success) and press Next:
现在按下 Done
Now press Done:

现在按下 Continue
Now press Continue:
现在按下 Save
And now press Save:

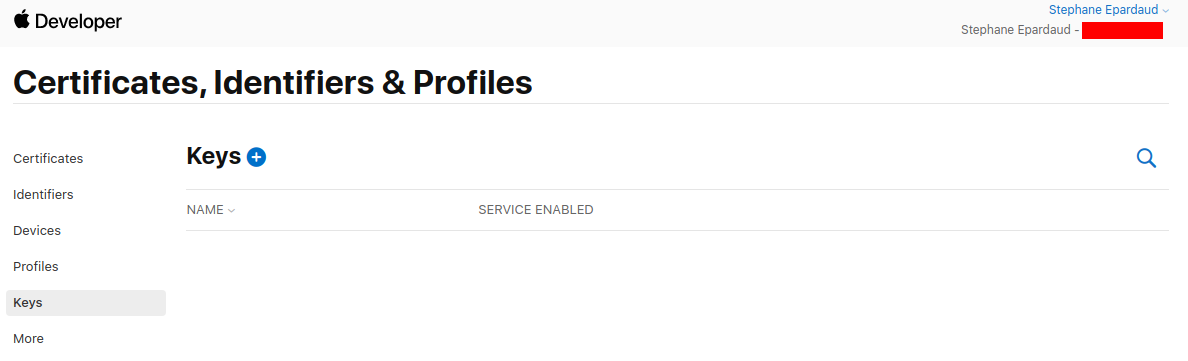
前往左侧菜单中的 Keys 页面,然后按下 +
Go to the Keys page on the left menu, and press +:
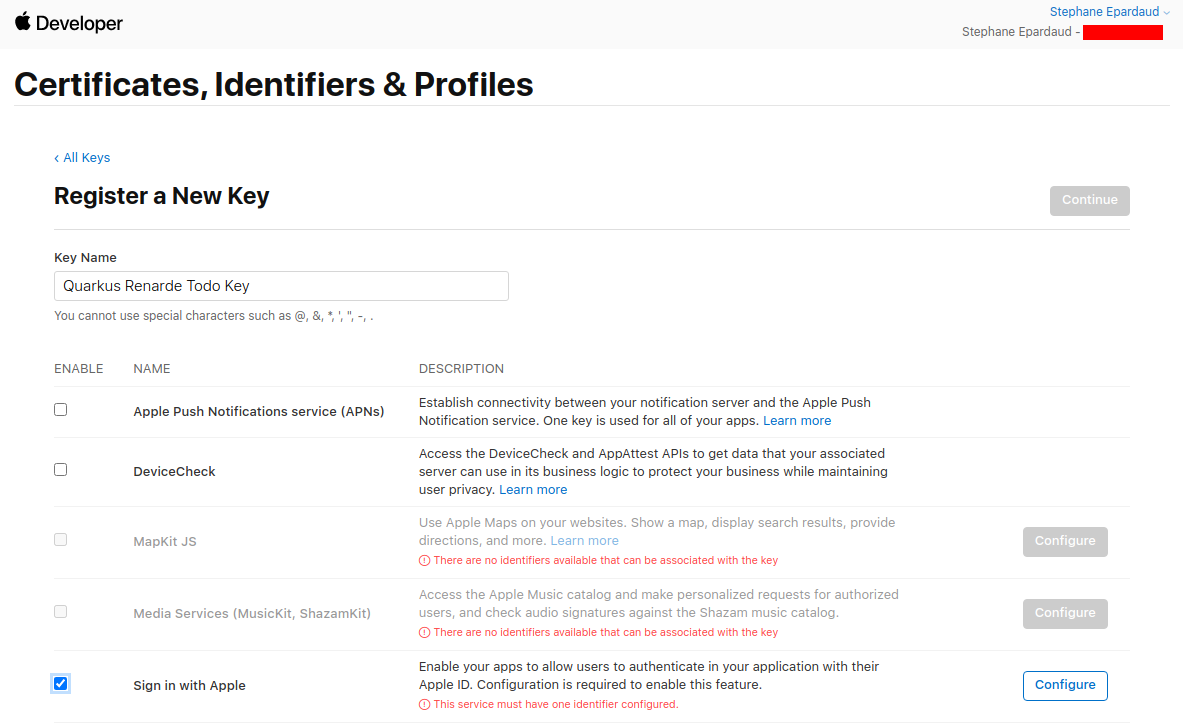
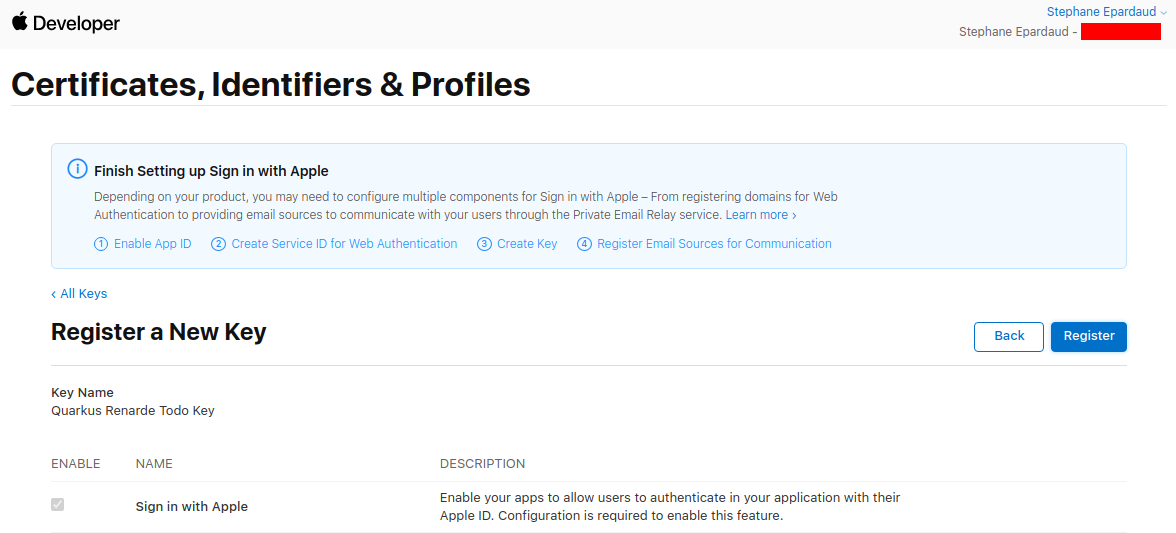
填写一个键名称,启用 Sign in with Apple,然后按下 Configure
Fill in a key name, enable Sign in with Apple, and press Configure:
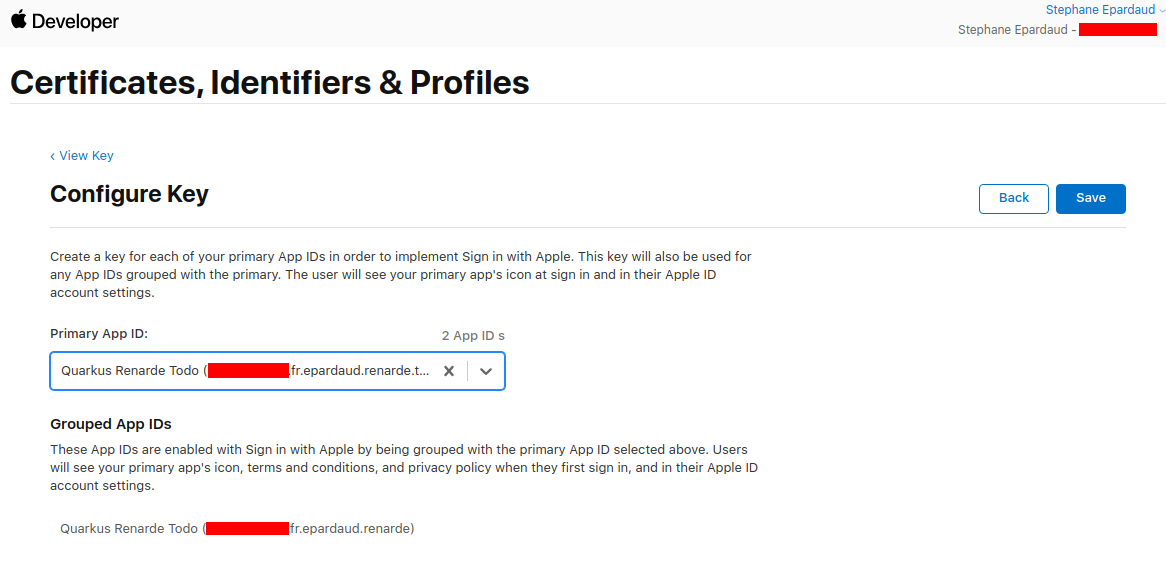
选择你的主要应用 ID,然后按下 Save
Select your Primary App ID and press Save:
返回到该键页面,按下 Continue
Back on the key page, press Continue:

现在按 Register:
Now press Register:
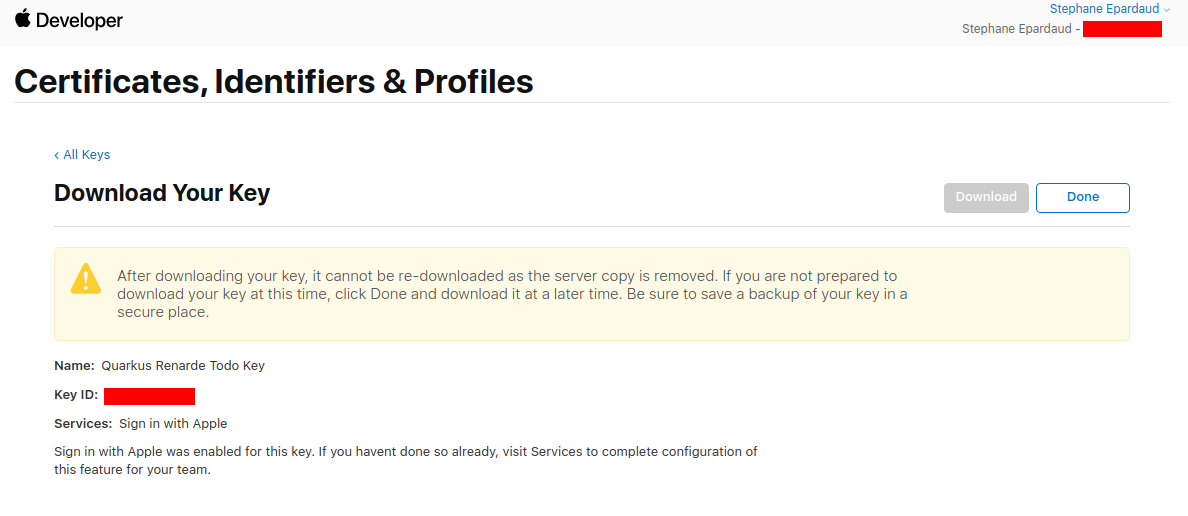
写下你的 Key ID,下载你的键,然后将其保存在 src/main/resources/AuthKey_<KEYID>.p8 中的 Quarkus 应用程序中
Write down your Key ID, download your key and save it to your Quarkus application in src/main/resources/AuthKey_<KEYID>.p8:
你现在可以配置你的 application.properties
You can now configure your application.properties:
quarkus.oidc.provider=apple
quarkus.oidc.client-id=<Bundle ID>
quarkus.oidc.credentials.jwt.key-file=AuthKey_<Key ID>.p8
quarkus.oidc.credentials.jwt.token-key-id=<Key ID>
quarkus.oidc.credentials.jwt.issuer=<App ID Prefix>
quarkus.oidc.credentials.jwt.subject=<Bundle ID}
quarkus.oidc.provider=apple 将请求 Apple 将 openid、email 和 name 范围添加到颁发的访问令牌。关于覆盖这些范围或请求更多范围的信息,请参阅 Provider scopes 部分。
quarkus.oidc.provider=apple will request Apple to add openid, email and name scopes to issued access tokens. For information about overriding these scopes or requesting more scopes, see the Provider scopes section.
Discord
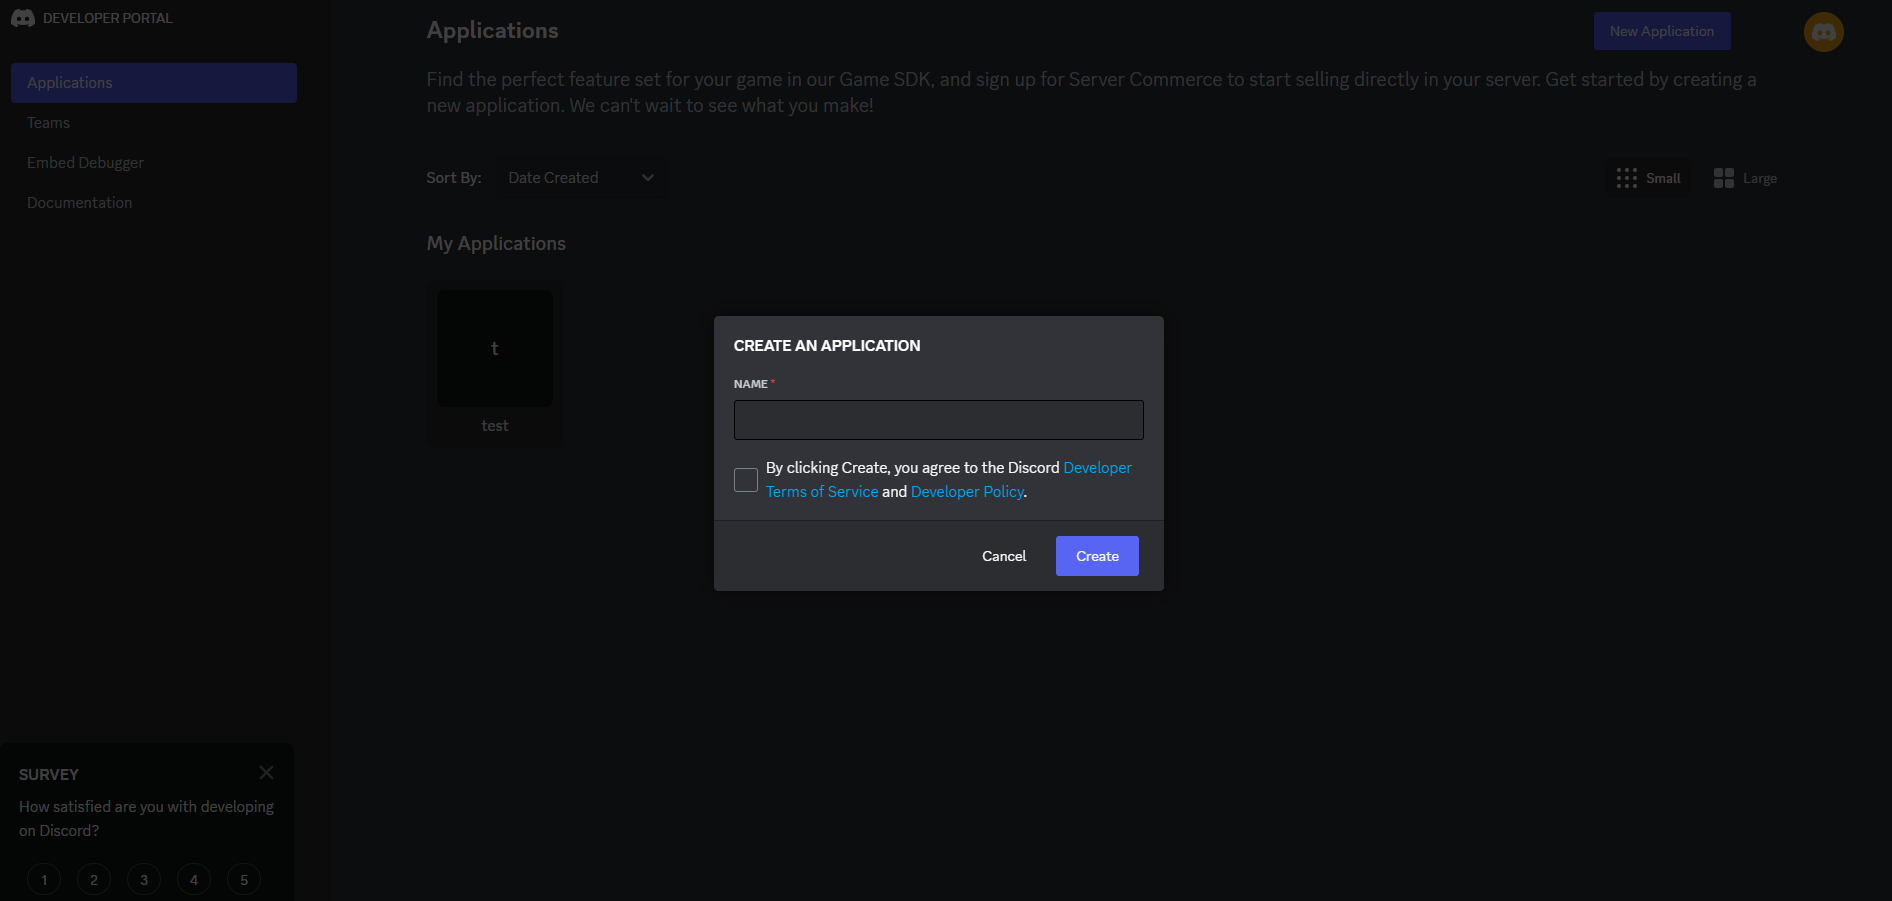
创建一个 Discord application
Create a Discord application:
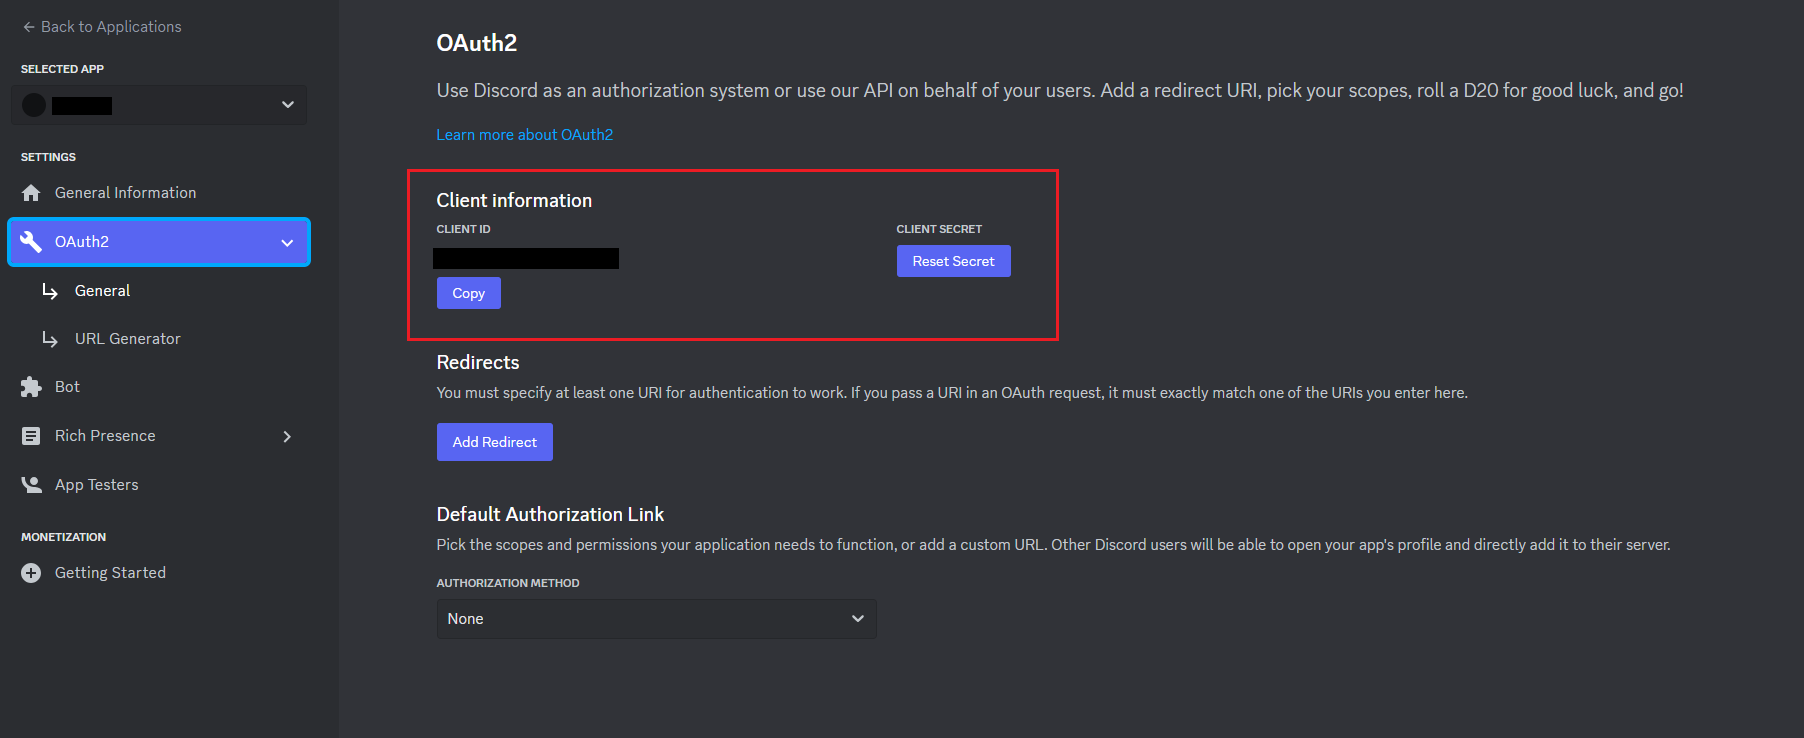
你现在可以获取你的客户端 ID 和 secret
You now can get your client id and secret:
你现在可以配置你的 application.properties
You can now configure your application.properties:
quarkus.oidc.provider=discord
quarkus.oidc.client-id=<Client ID>
quarkus.oidc.credentials.client-secret=<Client Secret>
Facebook 与大多数其他 OIDC 提供商不同,它不允许你对应用程序在 localhost 上进行测试:你需要通过 HTTPS 来运行它,并使其面向公众开放访问,因此出于开发目的,你可能希望使用如下服务 [role="bare"][role="bare"]https://ngrok.com
Facebook you will not be let you test your application on localhost like most other OIDC providers:
you will need to run it over HTTPS and make it publicly accessible, so for development purposes
you may want to use a service such as [role="bare"]https://ngrok.com.
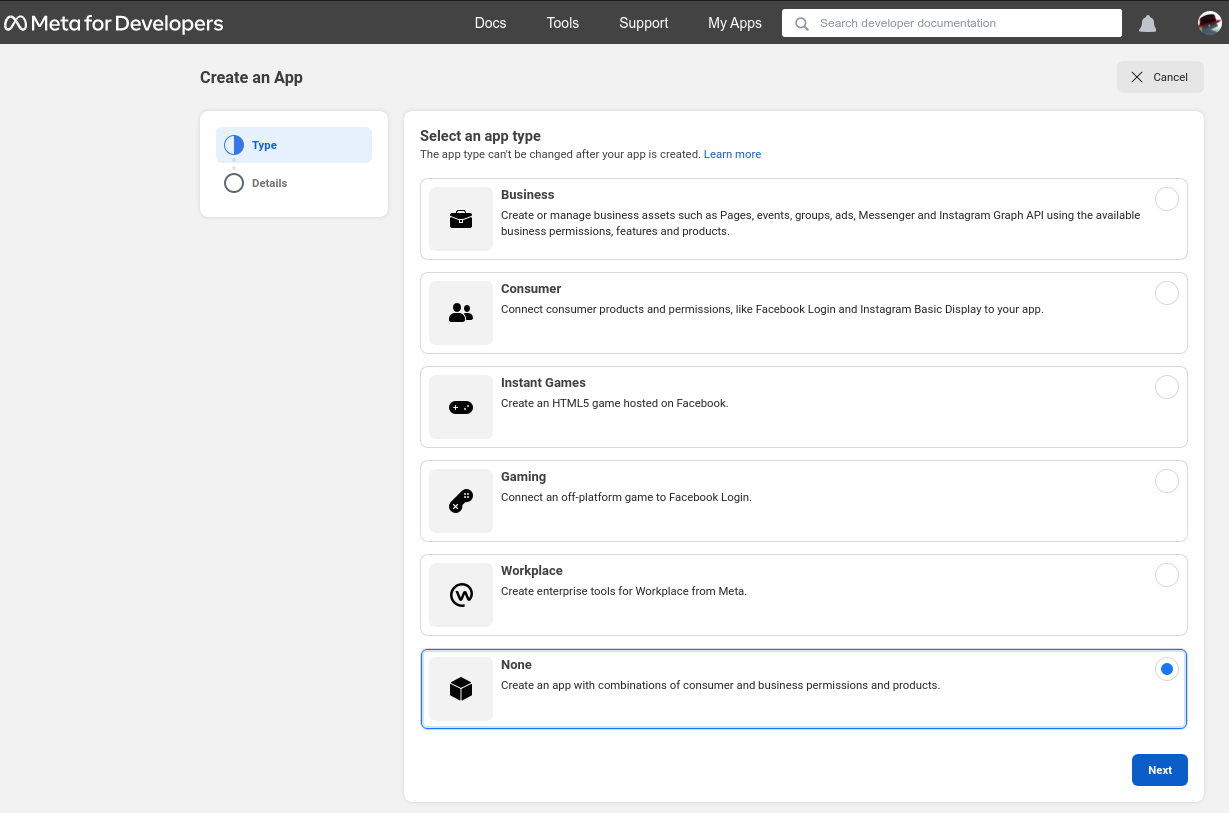
为了开始设置 Facebook 的 OIDC,首先 Creating an application,选择 None 作为一种应用程序类型,然后按下 Next
In order to set up OIDC for Facebook start by Creating an application, select None as an app type, and press Next:
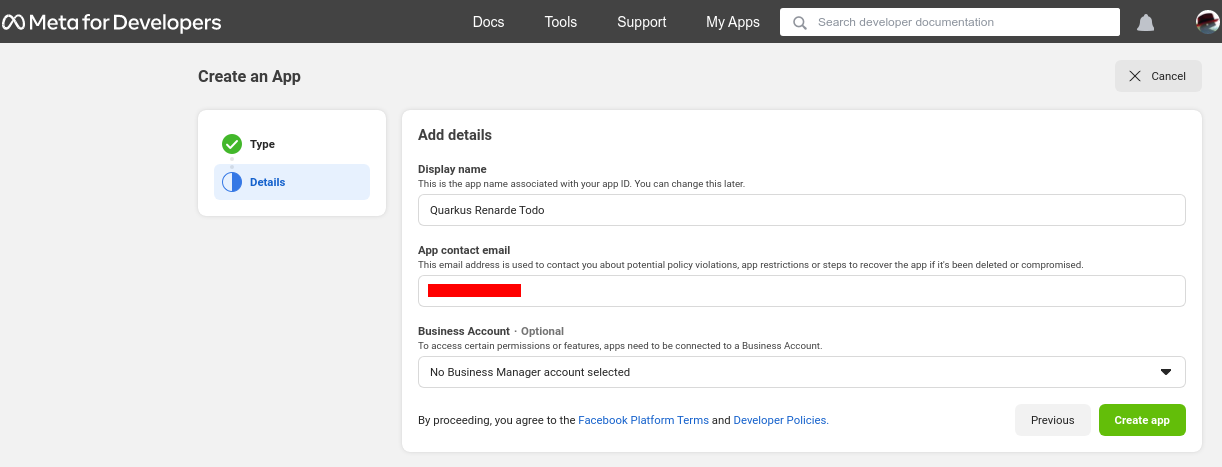
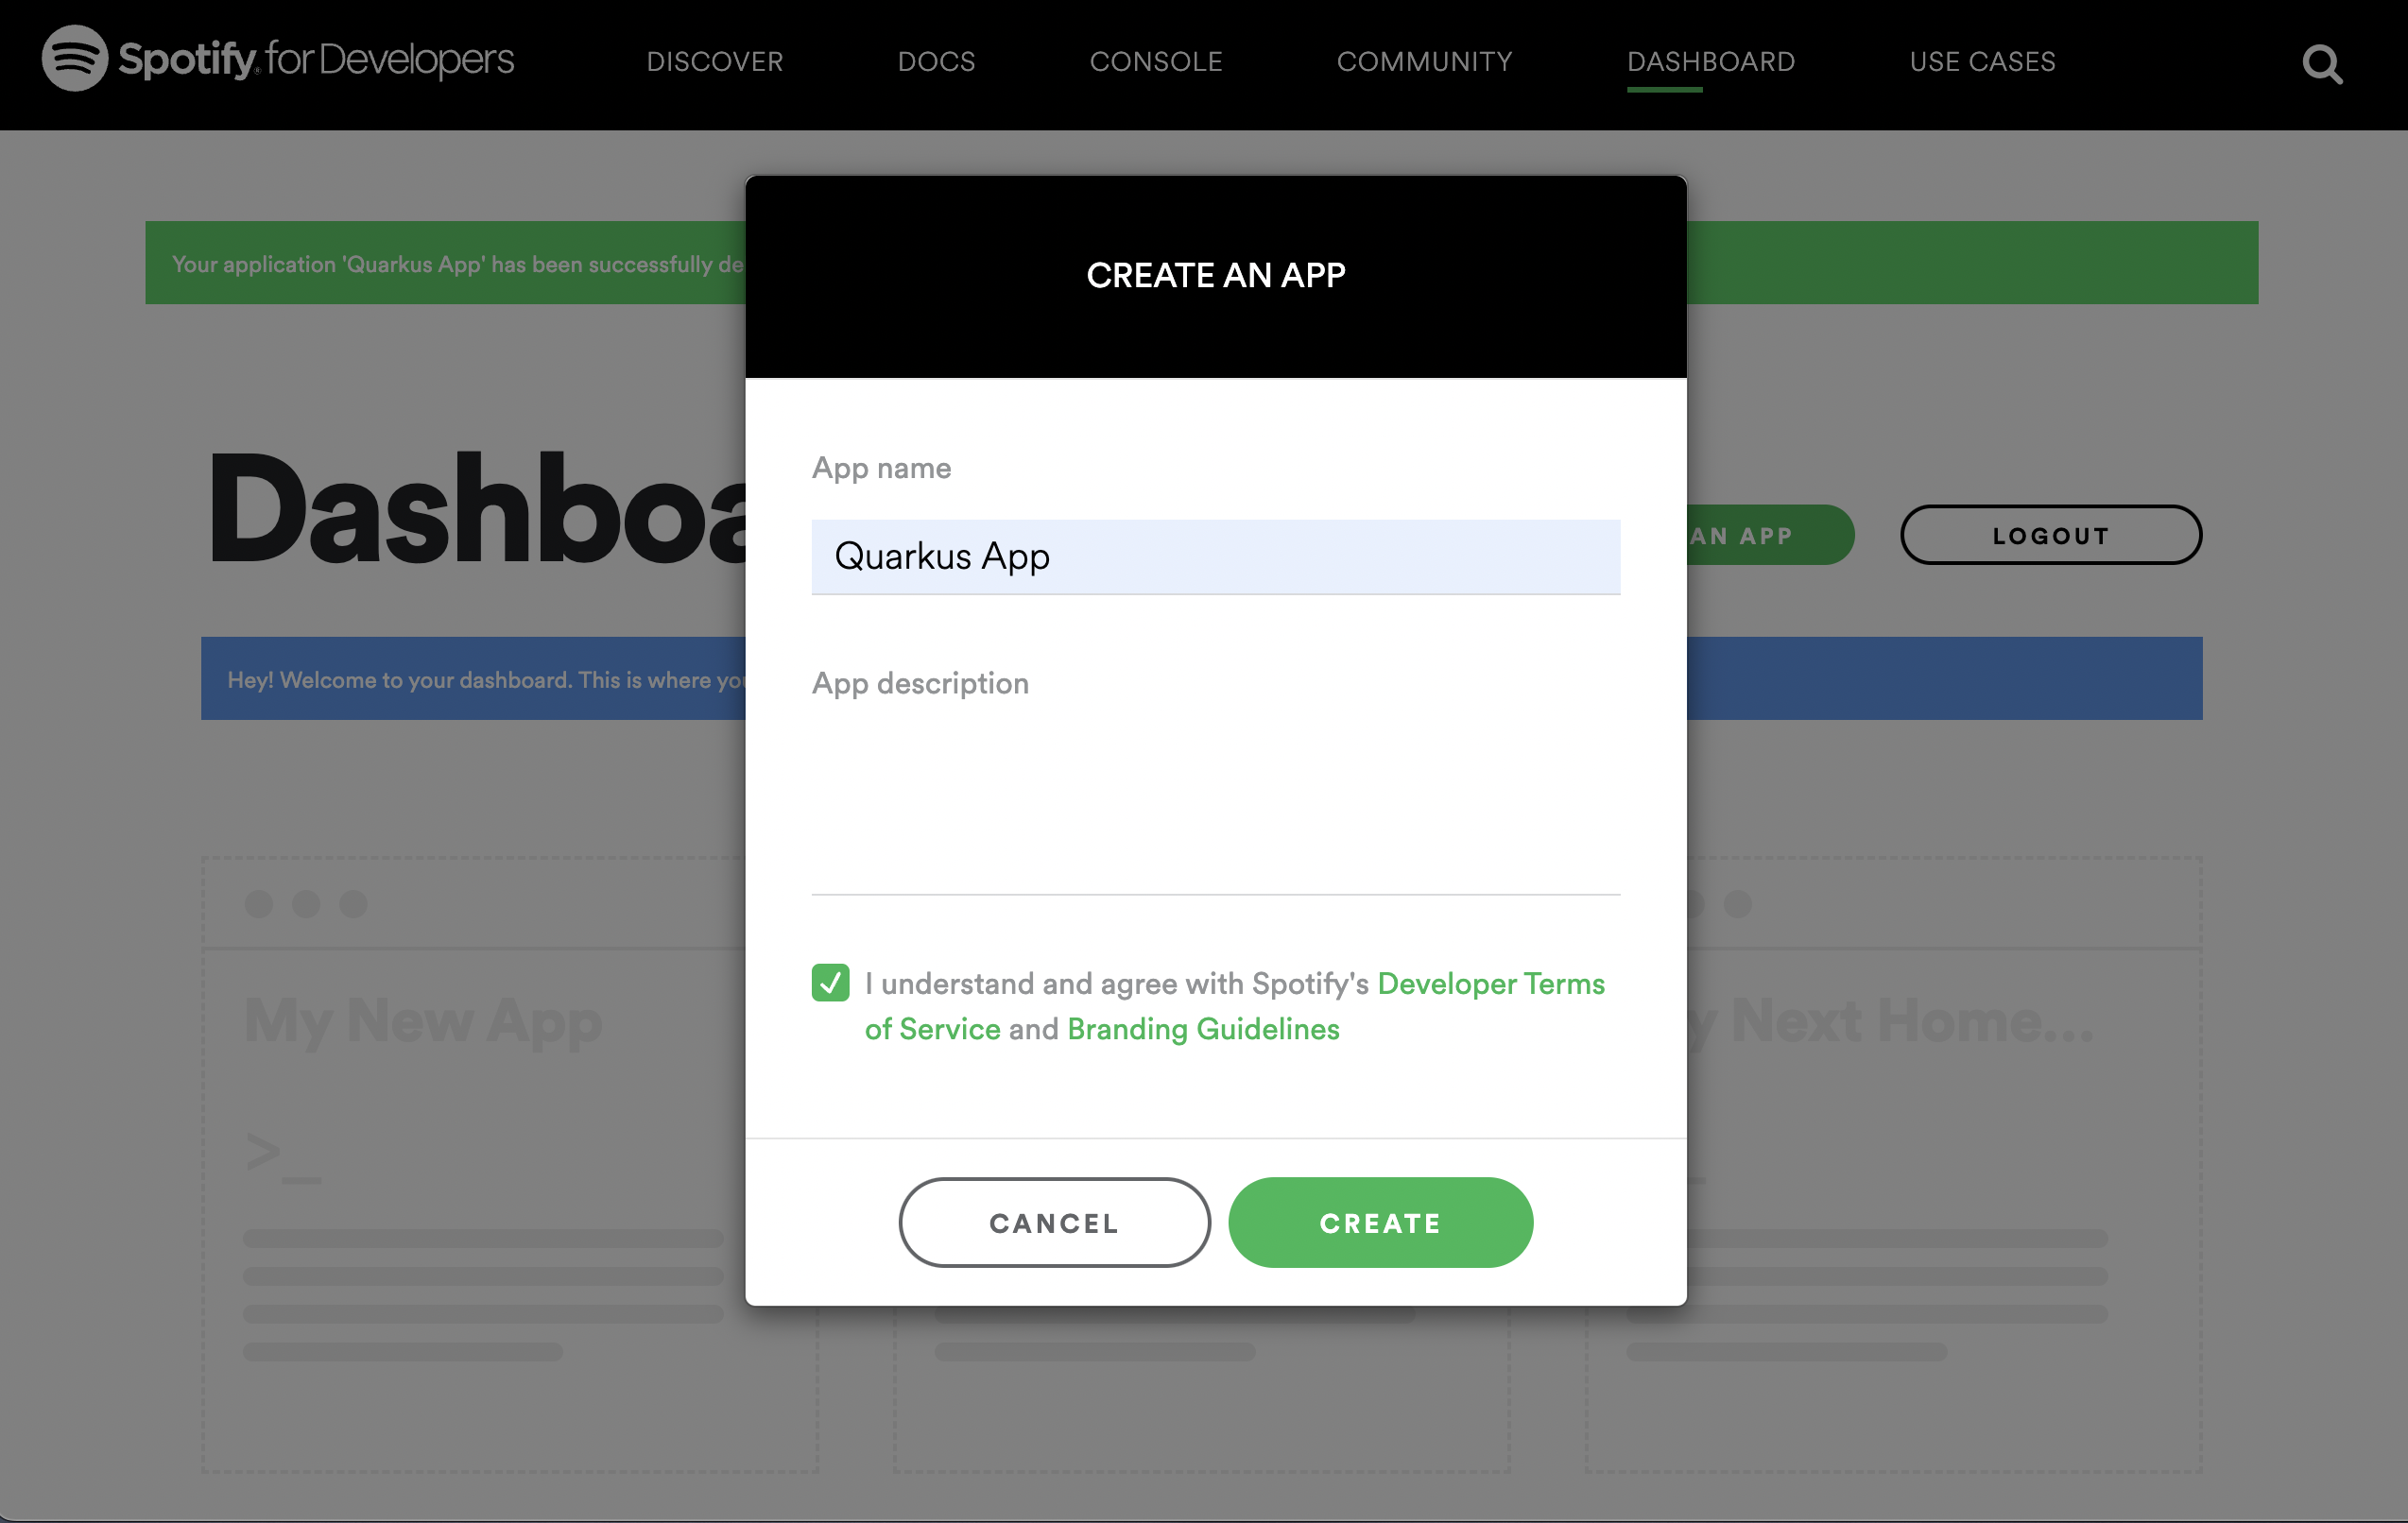
现在,输入一个应用程序名称和联系电子邮箱,然后按下 Create app
Now enter an application name, and contact email, and press Create app:
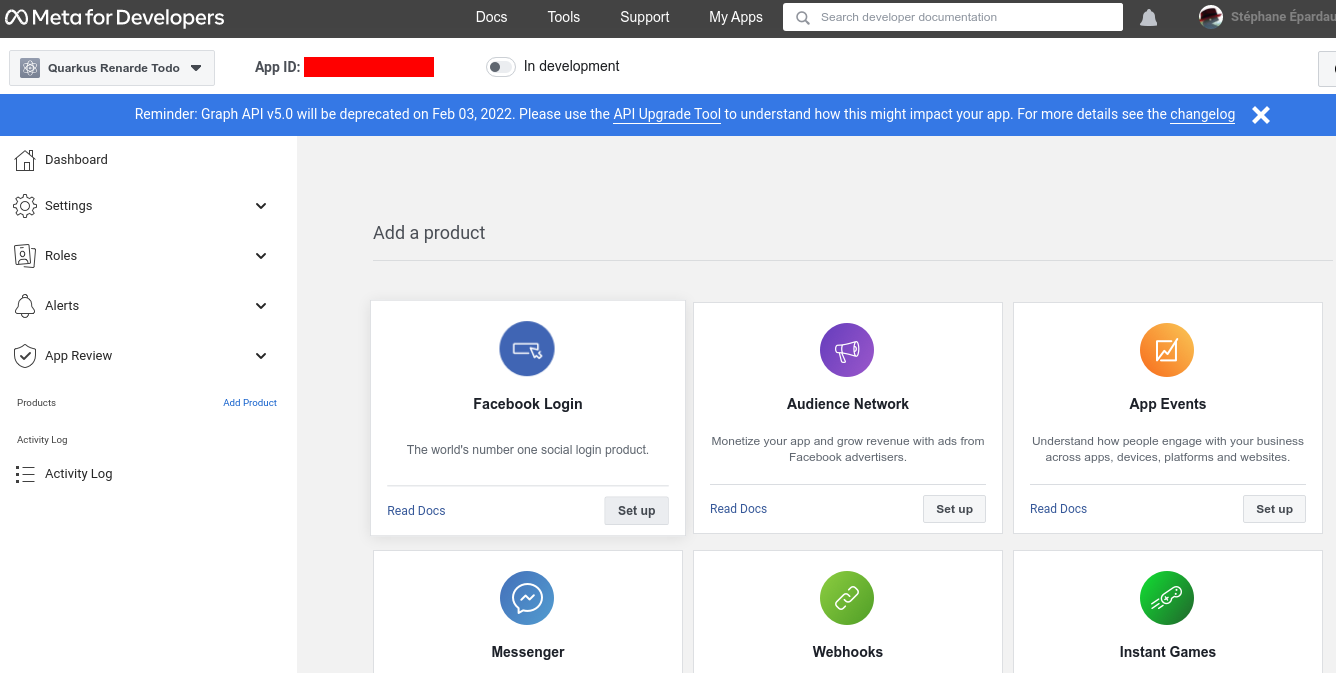
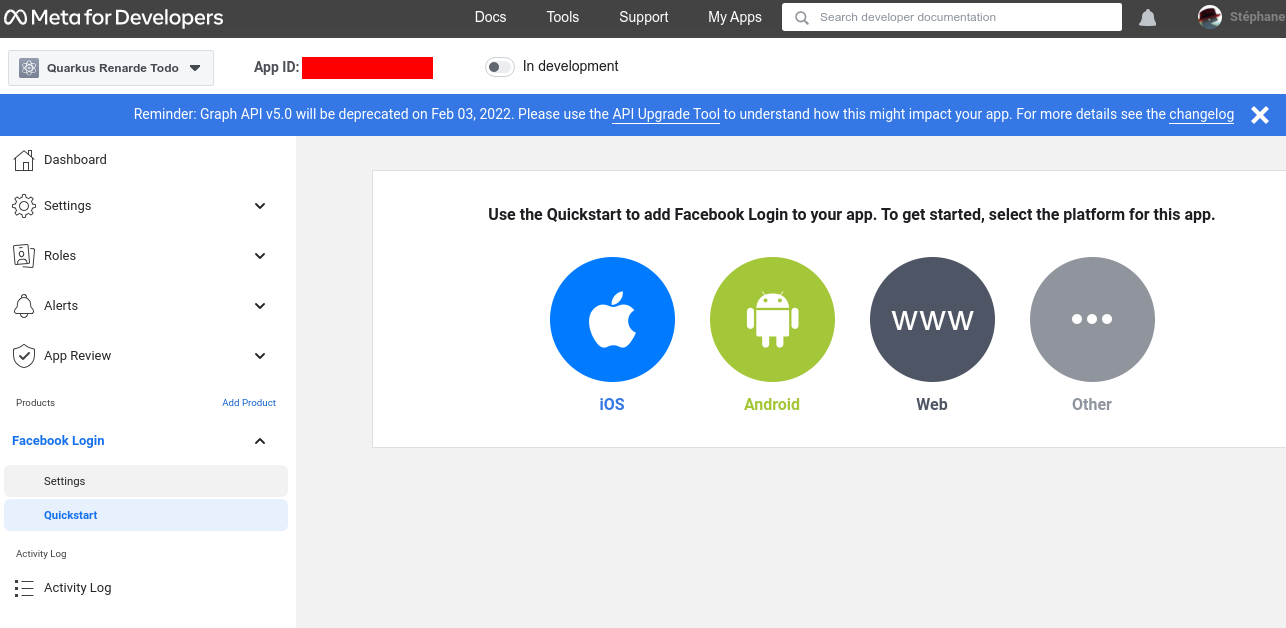
在应用程序页面上,点击 Facebook login 产品中的 Set up
On the app page, click Set up on the Facebook login product:
快速访问 Quickstarts 页面,然后点击左侧菜单中的 Facebook login > Settings
Quick the Quickstarts page and click on Facebook login > Settings on the left menu:
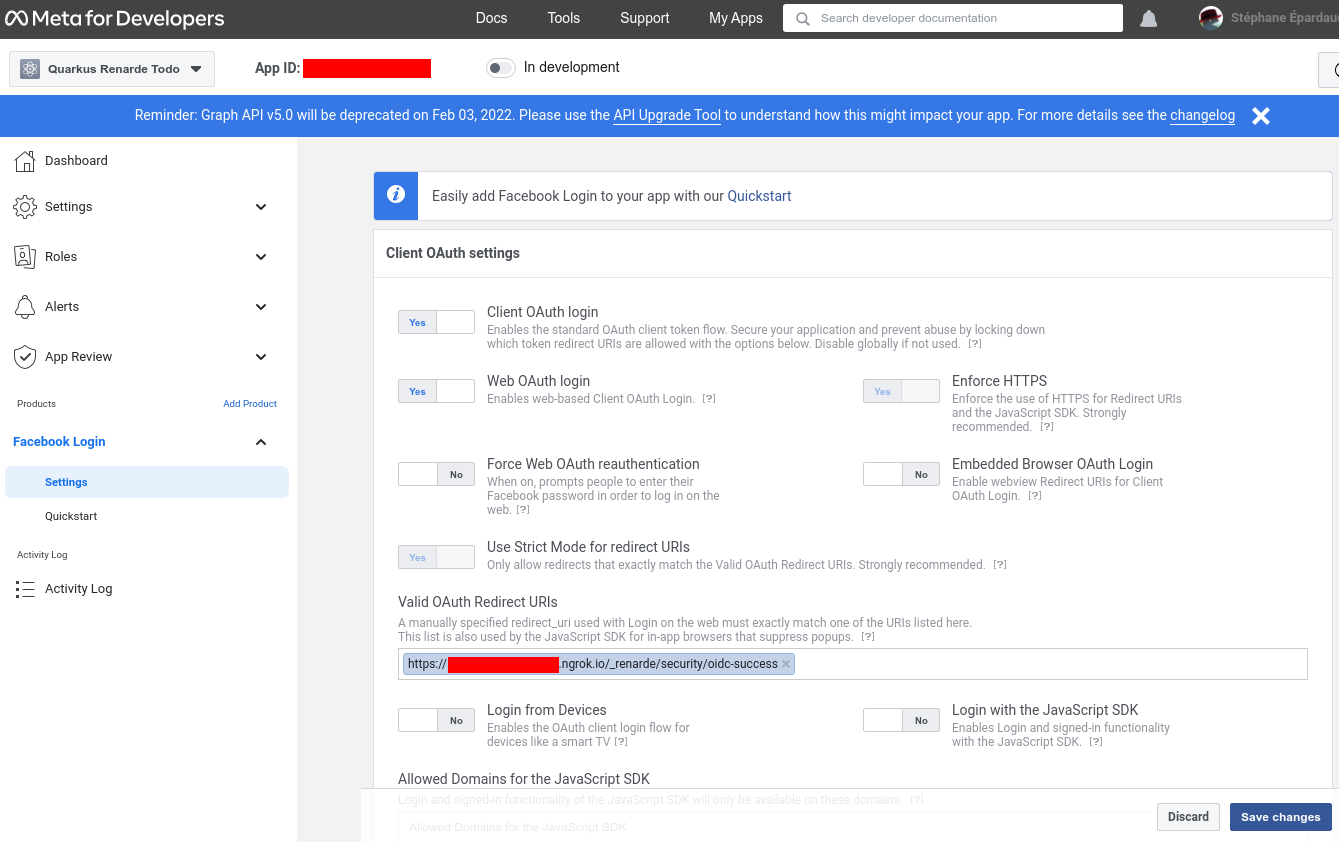
输入你的 Redirect URIs(设置为 <host>/_renarde/security/oidc-success),然后按下 Save changes
Enter your Redirect URIs (set to <host>/_renarde/security/oidc-success) and press Save changes:
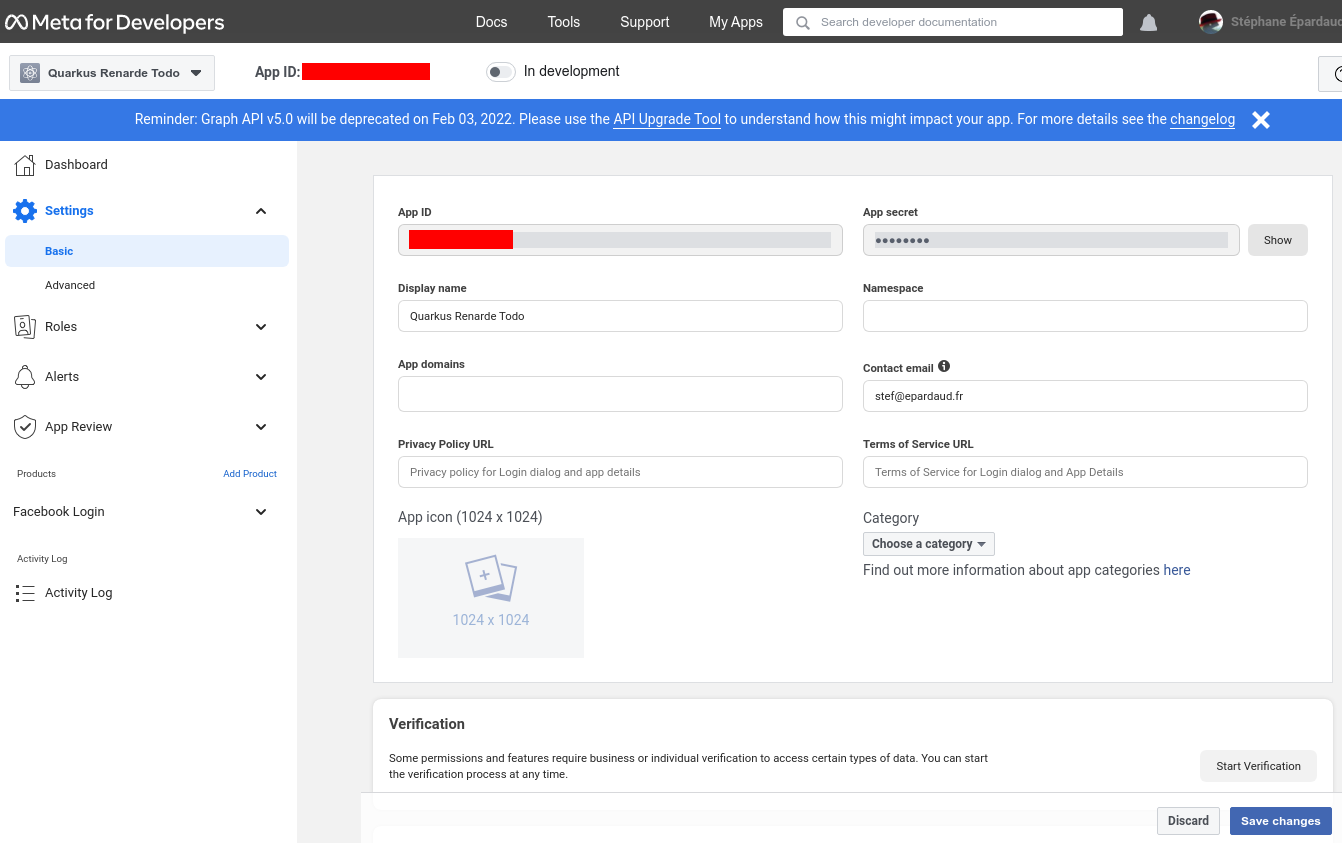
现在前往左侧菜单中的 Settings > Basic,然后写下你的 App ID 和 App secret
Now go to Settings > Basic on the left-hand menu, and write down your App ID and App secret:
你现在可以配置你的 application.properties
You can now configure your application.properties:
quarkus.oidc.provider=facebook
quarkus.oidc.client-id=<App ID>
quarkus.oidc.credentials.secret=<App secret>
quarkus.oidc.provider=facebook 将请求 Facebook 把 email 和 public_profile 范围添加到颁发的访问令牌。有关覆盖这些范围或请求更多范围的信息,请参见 Provider scopes 部分。
quarkus.oidc.provider=facebook will request Facebook to add email and public_profile scopes to issued access tokens. For information about overriding these scopes or requesting more scopes, see the Provider scopes section.
GitHub
为了设置 GitHub 的 OIDC,你需要在 GitHub developer settings 中创建一个新的 OAuth 应用程序:
In order to set up OIDC for GitHub you need to create a new OAuth application in your GitHub developer settings:
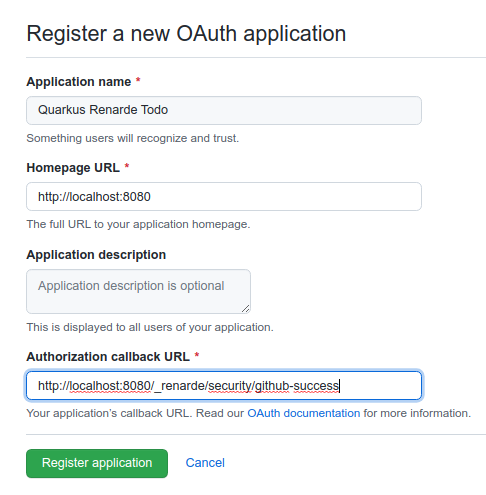
务必填写适当的详细信息,但更重要的是授权回调 URL,设置为 http://localhost:8080/_renarde/security/github-success(如果你打算使用 Quarkus 开发模式测试此功能)。
Make sure to fill in the appropriate details, but more importantly the Authorization Callback URL, set to http://localhost:8080/_renarde/security/github-success
(if you intend to test this using the Quarkus dev mode).
现在点击 Register application,你将看到你的应用程序页面:
Now click on Register application and you’ll be shown your application page:
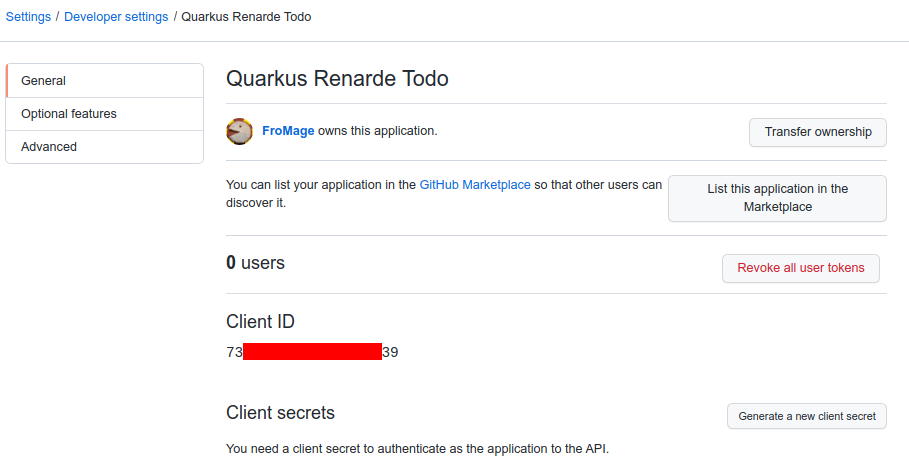
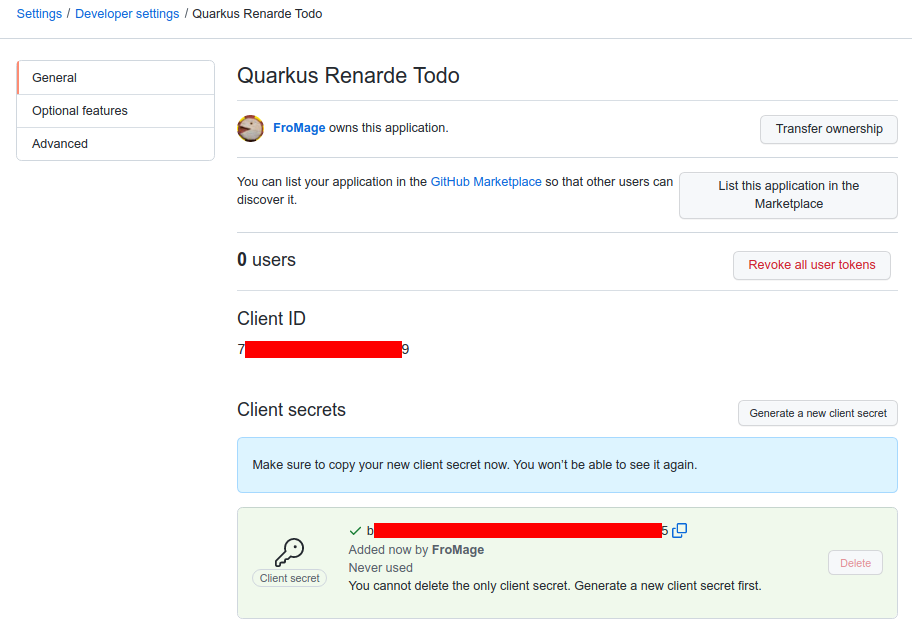
你需要点击 Generate a new client secret,确认你的凭据,并写下你的客户端 ID 和客户端密钥(特别是客户端密钥,因为你以后无法再从该页面看到它,但你可以随时重新创建一个,所以不用太担心):
You need to click on Generate a new client secret, confirm your credentials, and write down
your Client ID and Client secret (especially that one, because you will not be able to see it again
later from that page, but you can always recreate one, do don’t worry too much):
现在将以下配置添加到你的 application.properties:
Now add the following configuration to your application.properties:
quarkus.oidc.provider=github
quarkus.oidc.client-id=<Client ID>
quarkus.oidc.credentials.secret=<Secret>
quarkus.oidc.provider=github 将请求 GitHub 将 user:email 范围添加到颁发的访问令牌。有关覆盖此范围或请求更多范围的信息,请参见 Provider scopes 部分。
quarkus.oidc.provider=github will request GitHub to add a user:email scope to issued access tokens. For information about overriding this scope or requesting more scopes, see the Provider scopes section.
|
你还可以将由 GitHub 颁发的访问令牌发送到 |
|
You can also send access tokens issued by GitHub to |
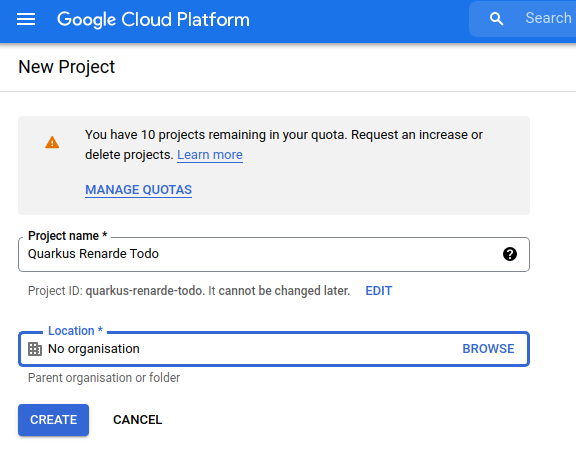
为了设置 Google 的 OIDC,你需要在 Google Cloud Platform console 中创建一个新项目:
In order to set up OIDC for Google you need to create a new project in your Google Cloud Platform console:
选择一个项目名称,然后点击 CREATE。
Pick a project name and click on CREATE.
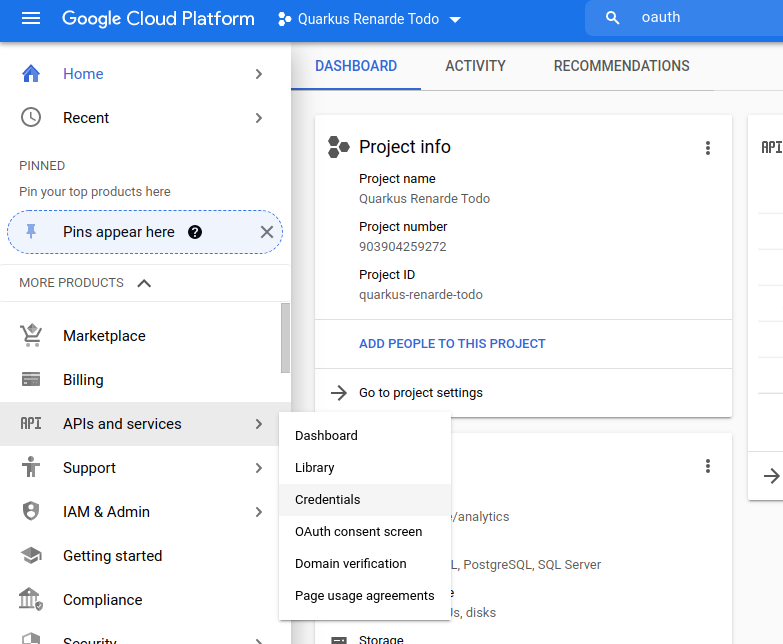
现在确保在顶部选择器中选择你的项目,然后点击左侧栏菜单中的 APIs and Services > OAuth consent screen:
Now make sure you select your project in the top selector, and click on the left-hand bar menu on APIs and Services > OAuth consent screen:
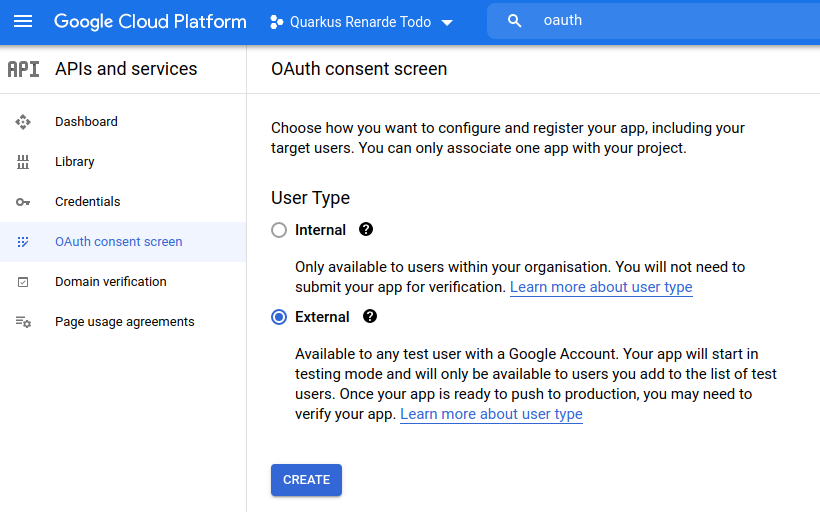
选择 External 授权任何 Google 用户登录你的应用程序,然后按 CREATE:
Select External to authorise any Google user to log in to your application and press CREATE:
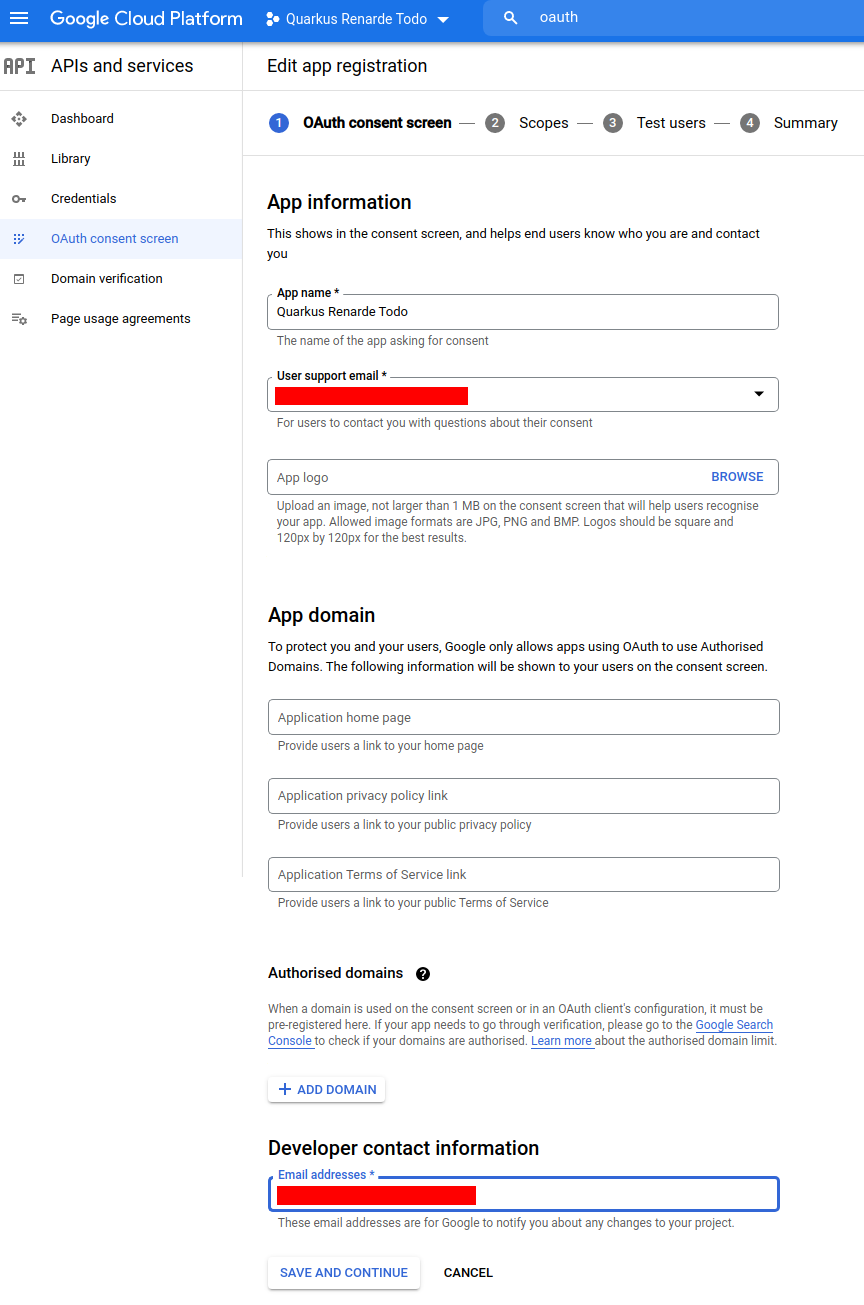
现在你可以填写你的应用程序名称、支持电子邮件、开发人员联系人信息,然后按 SAVE AND CONTINUE:
Now you can fill in your application name, your support email, your developer contact information and press SAVE AND CONTINUE:
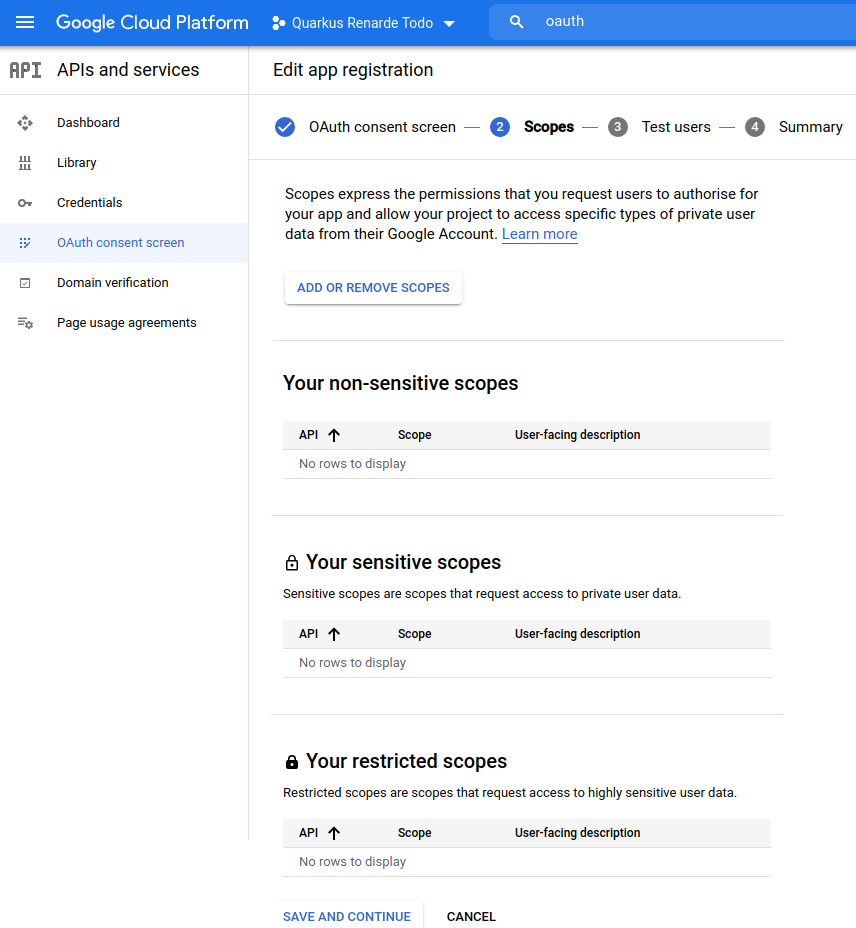
不要在下一页添加任何范围,然后按 SAVE AND CONTINUE:
Do not add any scopes on the next page, and press SAVE AND CONTINUE:
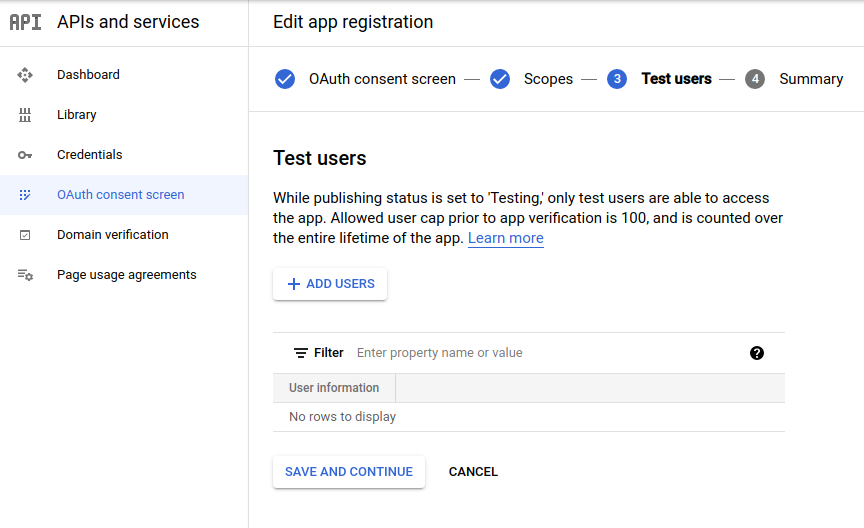
不要在下一页添加任何测试用户,然后按 SAVE AND CONTINUE:
Do not add any test user on the next page, and press SAVE AND CONTINUE:
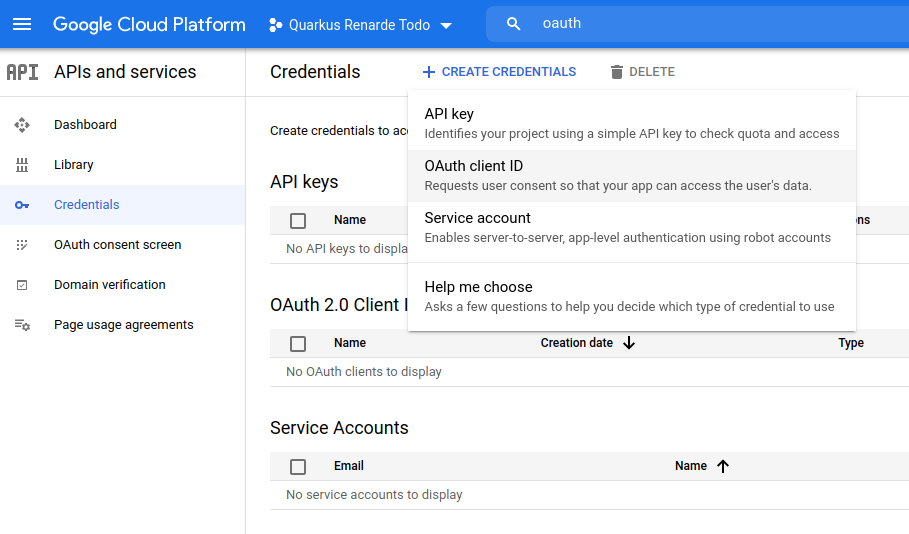
点击顶部菜单 CREATE CREDENTIALS> OAuth client ID:
Click on the top menu CREATE CREDENTIALS > OAuth client ID:
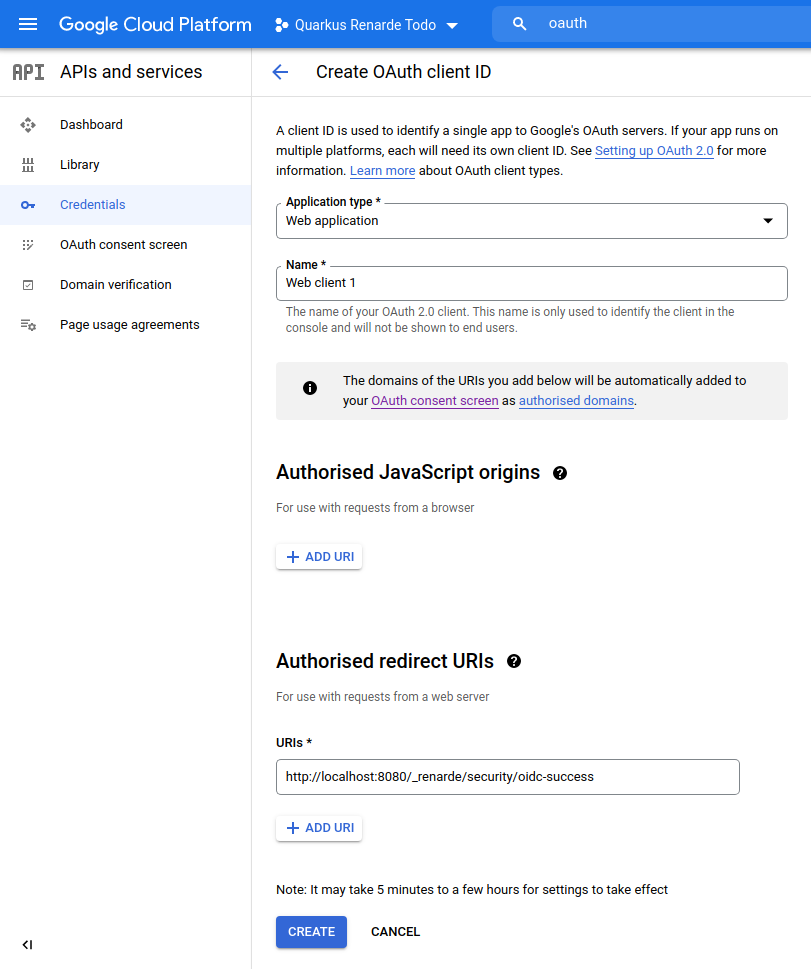
将 Application type 选择为 Web application,在 Authorised redirect URIs 列表中添加 http://localhost:8080/_renarde/security/oidc-success,然后按 CREATE:
Select Web application as Application type, and add http://localhost:8080/_renarde/security/oidc-success in
the Authorised redirect URIs list, then press CREATE:
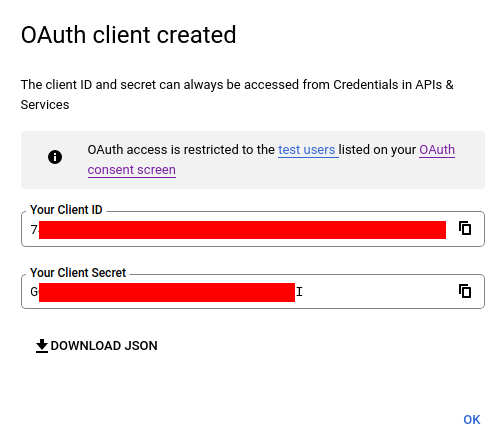
复制你的客户端 ID 和客户端密钥:
Copy your Client ID and Client Secret:
你现在可以配置你的 application.properties
You can now configure your application.properties:
quarkus.oidc.provider=google
quarkus.oidc.client-id=<Client ID>
quarkus.oidc.credentials.secret=<Secret>
quarkus.oidc.provider=google 将请求 Google 把 openid 、 email 和 profile 范围添加到颁发的访问令牌。有关覆盖这些范围或请求更多范围的信息,请参见 Provider scopes 部分。
quarkus.oidc.provider=google will request Google to add openid, email and profile scopes to issued access tokens. For information about overriding these scopes or requesting more scopes, see the Provider scopes section.
|
您还可以将 Google 发出的访问权限令牌发送到 |
|
You can also send access tokens issued by Google to |
Create a LinkedIn application:
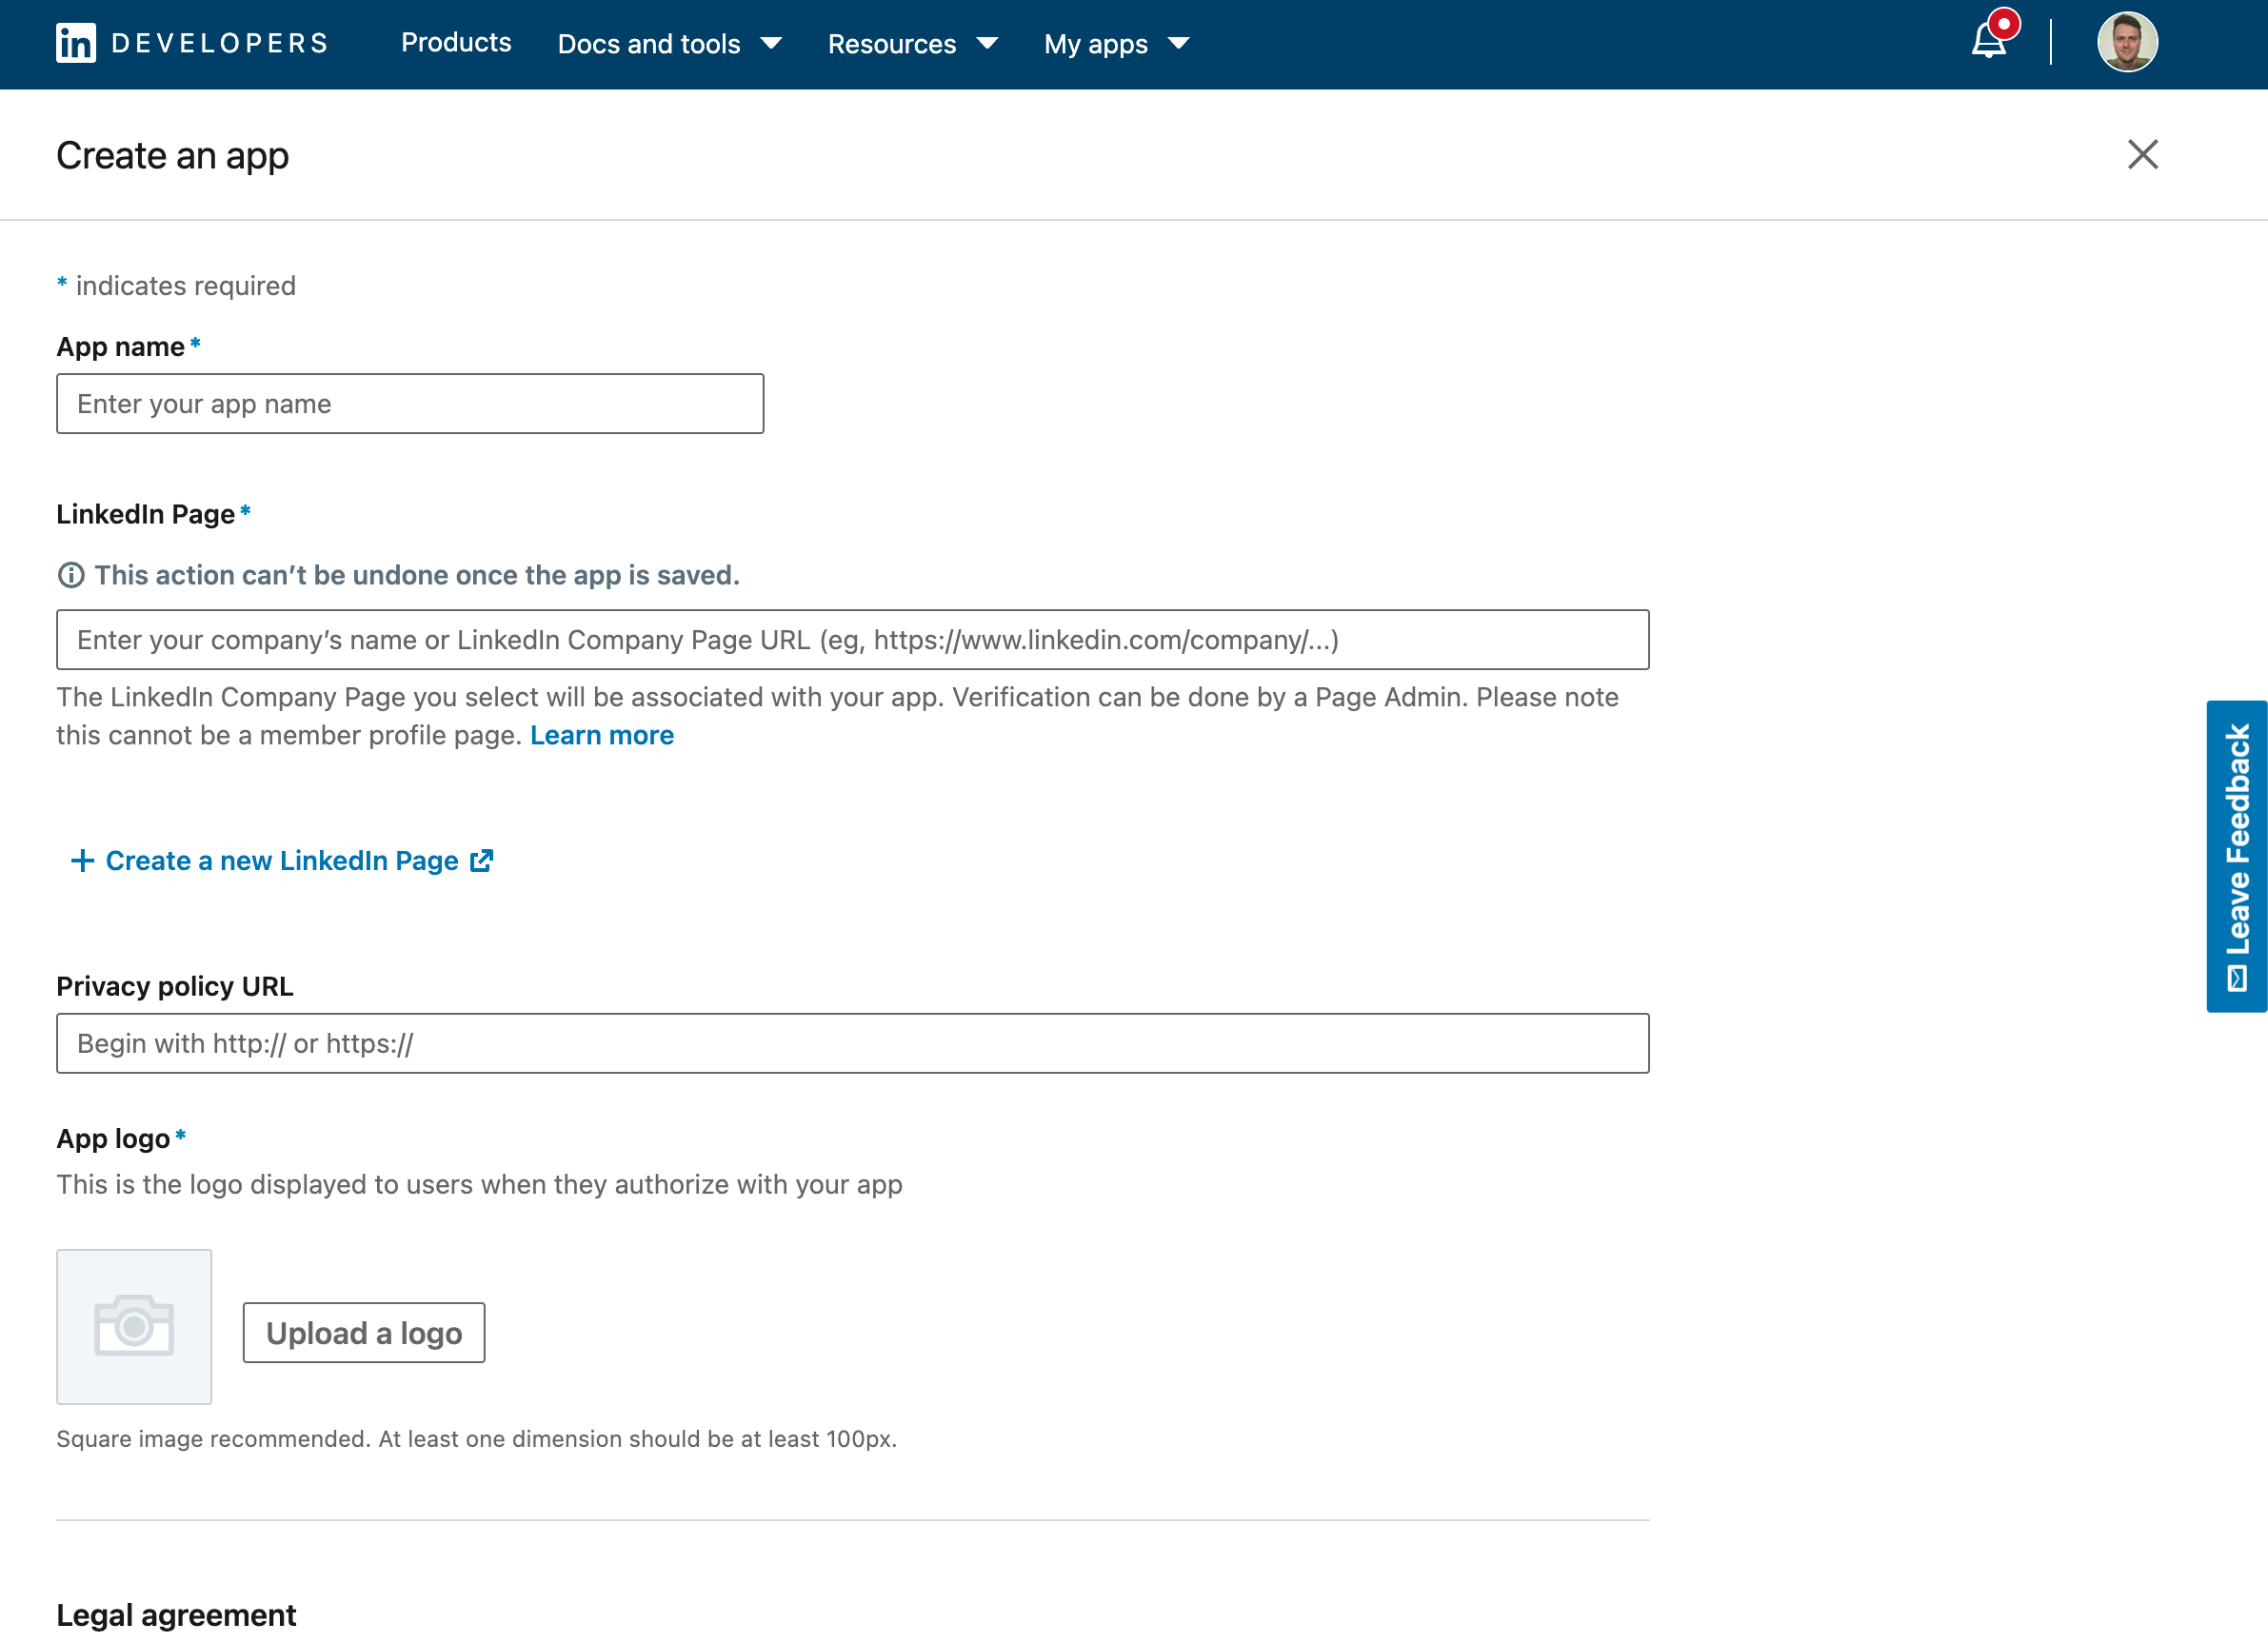
添加 Sign In with LinkedIn using OpenId Connect 产品:
Add the Sign In with LinkedIn using OpenId Connect product:
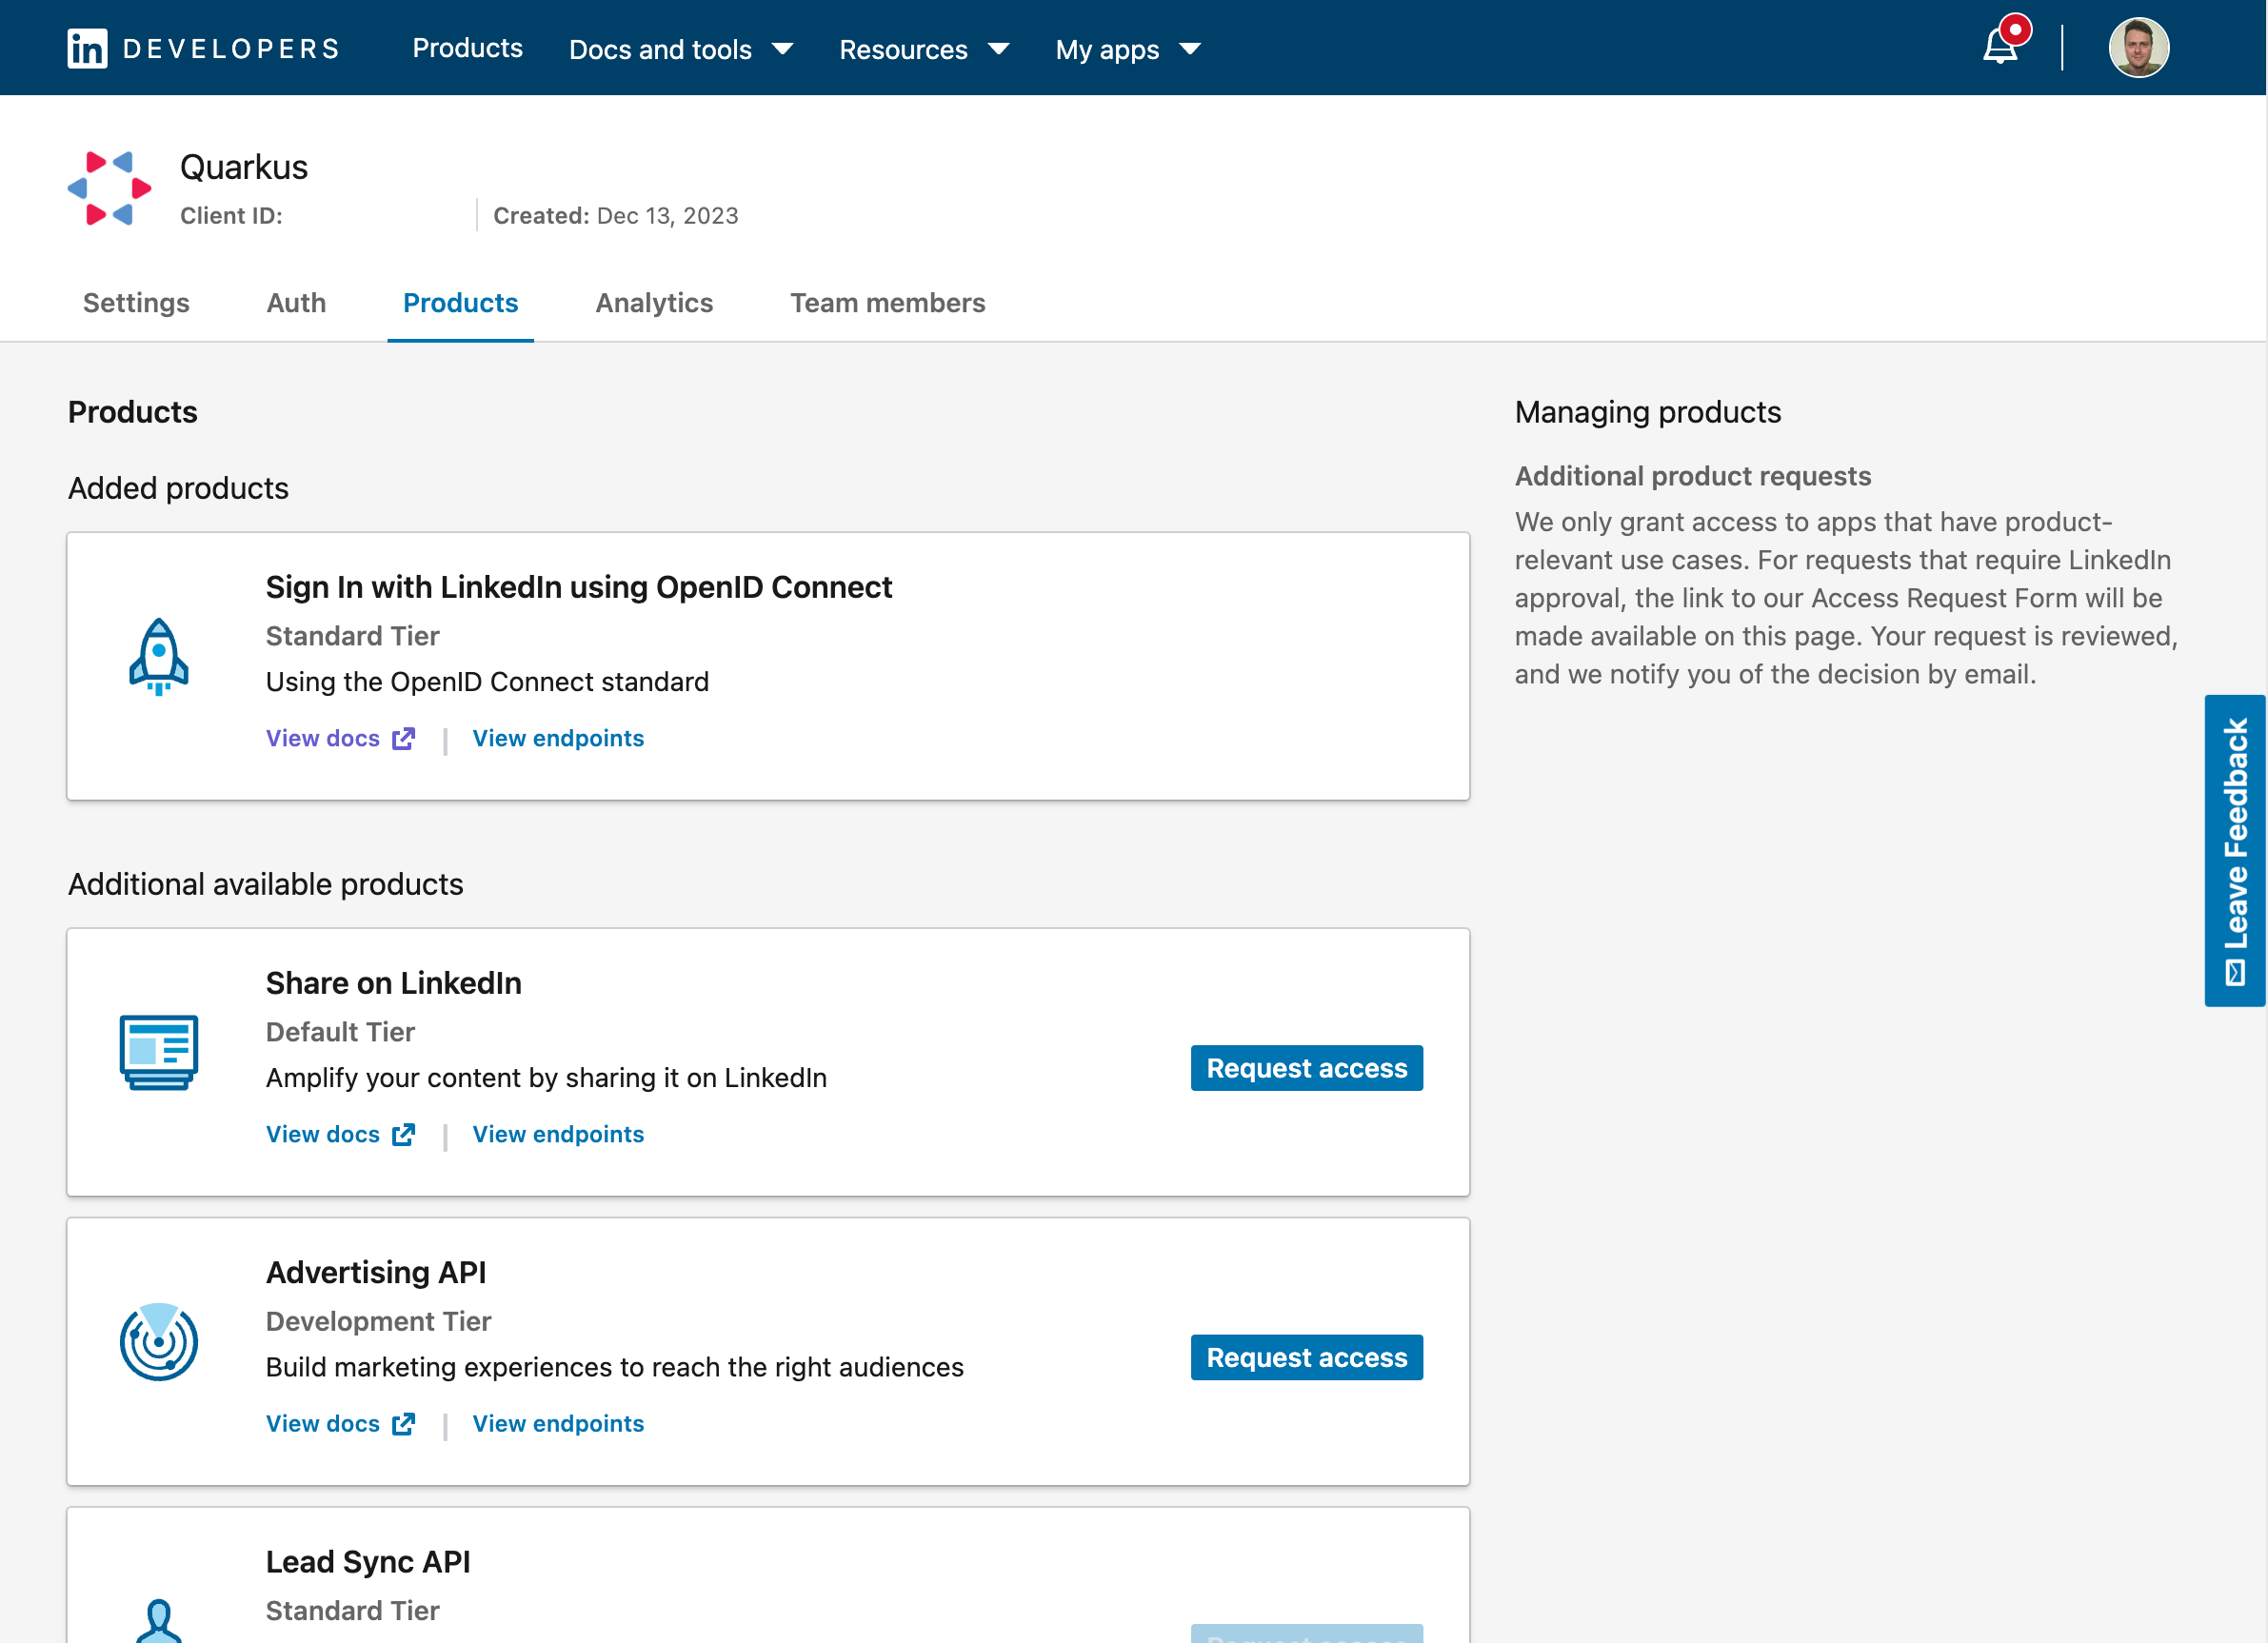
您现在可以获取您的客户端 ID 和加密信息。别忘了还要为您的应用程序添加已授权的重定向 URL:
You now can get your client id and secret. Don’t forget to also add the authorized redirect URLs for your application:
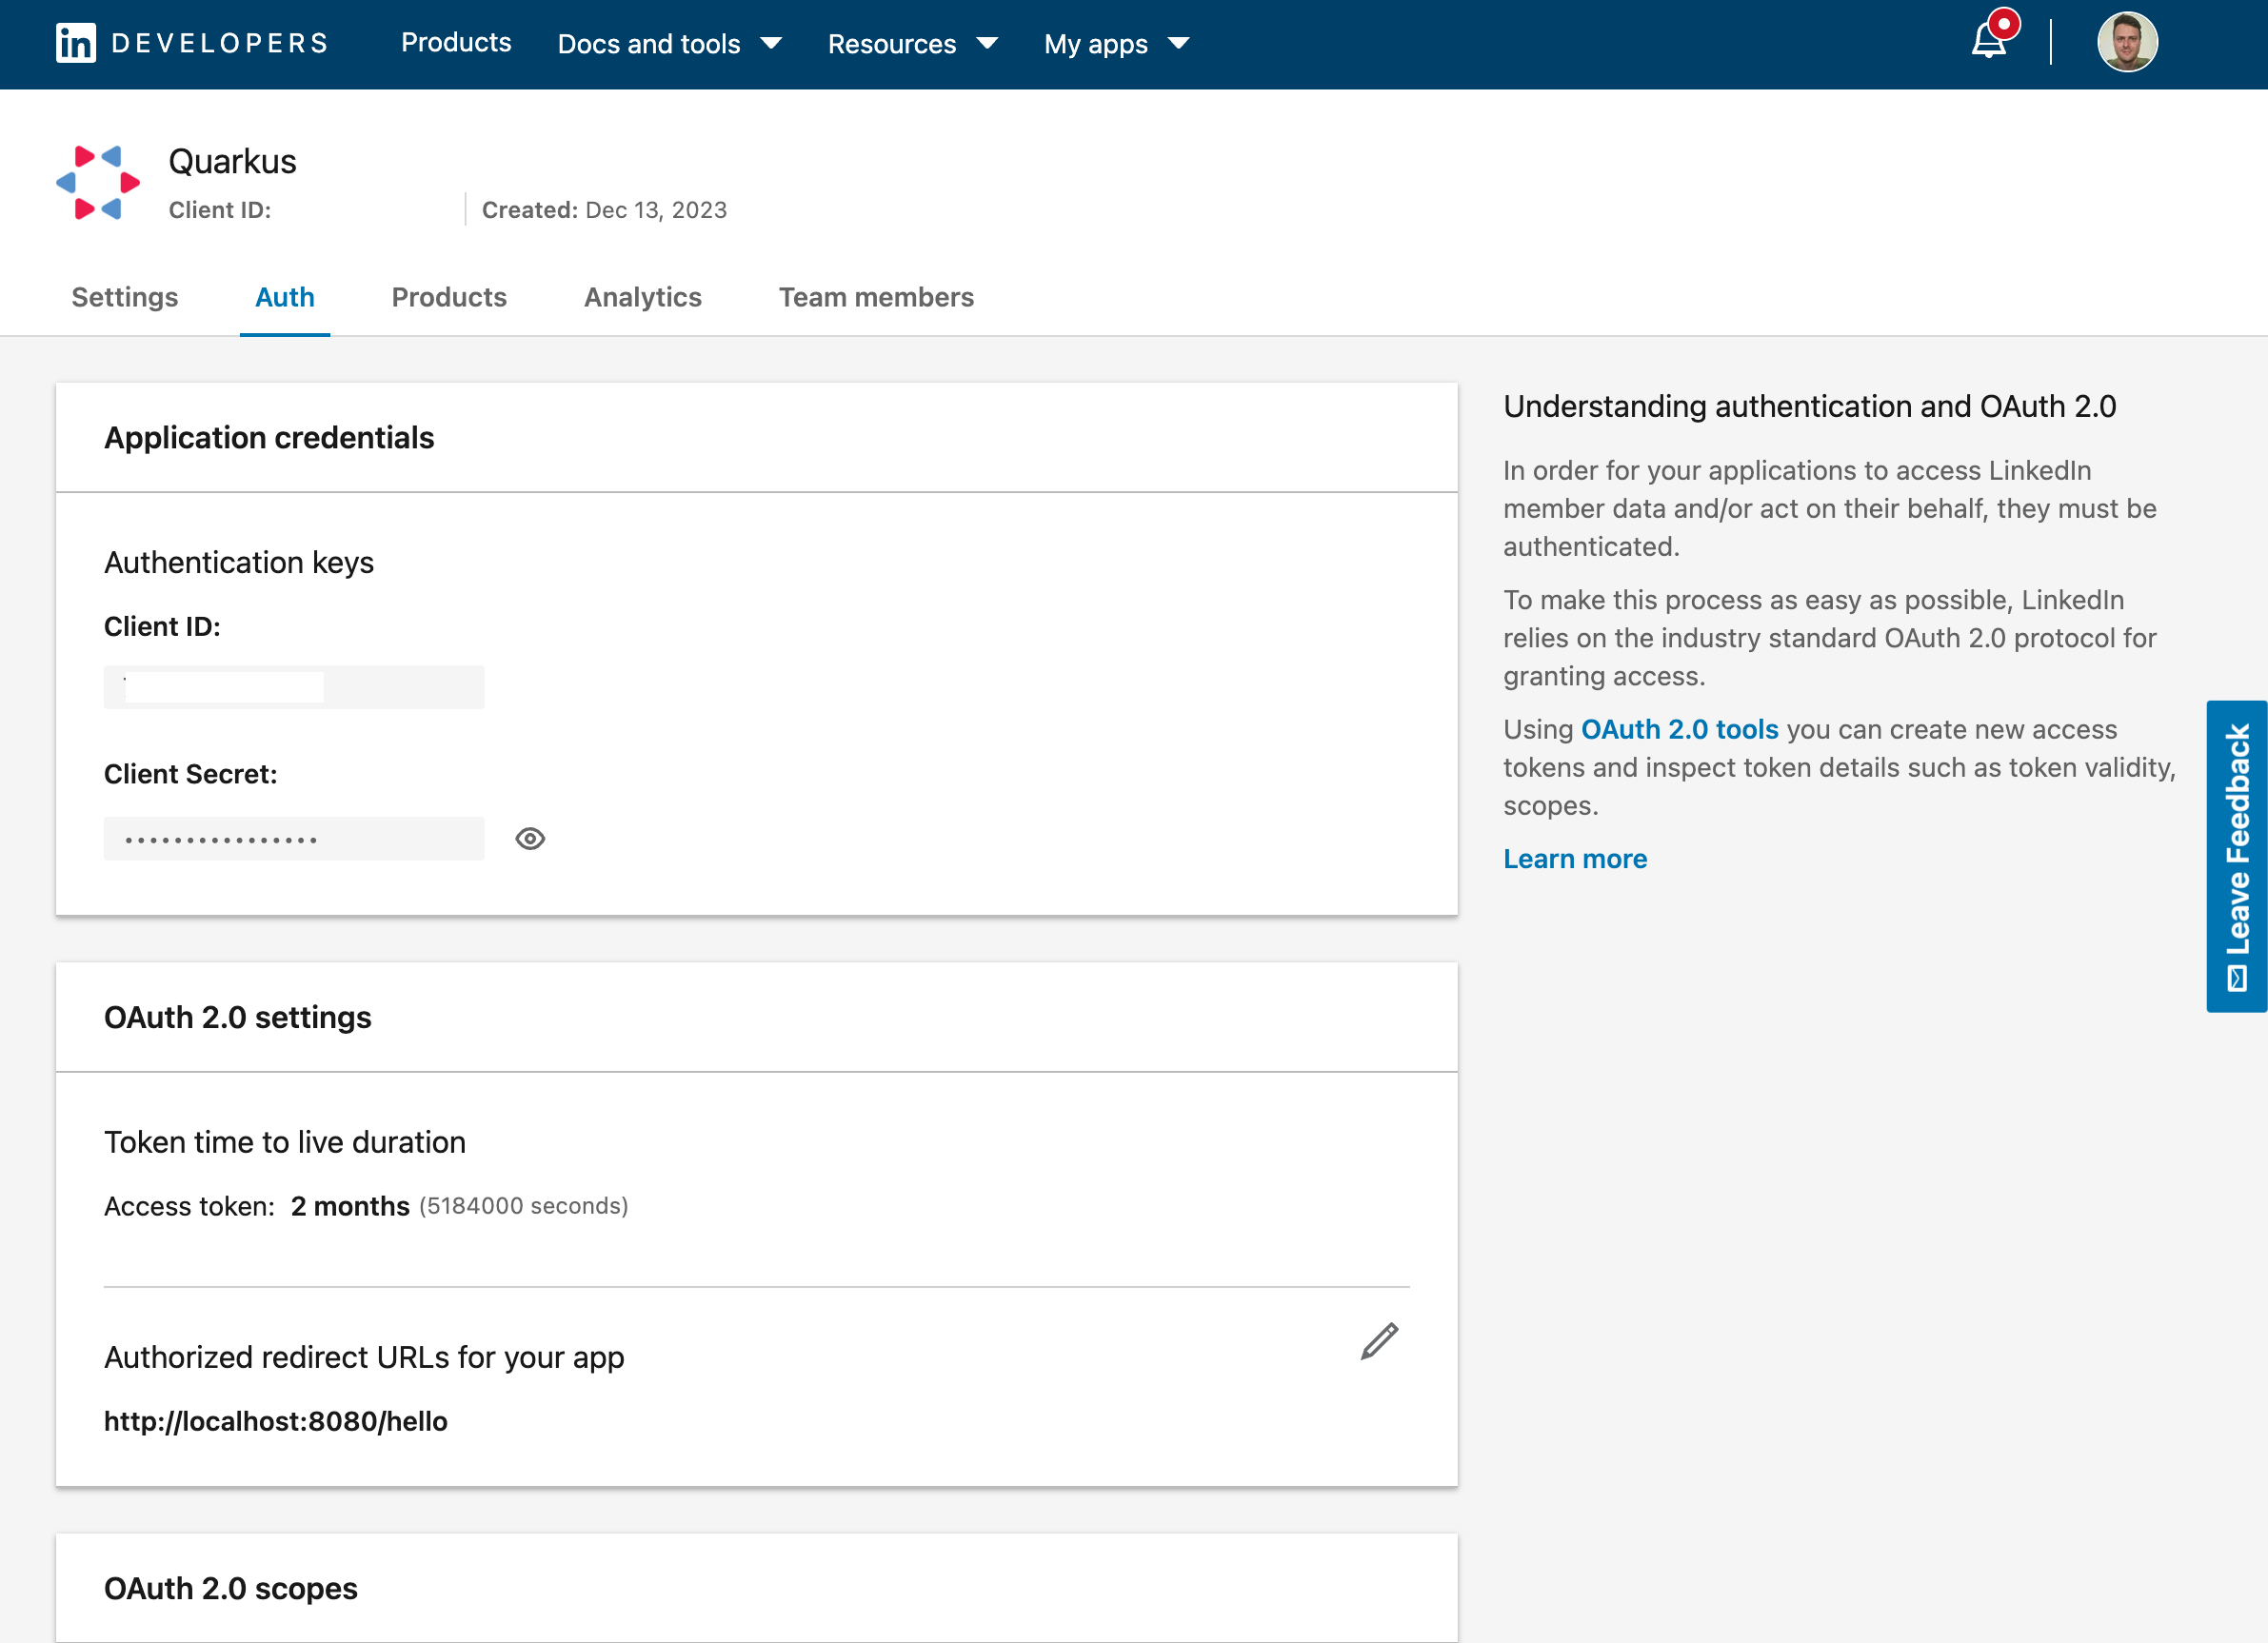
你现在可以配置你的 application.properties
You can now configure your application.properties:
quarkus.oidc.provider=linkedin
quarkus.oidc.client-id=<Client ID>
quarkus.oidc.credentials.client-secret=<Client Secret>
Mastodon
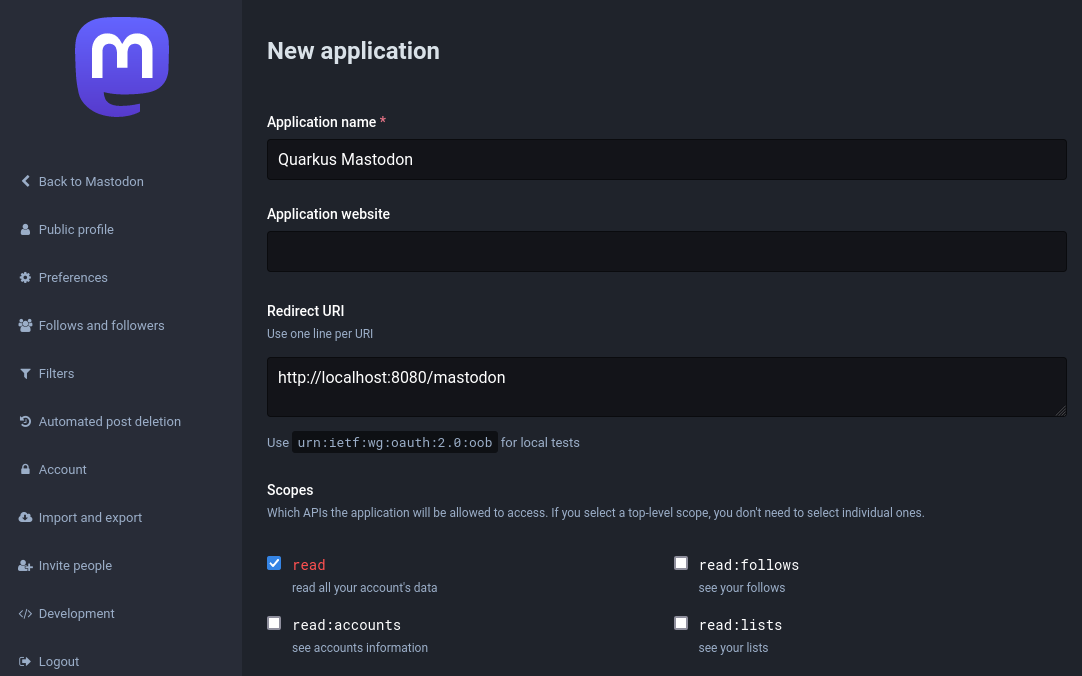
创建 Mastodon account。例如,您必须 pick a server mastodon.social。在您的帐户中选择一个 Development 选项并注册一个应用程序,例如:
Create a Mastodon account. You must pick a server, for example, mastodon.social.
Select a Development option in your account and register an application, for example:
选择已注册的应用程序:
Select the registered application:
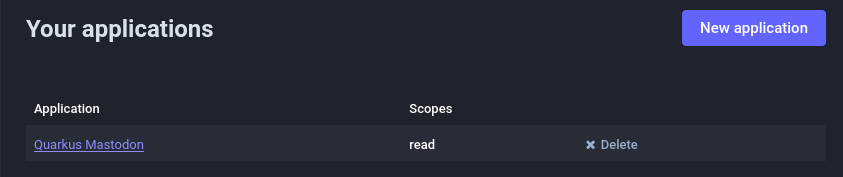
并记下其客户端 ID 和客户端加密信息属性,使用它们来配置您的 application.properties:
and note its client id and client secret properties, use them to configure your application.properties:
quarkus.oidc.provider=mastodon
quarkus.oidc.client-id=<Client ID>
quarkus.oidc.credentials.client-secret.value=<Client Secret>默认情况下,quarkus.oidc.provider=mastodon 将 quarkus.oidc.auth-server-url 设置为 https://mastodon.social Mastodon 服务器地址。
By default, quarkus.oidc.provider=mastodon sets quarkus.oidc.auth-server-url to the https://mastodon.social Mastodon server address.
如果您在另一个 Mastodon 服务器中创建了您的帐户,您可以覆盖 quarkus.oidc.auth-server-url,例如:
You can override quarkus.oidc.auth-server-url if you have created your account in another Mastodon server, for example:
quarkus.oidc.provider=mastodon
quarkus.oidc.auth-server-url=https://infosec.exchange
quarkus.oidc.client-id=<Client ID>
quarkus.oidc.credentials.client-secret.value=<Client Secret>
Microsoft
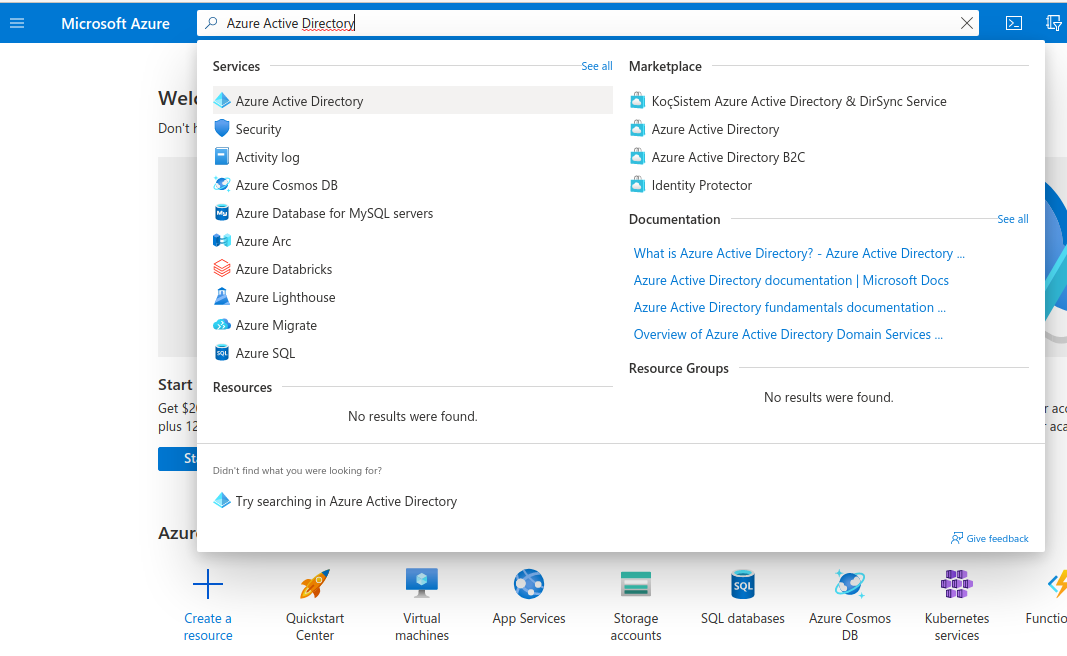
为了设置微软的 OIDC,您需要转到您的 Microsoft Azure Portal,并搜索 Azure Active Directory,然后点击它:
In order to set up OIDC for Microsoft you need to go to your Microsoft Azure Portal,
and search for Azure Active Directory, then click on it:
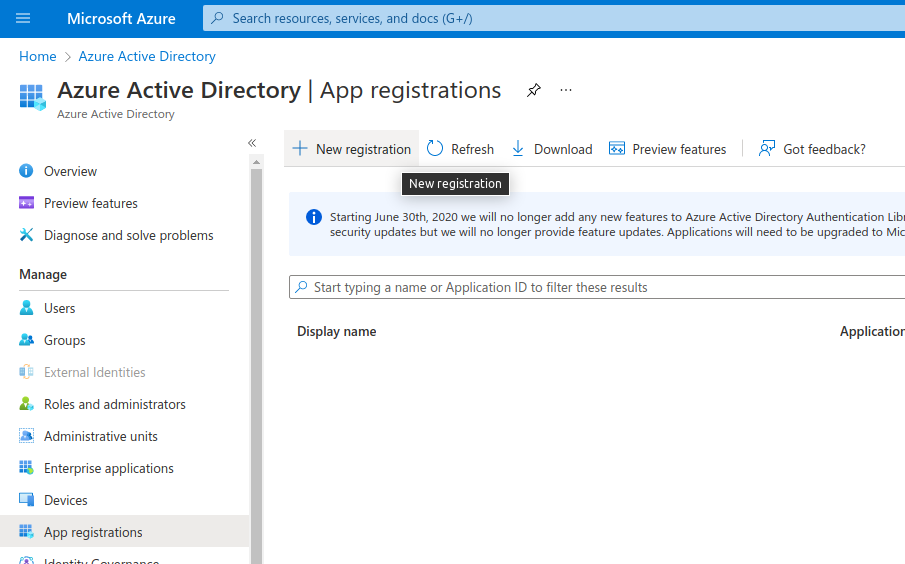
进入之后,在左侧的 Manage 下,点击 App registrations,然后点击 New registration:
Once there, on the left side under Manage, click on App registrations then click on New registration:
填写您的应用程序名称,选择 Accounts in any organizational directory (Any Azure AD directory - Multitenant) and personal Microsoft accounts (e.g. Skype, Xbox) 允许任何人登录,并添加 Web 重定向 URI 为 http://localhost:8080/_renarde/security/oidc-success,然后点击 Register:
Fill in your application name, select Accounts in any organizational directory (Any Azure AD directory - Multitenant) and personal Microsoft accounts (e.g. Skype, Xbox) to allow anyone to log in, and add a Web Redirect URI as http://localhost:8080/_renarde/security/oidc-success,
then click on Register:

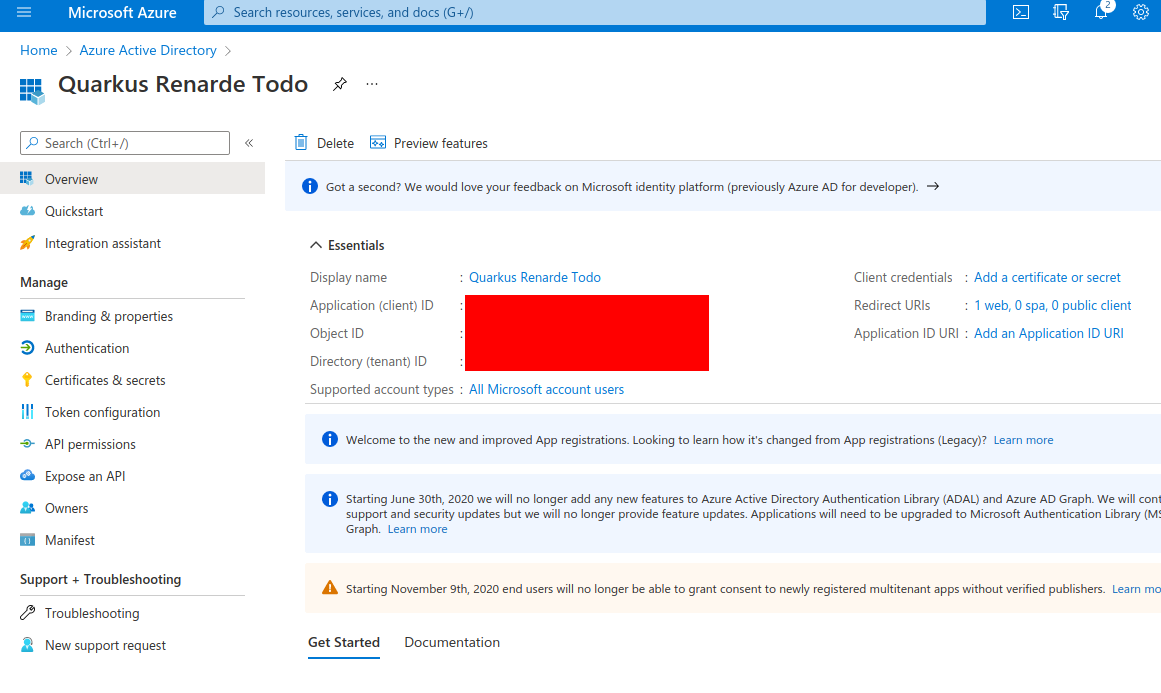
在结果页面上,复制 Client Id(在 Application (client) ID 下),然后点击 Add a certificate or secret:
On that resulting page, copy the Client Id (under Application (client) ID, then click on Add a certificate or secret:
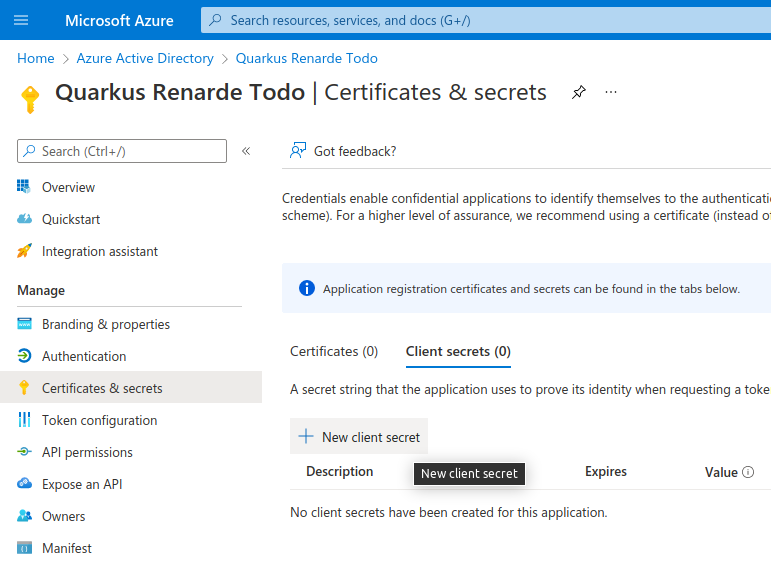
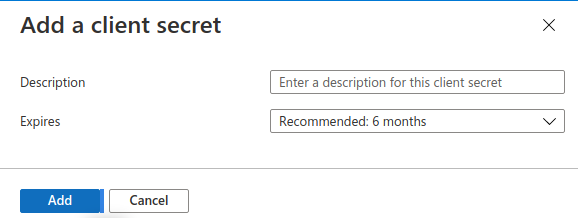
现在,在 Client secrets (0) 下,点击 New client secret:
Now, under Client secrets (0), click on New client secret:
在该对话框中点击 Add,无需更改任何内容:
Click on Add in that dialog without changing anything:
在结果页面上,复制您的 Secret Value:
On the resulting page, copy your Secret Value:

你现在可以配置你的 application.properties
You can now configure your application.properties:
quarkus.oidc.provider=microsoft
quarkus.oidc.client-id=<Client ID>
quarkus.oidc.credentials.secret=<Secret>
quarkus.oidc.provider=microsoft 将请求 Microsoft 为所发行的访问权限令牌添加 openid、email 和 profile 范围。有关覆盖这些范围或请求更多范围的信息,请参阅 Provider scopes 部分。
quarkus.oidc.provider=microsoft will request Microsoft to add openid, email and profile scopes to issued access tokens. For information about overriding these scopes or requesting more scopes, see the Provider scopes section.
|
您还可以将 Microsoft 发出的访问权限令牌发送到 |
|
You can also send access tokens issued by Microsoft to |
|
某些 Microsoft 服务可能会颁发令牌,其签名的验证需要使用当前令牌的 Some Microsoft services may issue tokens whose signatures can only be verified if the current token’s |
Spotify
Create a Spotify application:
别忘了将 http://localhost:8080 添加为开发目的的测试重定向 URI。在 Spotify 应用程序设置完成后,您应该会获得一个已生成的客户端 ID 和密钥,例如:
Don’t forget to add http://localhost:8080 as a redirect URI for testing during development purposes. You should get a client id and secret generated once a Spotify application setup has been complete, for example:
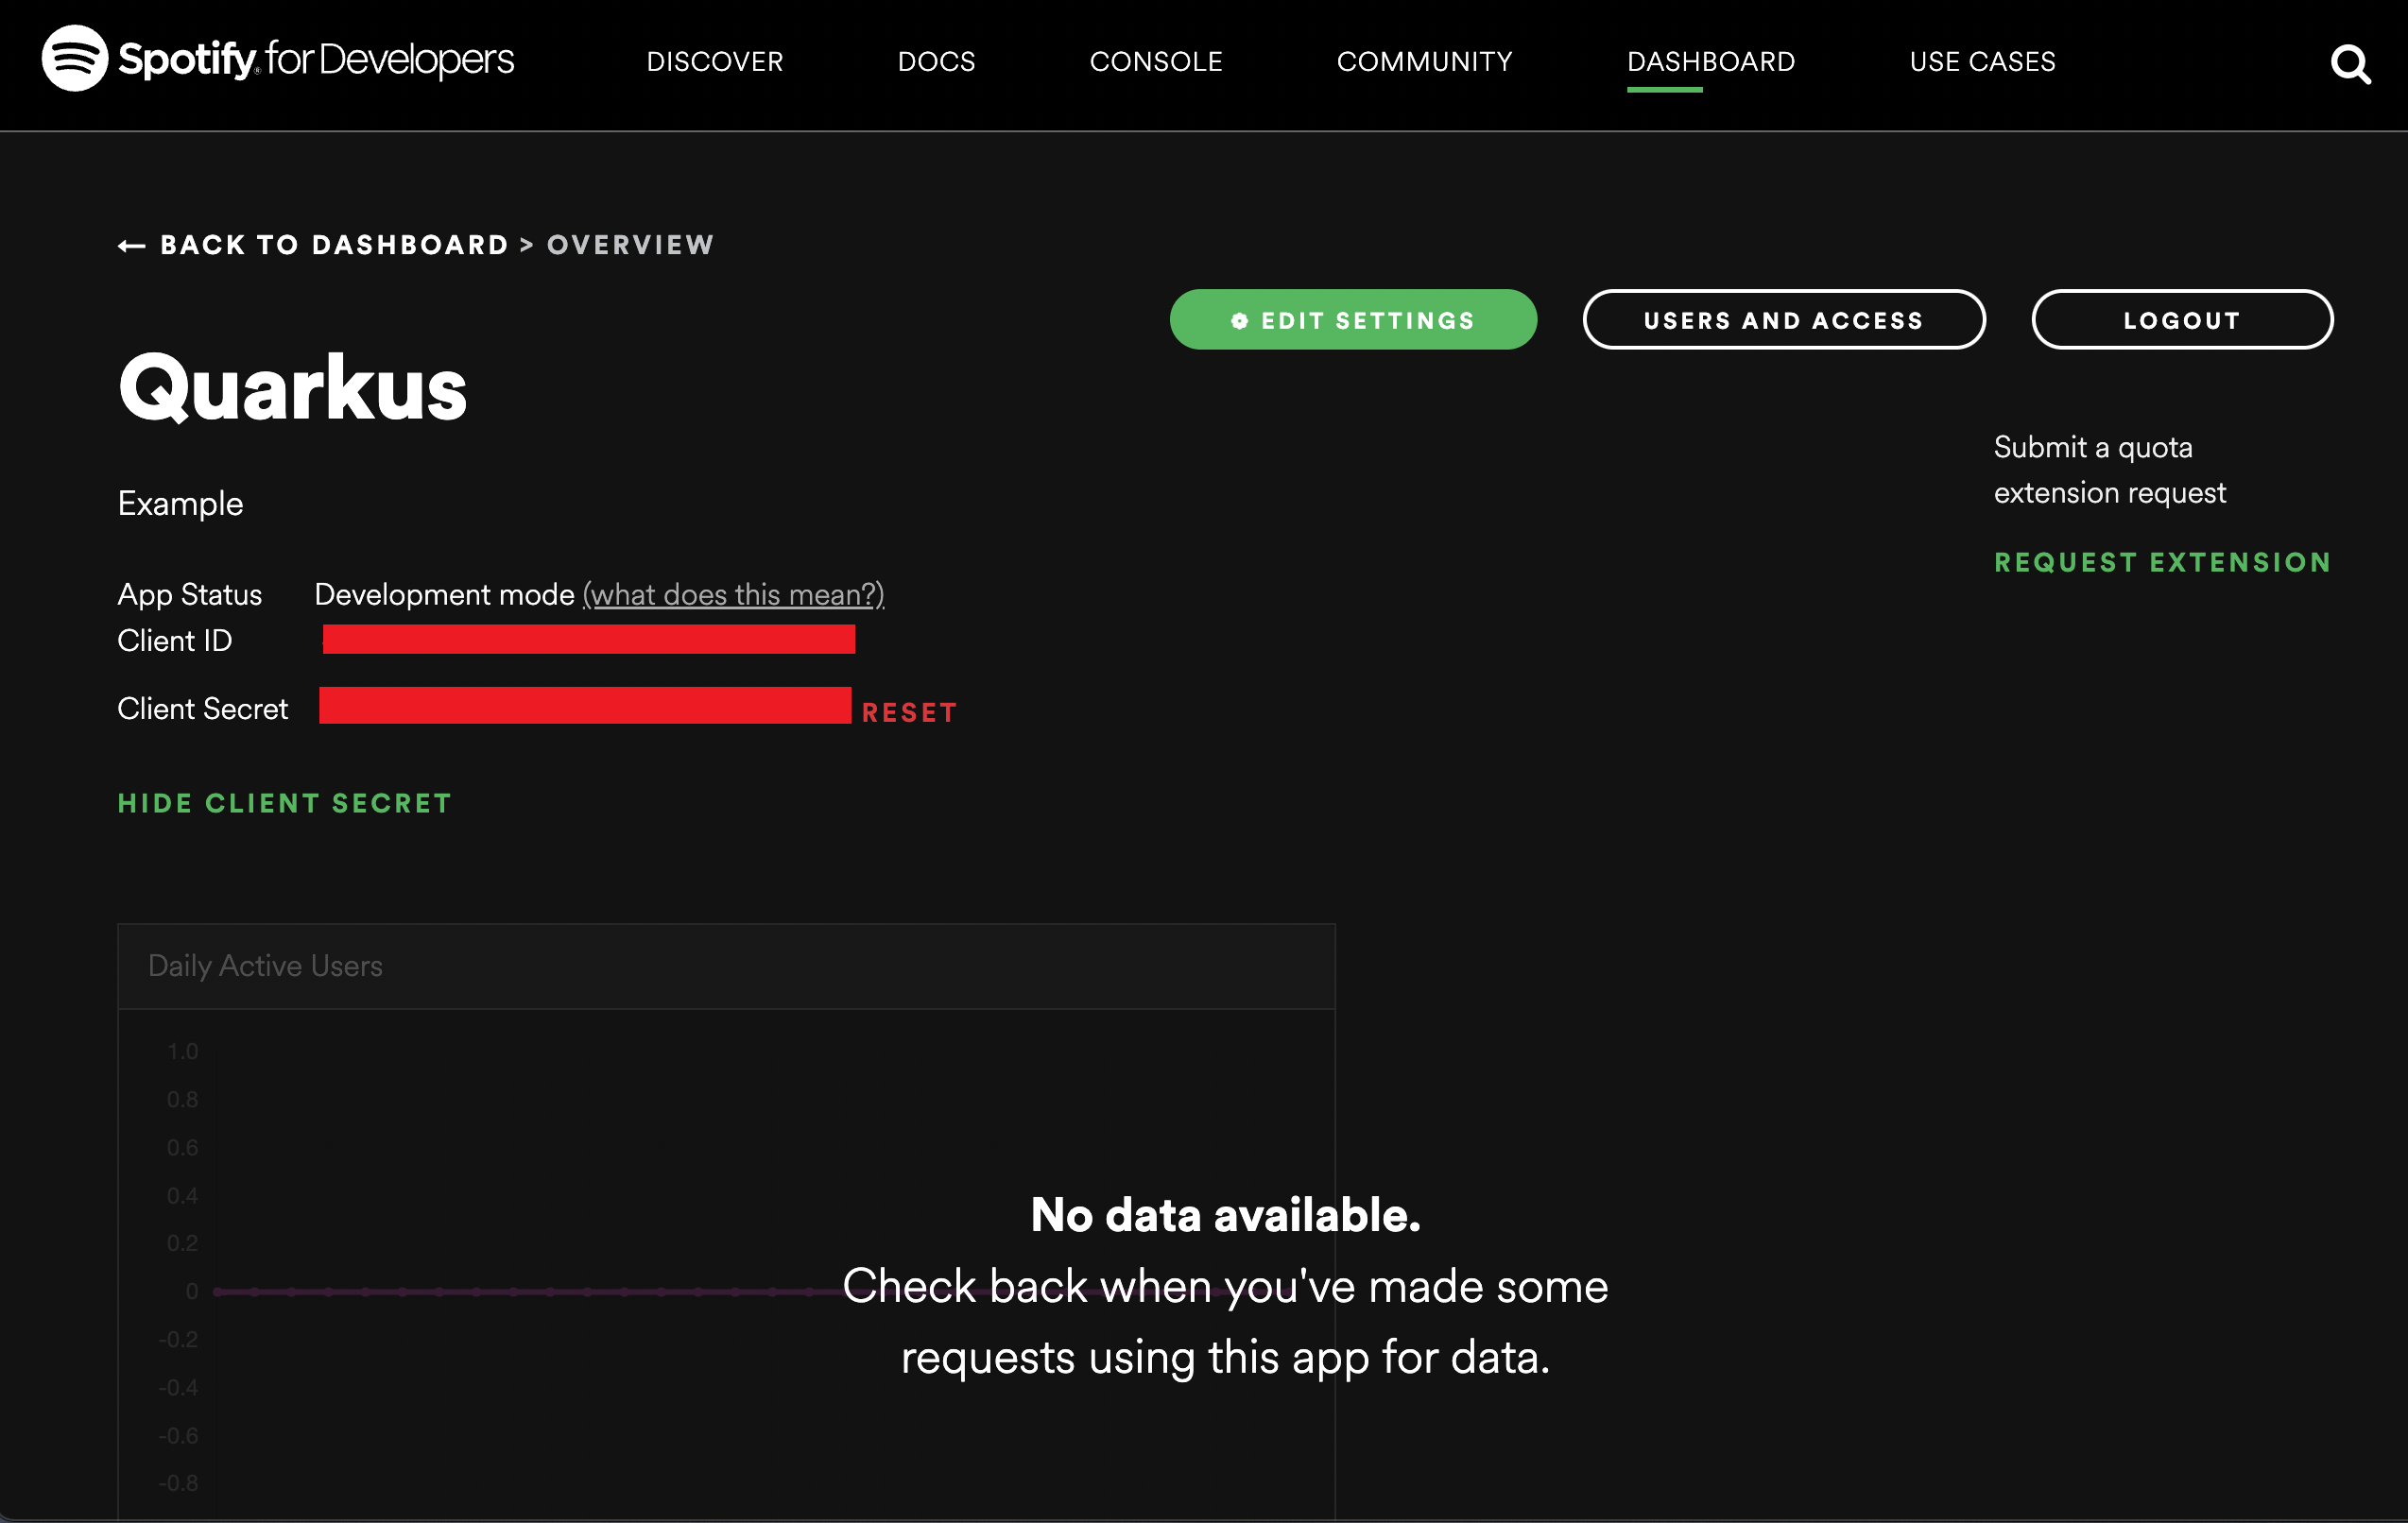
你现在可以配置你的 application.properties
You can now configure your application.properties:
quarkus.oidc.provider=spotify
quarkus.oidc.client-id=<Client ID>
quarkus.oidc.credentials.secret=<Client Secret>
quarkus.oidc.provider=spotify 会请求 Spotify 将 user-read-private 和 user-read-email 范围添加到已颁发的访问令牌。有关覆盖这些范围或请求更多范围的信息,请参阅 Provider scopes 部分。
quarkus.oidc.provider=spotify will request Spotify to add user-read-private and user-read-email scopes to issued access tokens. For information about overriding these scopes or requesting more scopes, see the Provider scopes section.
Strava
Create a Strava application:
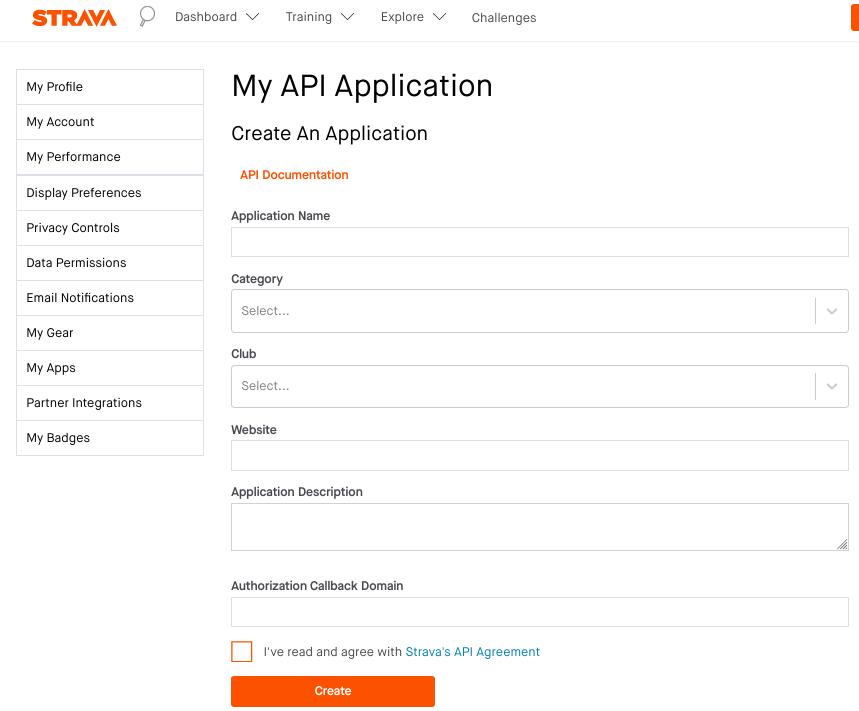
例如,将 Category 设置为 SocialMotivation,并将 ApplicationCallbackDomain 设置为 localhost 或 Ngrok 提供的域名,有关详细信息,请参阅 HTTPS Redirect URI。
For example, set Category to SocialMotivation, and set ApplicationCallbackDomain to either localhost or the domain name provided by Ngrok, see the HTTPS Redirect URI for more information.
你现在可以配置你的 application.properties
You can now configure your application.properties:
quarkus.oidc.provider=strava
quarkus.oidc.client-id=<Client ID>
quarkus.oidc.credentials.client-secret=<Client Secret>
# default value is '/strava'
quarkus.oidc.authentication.redirect-path=/fitness/welcome 1| 1 | Strava does not enforce that the redirect (callback) URI which is provided as an authorization code flow parameter is equal to the URI registered in the Strava application because it only requires configuring ApplicationCallbackDomain. For example, if ApplicationCallbackDomain is set to www.my-strava-example.com, Strava will accept redirect URIs such as www.my-strava-example.com/a, www.my-strava-example.com/path/a, which is not recommended by OAuth2 best security practices, see Insufficent redirect_uri validation for more information.
Therefore you must configure a redirect path when working with the Strava provider and Quarkus will enforce that the current request path matches the configured quarkus.oidc.authentication.redirect-path value before completing the authotization code flow. See the Exact redirect URI match for more information. |
Twitch
Create a Twitch application:
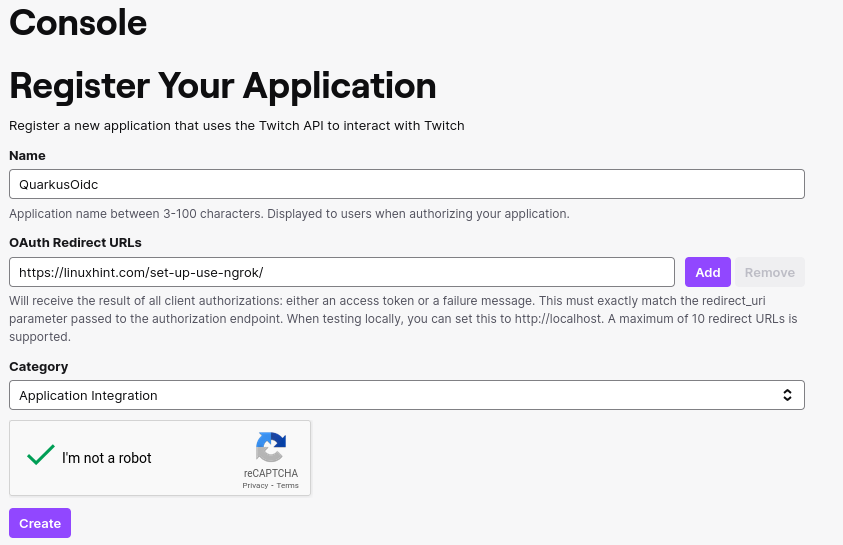
你现在可以配置你的 application.properties
You can now configure your application.properties:
quarkus.oidc.provider=twitch
quarkus.oidc.client-id=<Client ID>
quarkus.oidc.credentials.client-secret.value=<Client Secret>
[id="twitter"] X (formerly Twitter)
您可以使用 X (以前的 Twitter) 进行 OIDC 登录,但目前它限制了对用户电子邮件的访问,这意味着您必须自行获取并验证它。
You can use X (formerly Twitter) for OIDC login, but at the moment, it restricts access to the user’s email, which means you will have to obtain it and verify it yourself.
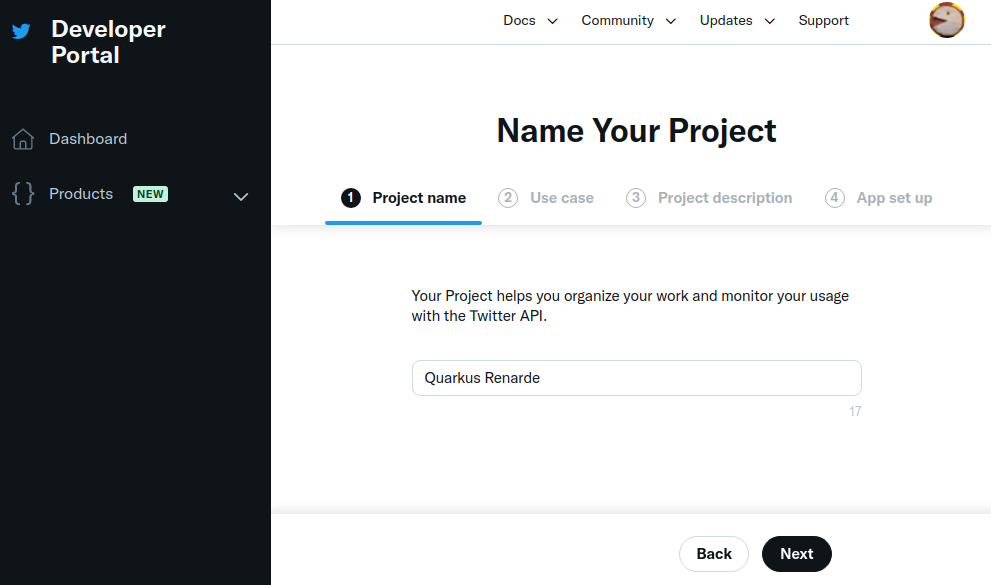
要为 X 设置 OIDC,首先 Creating a project,输入一个项目名称,然后按 Next:
In order to set up OIDC for X, start by Creating a project, enter a project name, and press Next:
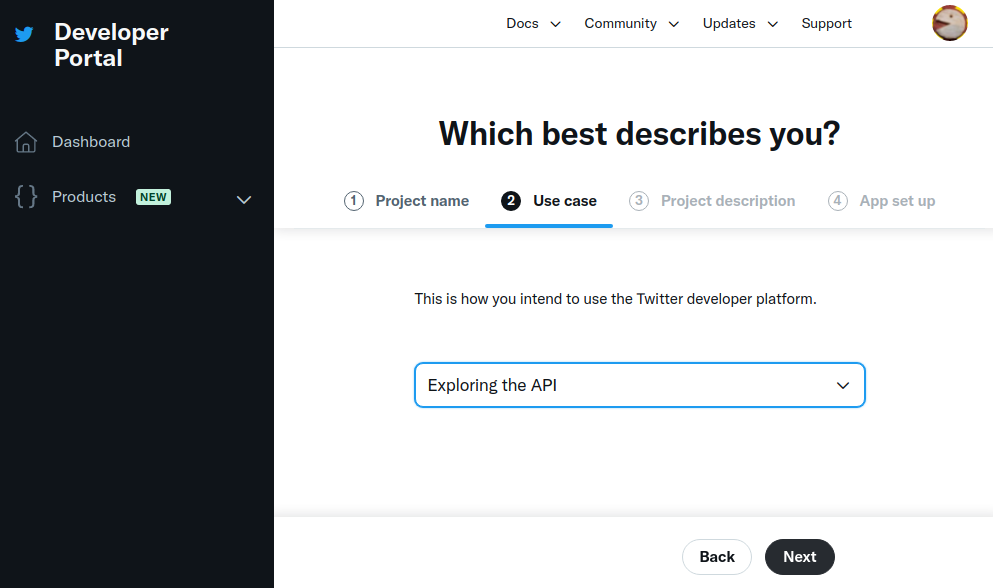
输入用例,然后按 Next:
Enter a use case, and press Next:
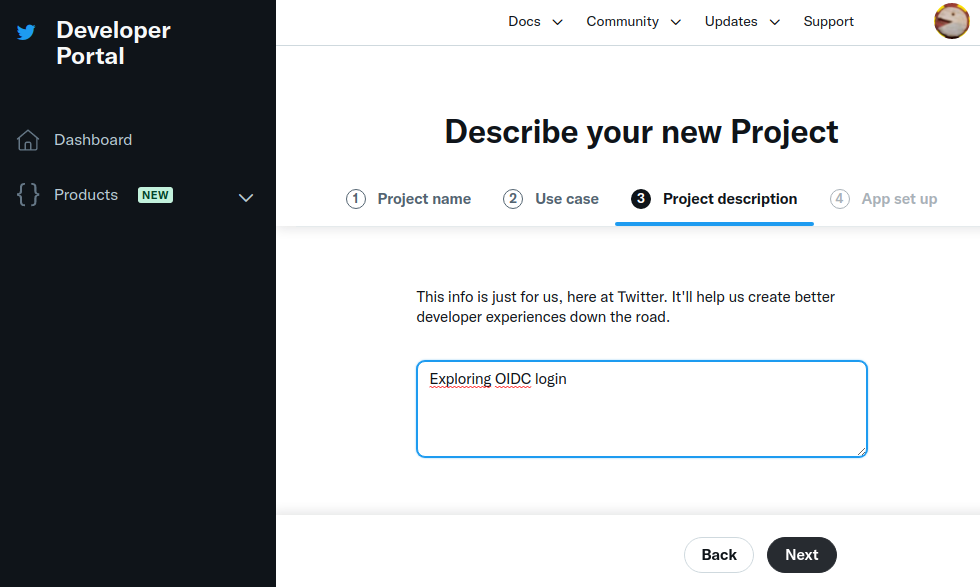
输入项目说明,然后按 Next:
Enter a project description, and press Next:
现在输入应用程序名称,然后按 Next:
Now enter an application name, and press Next:

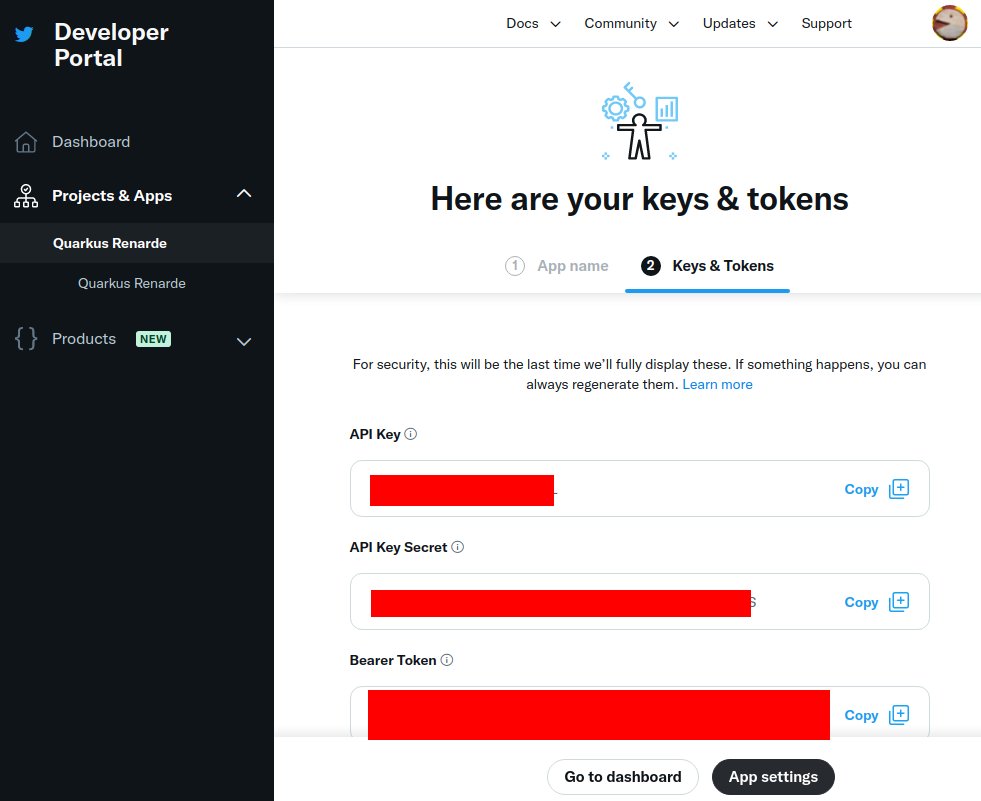
记下您的密钥,因为它们不会再次显示,然后按 App Settings:
Write down your keys, because they will not be displayed again, and press App Settings:
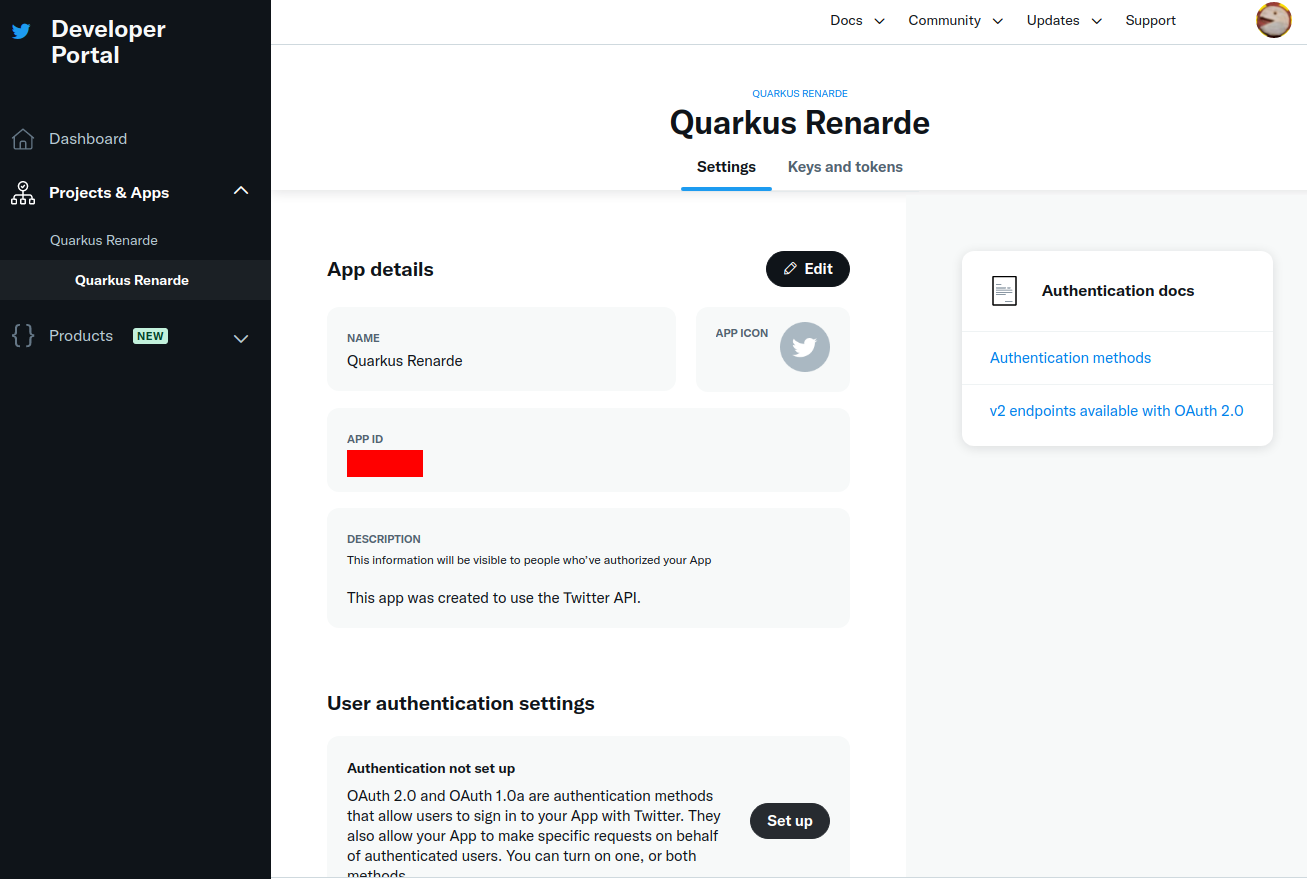
向下导航到 User authentication settings 部分,然后按 Set up:
Navigate down to the User authentication settings section and press Set up:
选中 OAuth 2.0 复选框:
Check the OAuth 2.0 check box:
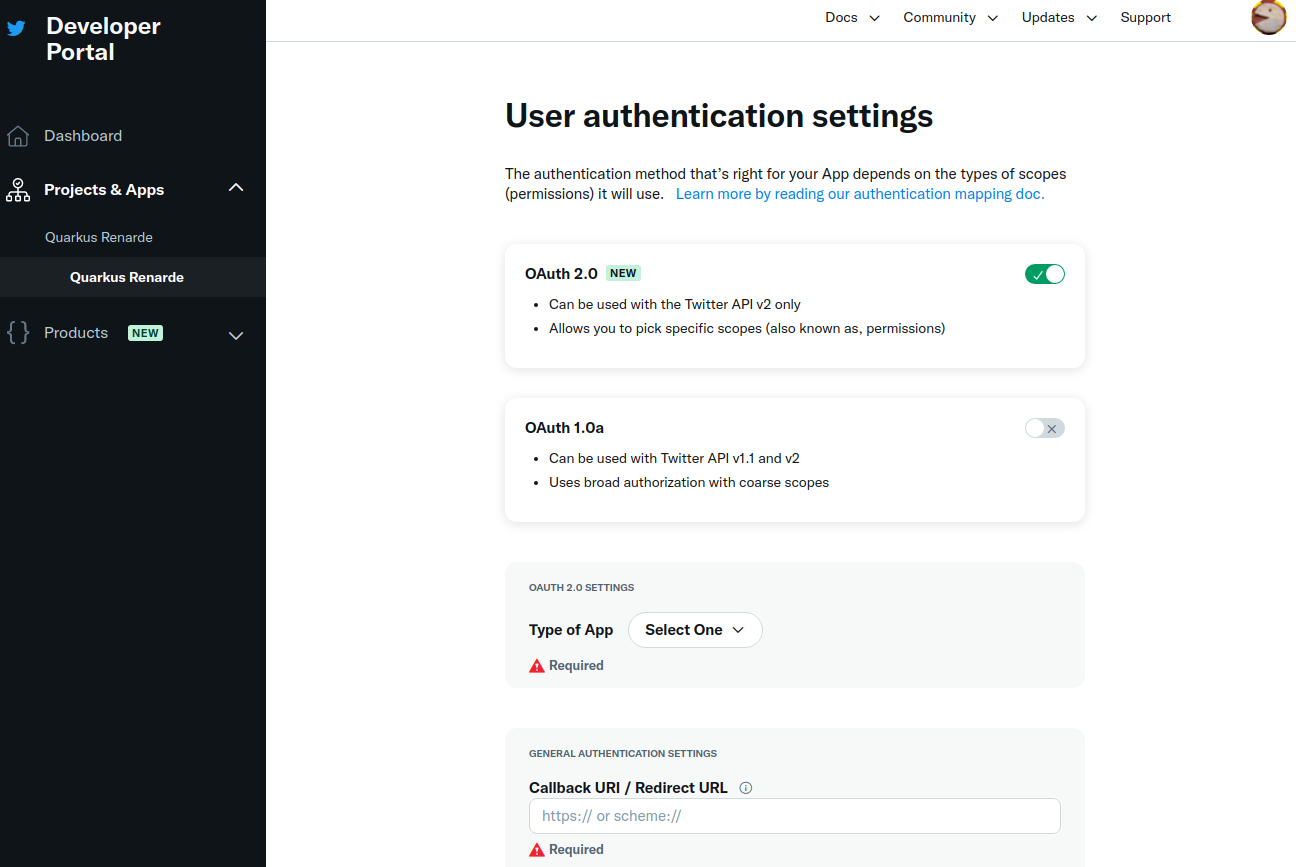
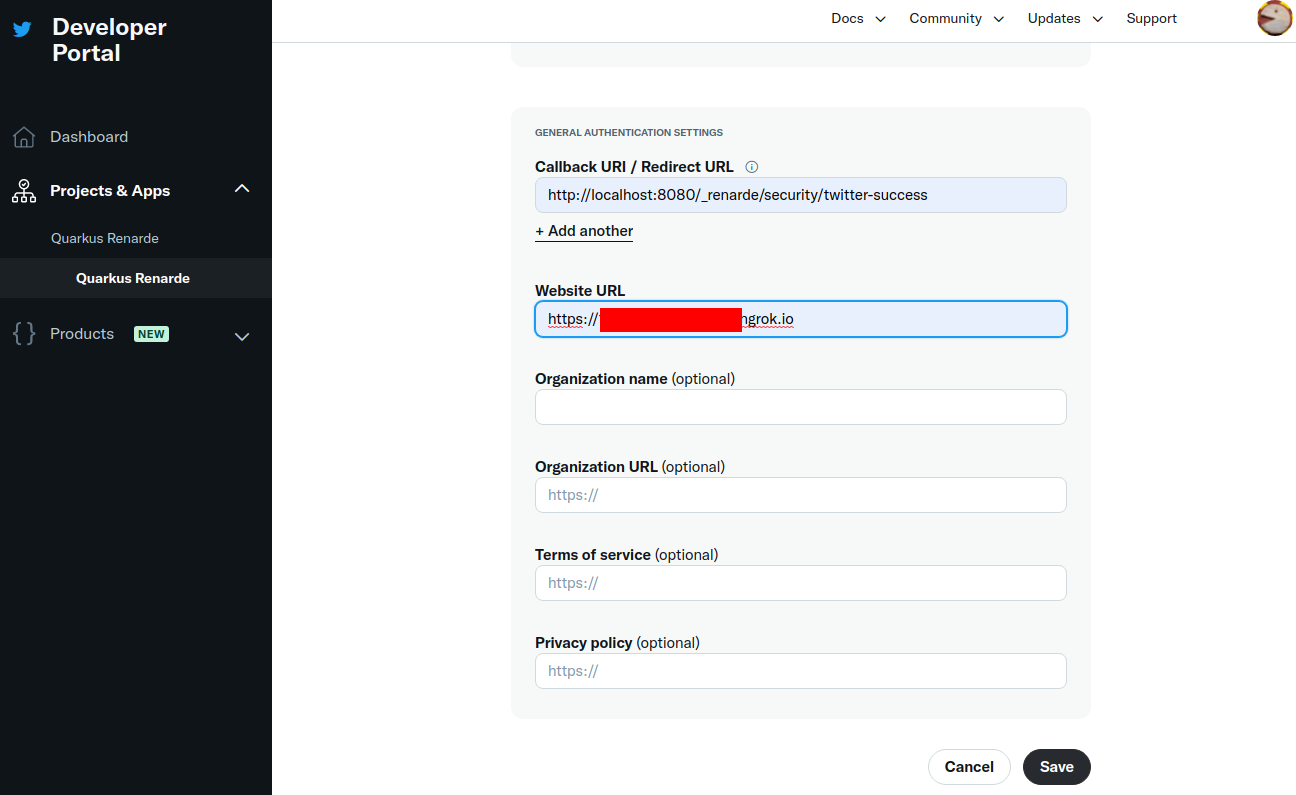
选择 Web App`作为应用程序类型,然后填写您的应用程序详细信息(在 `Callback URI 中使用 <host>/_renarde/security/twitter-success)。
Select Web App as application type, then fill in your application details (use <host>/_renarde/security/twitter-success
for the Callback URI).
|
X 在实践中不要求使用 https,但在没有 https 的情况下也不会接受您的 |
|
X doesn’t require https usage in practice, but won’t accept your |
现在按 Save:
Now press Save:
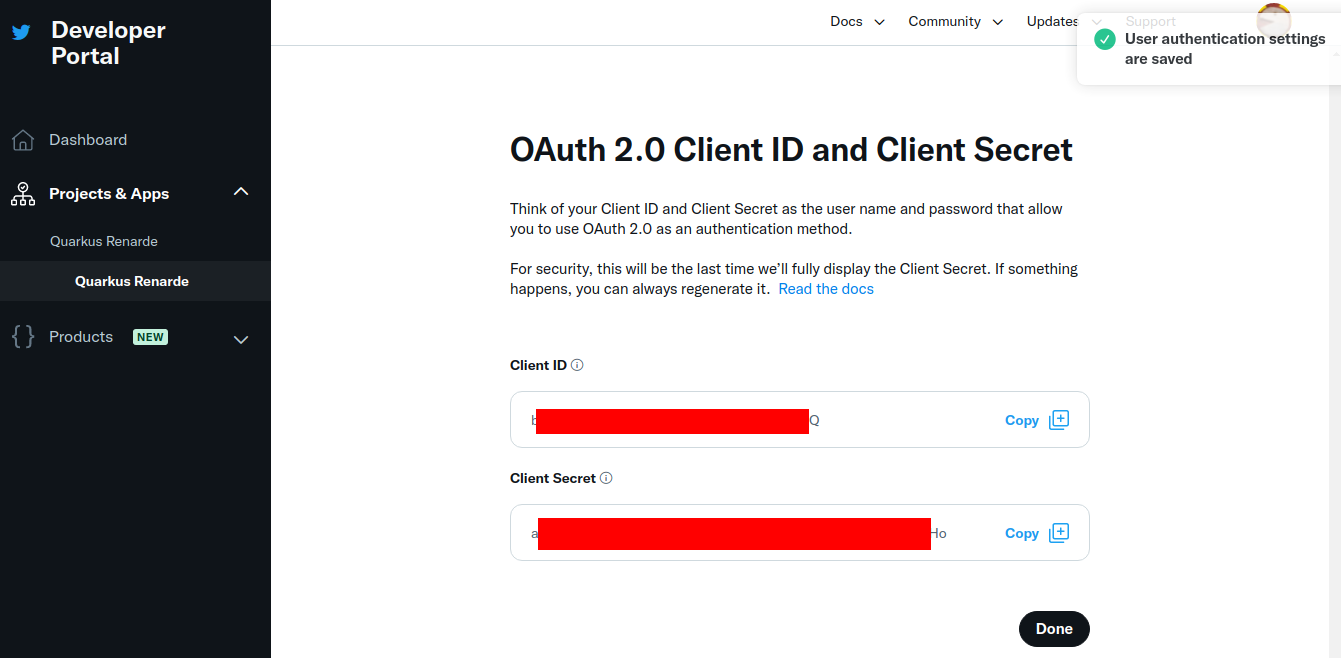
你现在可以复制你的 Client ID 和 Client Secret,然后按下 Done:
You can now copy your Client ID and Client Secret and press Done:
你现在可以配置你的 application.properties
You can now configure your application.properties:
quarkus.oidc.provider=x
quarkus.oidc.client-id=<Client ID>
quarkus.oidc.credentials.secret=<Client Secret>
quarkus.oidc.provider=x 会要求 X 将 offline.access、tweet.read 和 users.read 范围添加到已颁发的访问令牌。有关覆写这些范围或请求更多范围的信息,请参阅 Provider scopes 部分。
quarkus.oidc.provider=x will request X to add offline.access, tweet.read and users.read scopes to issued access tokens. For information about overriding these scopes or requesting more scopes, see the Provider scopes section.
|
X 供应商需要代码交换证明密钥 (PKCE),这受 X provider requires Proof Key for Code Exchange (PKCE) which is supported by the 如果你愿意,可以使用 You can provide your own secret key for encrypting the PKCE code verifier if you prefer with the |
|
X 是 Twitter 的新名称。目前你仍可以使用 X is the new name of Twitter. You can continue using |
Provider scopes
每个供应商声明都会要求将一个或多个令牌范围添加到由某个特定供应商颁发的访问令牌中。例如,quarkus.oidc.provider=google 将要求 Google 添加 openid、email 和 profile 范围。
Each provider declaration will request one or more token scopes added to access tokens issued by a given provider. For example, quarkus.oidc.provider=google will request Google to add openid, email and profile scopes.
你可以使用 quarkus.oidc.authentication.scopes 属性覆写这些范围,例如,如果你使用 Google 并且不想在访问令牌中添加 email 范围:
You can override these scopes with quarkus.oidc.authentication.scopes property, for example, if you work with Google and would not like to have an email scope added to access tokens:
quarkus.oidc.provider=google
quarkus.oidc.authentication.scopes=oidc,profile
你可能还想根据默认情况下请求的范围,额外添加一个或多个范围。例如,如果你想使用 Google 发行的访问令牌访问 Google Calendar 服务,你可以按如下方式进行操作:
You may also want to add one or more scopes in addition to the scopes requested by default. For example, if you would like to use an access token issued by Google to access Google Calendar service, you can do it like this:
quarkus.oidc.provider=google
quarkus.oidc.authentication.extra-params.scope=https://www.googleapis.com/auth/calendar
这比使用 quarkus.oidc.authentication.scopes 添加新范围简单,因为 quarkus.oidc.authentication.scopes 会覆写供应商声明已设置的范围,这就是为什么你必须在这种情况下列出所有必需的范围:
It is simpler than using quarkus.oidc.authentication.scopes to add a new scope, because quarkus.oidc.authentication.scopes overrides the scopes already set by the provider declaration, which is why you need to list all the required scopes in this case:
quarkus.oidc.provider=google
quarkus.oidc.authentication.scopes=oidc,email,profile,https://www.googleapis.com/auth/calendar
Support for multiple providers
如果你想支持使用多个供应商对用户进行身份验证,则必须支持特定于供应商的租户配置解析。
If you would like to support authenticating users with more than one provider then a provider-specific tenant configuration resolution must be supported.
有关详细信息,请参阅 Quarkus Using OpenID Connect (OIDC) Multi-Tenancy 指南。
For more information, see the Quarkus Using OpenID Connect (OIDC) Multi-Tenancy guide.
Access provider services with token propagation
有时,仅对 用户进行社交供应商身份验证是不够的。Quarkus OIDC web-app 应用程序还需要访问特定于供应商的服务,以代表当前经过身份验证的用户从供应商服务中获取或更新数据。
Sometimes, only authenticating users with a social provider is not enough.
A provider-specific service also needs to be accessed for the Quarkus OIDC web-app application to fetch or update data from the provider service on behalf of the currently authenticated user.
如 OIDC code flow mechanism for protecting web applications 指南中所述,授权代码流完成后会返回 ID 和访问令牌,而像 GitHub 这样的某些供应商只会返回访问令牌。正是这个访问令牌必须传播到诸如 Google Calendar 或 Spotify Playlists 等服务,以便当前经过身份验证的用户能够使用此类服务。
As mentioned in the OIDC code flow mechanism for protecting web applications guide, ID and access tokens are returned after the authorization code flow has been completed, with some providers like GitHub returning an access token only.
It is this access token that has to be propagated to services such as Google Calendar, or Spotify Playlists for the currently authenticated user to be able to use such services.
你无需引入特定于供应商的库来实现此目的,而可以使用响应式的 Token Propagation 过滤器,该过滤器可以通过简单的注释绑定到给定的 REST 客户端。有关详细信息,请参阅 Quarkus Access token propagation 指南。
You do not have to bring provider-specific libraries in order to achieve this, but instead you can use a reactive Token Propagation filter, which can be bound to a given REST client with a simple annotation.
For more information, see the Quarkus Access token propagation guide.
例如,在配置了 Google 供应商之后,你可以使用 REST 客户端在用户的 Google 日历中添加事件,如下例所示:
For example, after you have configured the Google provider, you can have events added to the user’s Google Calendar by using a REST client as shown in the following example:
package org.acme.calendar;

import org.eclipse.microprofile.rest.client.inject.RegisterRestClient;

import io.quarkus.oidc.token.propagation.AccessToken;
import io.smallrye.mutiny.Uni;
import jakarta.ws.rs.Consumes;
import jakarta.ws.rs.POST;
import jakarta.ws.rs.Path;
import jakarta.ws.rs.Produces;
import jakarta.ws.rs.core.MediaType;

@RegisterRestClient(configKey="google-calendar-api")
@AccessToken  1
@Path("/calendars/primary")
public interface GoogleCalendarClient {
    @POST
    @Path("events")
    @Consumes(MediaType.APPLICATION_JSON)
    @Produces(MediaType.APPLICATION_JSON)
    Uni<String> addEvent(Event event);
    public static class Event {
        public String summary;
        public String kind = "calendar#event";
        public Time start;
        public Time end
    }

    public static class Time {
        public String dateTime;
        public String timeZone = "Europe/CET";
        public Time() {
        }
        public Time(String value) {
            dateTime = value;
	}
    }
}| 1 | The @AccessToken annotation enables an access token propagation to the target service. |
最后,你需要配置 Google 日历地址并请求访问令牌的 Google 日历范围,如下例所示:
Finally, you need to configure the Google Calendar address and request the Google Calendar scope for an access token, as outlined in the following example:
quarkus.oidc.provider=google
quarkus.oidc.client-id=<Client ID>
quarkus.oidc.credentials.secret=<Secret>

# Add a required calendar scope
quarkus.oidc.authentication.extra-params.scope=https://www.googleapis.com/auth/calendar

# Point REST client to Google Calendar endpoint
quarkus.rest-client.google-calendar-api.url=https://www.googleapis.com/calendar/v3
现在,你已经准备好让用户通过 Google 身份验证,并支持代表用户更新他们的 Google 日历,例如:
Now you are ready to have users authenticated with Google and support updating their Google calendars on their behalf, for example:
package org.acme.calendar;
import org.eclipse.microprofile.jwt.JsonWebToken;
import org.eclipse.microprofile.rest.client.inject.RestClient;
import io.quarkus.oidc.IdToken;
import io.quarkus.security.Authenticated;
import io.smallrye.mutiny.Uni;
import jakarta.inject.Inject;
import jakarta.ws.rs.GET;
import jakarta.ws.rs.Path;
import jakarta.ws.rs.Produces;
@Path("/calendar")
@Authenticated
public class CalendarService {
@Inject
@IdToken
JsonWebToken jwt;
@Inject
@RestClient
GoogleCalendarClient calendarClient;
@GET
@Path("/event")
@Produces("text/plain")
public Uni<String> get() {
return calendarClient.addEvent(new Event()).onItem()
.transform(c -> ("Hello " + jwt.getName() + ", new event: " + c));
}
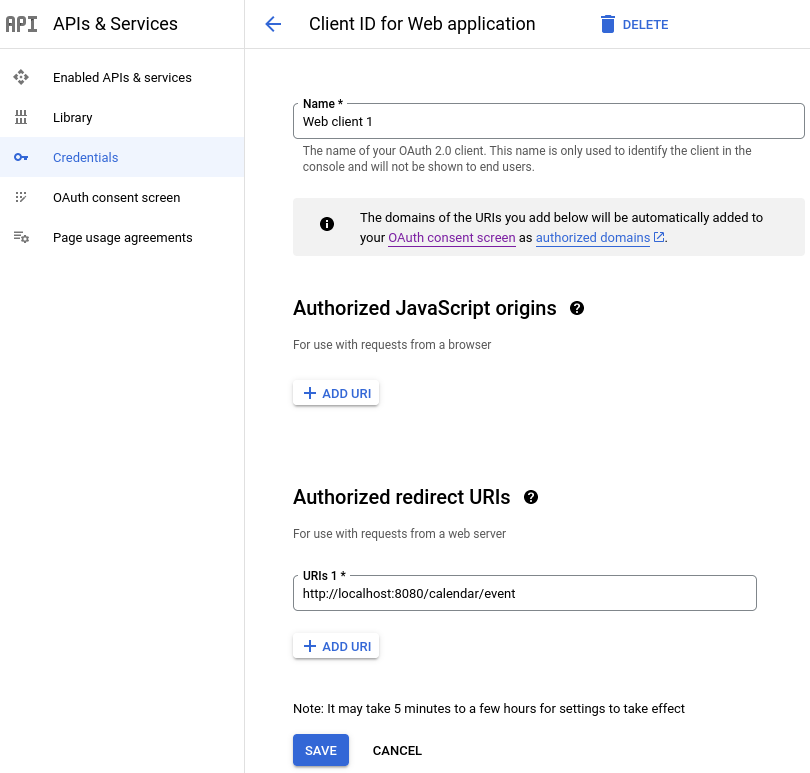
}如果你想在本地主机上测试这个端点,必须更新在 Google 供应商中注册的应用程序以将 http://localhost:8080/calendar/event 列为授权的重定向 URI 之一,例如:
You must update the application registered with the Google provider to list http://localhost:8080/calendar/event as one of the authorized redirect URIs if you would like to test this endpoint on the local host, for example:
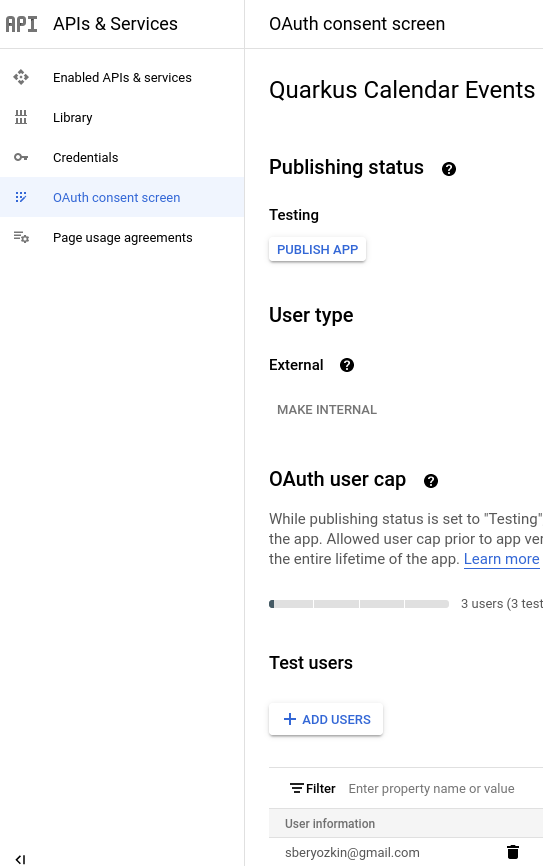
你可能还必须注册一个或多个测试用户:
You might also have to register one or more test users:
如果端点必须访问其他 Google 服务,请遵循相同的方法。
Follow the same approach if the endpoint must access other Google services.
使用特定供应商进行身份验证的模式,其中端点使用 ID 令牌或 UserInfo(尤其是如果使用仅 OAuth2 的供应商,例如 GitHub)获取有关当前经过身份验证的用户信息,并使用访问令牌以该用户的名义访问一些下游服务(供应商或应用程序特定的服务),无论使用哪个供应商来保护应用程序都可普遍应用。
The pattern of authenticating with a given provider, where the endpoint uses either an ID token or UserInfo (especially if an OAuth2-only provider such as GitHub is used) to get some information about the currently authenticated user and using an access token to access some downstream services (provider or application specific ones) on behalf of this user can be universally applied, irrespectively of which provider is used to secure the application.
Exact redirect URI match
大多数 OIDC 和 OAuth2 供应商(Strava 除外)都会强制执行以下操作:只有当重定向 URI 与在给定供应商的信息中心中配置的重定向 URI 完全匹配时,才能完成授权代码流程。
Most OIDC and OAuth2 providers with the exception of Strava will enforce that the authorization code flow can be completed only if the redirect URI matches precisely the redirect URI configured in a given provider’s dashboard.
从实际的角度来看,你的 Quarkus 端点很可能需要将 quarkus.oidc.authentication.redirect-path 相对路径属性设置为所有经过身份验证的用户的初始入口路径,例如 quarkus.oidc.authentication.redirect-path=/authenticated,这意味着新经过身份验证的用户将登陆 /authenticated 页面,无论你的应用程序有多少安全入口点,以及他们最初访问了哪个安全资源。
From the practical point of view, your Quarkus endpoint will most likely need to have the quarkus.oidc.authentication.redirect-path relative path property set to an initial entry path for all the authenticated users, for example, quarkus.oidc.authentication.redirect-path=/authenticated, which means that newly authenticated users will land on the /authenticated page, irrespectively of how many secured entry points your application has and which secured resource they initially accessed.
这是许多 OIDC web-app 应用程序的典型流程。一旦用户登陆初始的安全页面,你的应用程序就会返回一个 HTML 页面,该页面使用链接指导用户到应用程序的其他部分,或用户可以直接在 JAX-RS API 的帮助下重定向到其他应用程序资源。
It is a typical flow for many OIDC web-app applications. Once the user lands on the initial secured page, your application can return an HTML page which uses links to guide users to other parts of the application or users can be immediately redirected to other application resources with the help of JAX-RS API.
如有必要,你可以在完成身份验证后配置 Quarkus 以还原原始请求 URI。例如:
If necessary, you can configure Quarkus to restore the original request URI after the authentication has been completed. For example:
quarkus.oidc.provider=strava 1
quarkus.oidc.client-id=<Client ID>
quarkus.oidc.credentials.secret=<Secret>
quarkus.oidc.authentication.restore-path-after-redirect=true 2| 1 | strava provider configuration is the only supported configuration which enforces the quarkus.oidc.authentication.redirect-path property with the /strava path which you can override with another path such as /fitness. |
| 2 | If the users access the /run endpoint before the authentication, then, once they have authenticated and been redirected to the configured redirect path such as /strava, they will land on the original request /run path. |
你不必立即设置 quarkus.oidc.authentication.redirect-path,因为如果未配置 quarkus.oidc.authentication.redirect-path,Quarkus 会假定当前请求 URL 是授权代码流程重定向 URL。例如,要测试 Google 身份验证是否有效,你可以让 Quarkus 端点侦听 /google,并更新 Google 信息中心以支持 http://localhost:8080/google 重定向 URI。一旦你受保护的应用程序 URL 空间增长,将需要设置 quarkus.oidc.authentication.redirect-path 属性。
You do not have to set quarkus.oidc.authentication.redirect-path immediately because Quarkus assumes the current request URL is an authorization code flow redirect URL if no quarkus.oidc.authentication.redirect-path is configured. For example, to test that a Google authentication is working, you can have a Quarkus endpoint listening on /google and update the Google dashboard that http://localhost:8080/google redirect URI is supported. Setting quarkus.oidc.authentication.redirect-path property will be required once your secured application URL space grows.
HTTPS Redirect URI
一些供应商只接受基于 HTTPS 的重定向 URI。例如 ngrok can be set up 之类的工具可帮助在处于开发模式的本地主机上运行的 Quarkus 端点上测试此类供应商。
Some providers will only accept HTTPS-based redirect URIs. Tools such as ngrok can be set up to help testing such providers with Quarkus endpoints running on localhost in dev mode.
Rate Limiting
根据你的开发者 API 订阅级别,一些供应商可能会强制执行相当严格的请求速率限制策略。
Depending on your developer API subscription level, some providers may enforce a rather strict request rate limiting policy.
当 Quarkus 从像 Google 供应商这样的符合 OIDC 的供应商中获取公共验证密钥,并通过本地密钥持续验证用户会话时,这可能不成问题。然而,对于纯 OAuth2 供应商(仅有访问令牌可用,且必须通过在经过身份验证的用户的每个请求中请求供应商端点的 UserInfo 间接验证这种供应商),这可能会成为问题。
It may not be a problem when Quarkus fetches public verification keys from OIDC-compliant providers like the Google provider and keeps verifying the user session with these keys locally. However, for pure OAuth2 providers where only an access token is available and which has to be verified indirectly by requesting UserInfo from the provider endpoint on every request done by an already authenticated user, it can become a problem.
因此,UserInfo 会嵌入到内部生成的 ID 令牌中,并在会话 Cookie 中进行加密。你可以使用 quarkus.oidc.cache-user-info-in-idtoken=false 禁用它。
Therefore, UserInfo is embedded in an internally generated ID token and is encrypted in the session cookie. You can disable it with quarkus.oidc.cache-user-info-in-idtoken=false.
或者,使用默认或自定义 UserInfo 缓存供应商,请参阅“OpenID Connect (OIDC) Bearer 令牌身份验证”指南的 Token Introspection and UserInfo cache 部分。
Alternatively, use a default or custom UserInfo cache provider, please see the Token Introspection and UserInfo cache section of the "OpenID Connect (OIDC) Bearer token authentication" guide.