Android 简明教程
Android - Wi-Fi
Android 允许应用程序在非常低的级别访问查看无线连接的状态。应用程序几乎可以访问 Wi-Fi 连接的所有信息。
Android allows applications to access to view the access the state of the wireless connections at very low level. Application can access almost all the information of a wifi connection.
应用程序可以访问的信息包括已连接网络的链路速度、IP 地址、协商状态和其他网络信息。应用程序还可以扫描、添加、保存、终止和发起 Wi-Fi 连接。
The information that an application can access includes connected network’s link speed,IP address, negotiation state, other networks information. Applications can also scan, add, save, terminate and initiate Wi-Fi connections.
Android 提供 WifiManager API 来管理 Wi-Fi 连接的所有方面。我们可以通过调用 getSystemService 方法实例化此类。其语法如下所示:
Android provides WifiManager API to manage all aspects of WIFI connectivity. We can instantiate this class by calling getSystemService method. Its syntax is given below −
WifiManager mainWifiObj;
mainWifiObj = (WifiManager) getSystemService(Context.WIFI_SERVICE);
为了扫描无线网络列表,你还需要注册 BroadcastReceiver。它可以使用 registerReceiver 方法与接收器类对象的参数一起注册。其语法如下所示:
In order to scan a list of wireless networks, you also need to register your BroadcastReceiver. It can be registered using registerReceiver method with argument of your receiver class object. Its syntax is given below −
class WifiScanReceiver extends BroadcastReceiver {
   public void onReceive(Context c, Intent intent) {
   }
}

WifiScanReceiver wifiReciever = new WifiScanReceiver();
registerReceiver(wifiReciever, new IntentFilter(WifiManager.SCAN_RESULTS_AVAILABLE_ACTION));
Wi-Fi 扫描可以通过调用 WifiManager 类的 startScan 方法来启动。此方法返回一个 ScanResult 对象列表。你可以通过调用列表的 get 方法访问任意对象。其语法如下所示:
The wifi scan can be start by calling the startScan method of the WifiManager class. This method returns a list of ScanResult objects. You can access any object by calling the get method of list. Its syntax is given below −
List<ScanResult> wifiScanList = mainWifiObj.getScanResults();
String data = wifiScanList.get(0).toString();
除了扫描,你还可以使用 WifiManager 类中定义的方法对你的 Wi-Fi 进行更多控制。它们如下所示:
Apart from just Scanning, you can have more control over your WIFI by using the methods defined in WifiManager class. They are listed as follows −
Sr.No |
Method & Description |
1 |
addNetwork(WifiConfiguration config) This method add a new network description to the set of configured networks. |
2 |
createWifiLock(String tag) This method creates a new WifiLock. |
3 |
disconnect() This method disassociate from the currently active access point. |
4 |
enableNetwork(int netId, boolean disableOthers) This method allow a previously configured network to be associated with. |
5 |
getWifiState() This method gets the Wi-Fi enabled state |
6 |
isWifiEnabled() This method return whether Wi-Fi is enabled or disabled. |
7 |
setWifiEnabled(boolean enabled) This method enable or disable Wi-Fi. |
8 |
updateNetwork(WifiConfiguration config) This method update the network description of an existing configured network. |
Example
这里有一个演示 Wi-Fi 用法示例。它创建一个打开 Wi-Fi 和关闭 Wi-Fi 的基本应用程序。
Here is an example demonstrating the use of WIFI. It creates a basic application that open your wifi and close your wifi
要测试此示例,你需要在已打开 Wi-Fi 的实际设备上运行它。
To experiment with this example, you need to run this on an actual device on which wifi is turned on.
Steps |
Description |
1 |
You will use Android studio to create an Android application under a package com.example.sairamkrishna.myapplication. |
2 |
Modify src/MainActivity.java file to add WebView code. |
3 |
Modify the res/layout/activity_main to add respective XML components |
4 |
Modify the AndroidManifest.xml to add the necessary permissions |
5 |
Run the application and choose a running android device and install the application on it and verify the results. |
以下是修改的主活动文件 src/MainActivity.java 的内容。
Following is the content of the modified main activity file src/MainActivity.java.
package com.example.sairamkrishna.myapplication;

import android.net.wifi.WifiManager;
import android.os.Bundle;
import android.app.Activity;
import android.content.Context;
import android.view.View;
import android.view.View.OnClickListener;
import android.widget.Button;

public class MainActivity extends Activity {
   Button enableButton,disableButton;
   @Override
   protected void onCreate(Bundle savedInstanceState) {
      super.onCreate(savedInstanceState);
      setContentView(R.layout.activity_main);

      enableButton=(Button)findViewById(R.id.button1);
      disableButton=(Button)findViewById(R.id.button2);

      enableButton.setOnClickListener(new OnClickListener(){
         public void onClick(View v){
            WifiManager wifi = (WifiManager) getSystemService(Context.WIFI_SERVICE);
            wifi.setWifiEnabled(true);
         }
      });

      disableButton.setOnClickListener(new OnClickListener(){
         public void onClick(View v){
            WifiManager wifi = (WifiManager) getSystemService(Context.WIFI_SERVICE);
            wifi.setWifiEnabled(false);
         }
      });
   }
}
以下是修改后的 xml res/layout/activity_main.xml 内容。
Following is the modified content of the xml res/layout/activity_main.xml.
<?xml version="1.0" encoding="utf-8"?>
<RelativeLayout xmlns:android="http://schemas.android.com/apk/res/android"
   xmlns:tools="http://schemas.android.com/tools" android:layout_width="match_parent"
   android:layout_height="match_parent"
   android:paddingLeft="@dimen/activity_horizontal_margin"
   android:paddingRight="@dimen/activity_horizontal_margin"
   android:paddingTop="@dimen/activity_vertical_margin"
   android:paddingBottom="@dimen/activity_vertical_margin" tools:context=".MainActivity">

   <ImageView
      android:layout_width="wrap_content"
      android:layout_height="wrap_content"
      android:id="@+id/imageView"
      android:src="@drawable/abc"
      android:layout_alignParentTop="true"
      android:layout_centerHorizontal="true" />

   <Button
      android:id="@+id/button1"
      android:layout_width="wrap_content"
      android:layout_height="wrap_content"
      android:layout_marginLeft="76dp"
      android:text="Enable Wifi"
      android:layout_centerVertical="true"
      android:layout_alignEnd="@+id/imageView" />

   <Button
      android:id="@+id/button2"
      android:layout_width="wrap_content"
      android:layout_height="wrap_content"
      android:text="Disable Wifi"
      android:layout_marginBottom="93dp"
      android:layout_alignParentBottom="true"
      android:layout_alignStart="@+id/imageView" />

</RelativeLayout>
下面是 AndroidManifest.xml 文件的内容。
Following is the content of AndroidManifest.xml file.
<?xml version="1.0" encoding="utf-8"?>
<manifest xmlns:android="http://schemas.android.com/apk/res/android"
   package="com.example.sairamkrishna.myapplication" >
   <uses-permission android:name="android.permission.ACCESS_WIFI_STATE" />
   <uses-permission android:name="android.permission.CHANGE_WIFI_STATE" />

   <application
      android:allowBackup="true"
      android:icon="@mipmap/ic_launcher"
      android:label="@string/app_name"
      android:theme="@style/AppTheme" >

      <activity
         android:name=".MainActivity"
         android:label="@string/app_name" >

         <intent-filter>
            <action android:name="android.intent.action.MAIN" />
            <category android:name="android.intent.category.LAUNCHER" />
         </intent-filter>

      </activity>

   </application>
</manifest>
让我们尝试运行你的应用程序。我假设你已将你的实际 Android 移动设备与你的计算机连接。要从 Android Studio 运行应用程序,请打开一个项目活动文件,然后从工具栏中单击“运行”图标。在启动应用程序之前,Android Studio 将显示以下窗口,用于选择希望在其中运行 Android 应用程序的选项。
Let’s try to run your application. I assume you have connected your actual Android Mobile device with your computer. To run the app from Android studio, open one of your project’s activity files and click Run icon from the toolbar. Before starting your application, Android studio will display following window to select an option where you want to run your Android application.
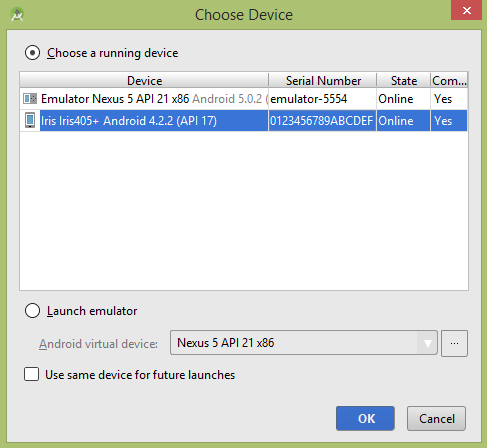
选择移动设备作为选项,它将显示以下图片-
Select your mobile device as an option and It will shows the following image−

现在,单击禁用 WiFi 按钮。然后,示例输出应该如下 -
Now click on disable wifi button.then the sample output should be like this −
