Selenium 简明教程
Selenium with Kotlin Tutorial
Selenium 可以使用多种语言,比如 Java、Python、Kotlin、JavaScript、Ruby 等等。Selenium 被广泛用于 web 自动化测试。Selenium 是一个开源且可移植的自动化软件测试工具,用于测试 Web 应用程序。它具有跨不同浏览器和操作系统运行的能力。Selenium 不仅是一个单一的工具,而是一套工具,可帮助测试人员更有效地自动化基于 Web 的应用程序。
Selenium can be used with multiple languages like Java, Python, Kotlin, JavaScript, Ruby, and so on. Selenium is used extensively for web automation testing. Selenium is an open-source and a portable automated software testing tool for testing web applications. It has capabilities to operate across different browsers and operating systems. Selenium is not just a single tool but a set of tools that helps testers to automate web-based applications more efficiently.
Setup Selenium with Kotlin
Step 1 − 使用链接安装系统中的 Maven − https://maven.apache.org/download.cgi 。
Step 1 − Install Maven in our system using the link − https://maven.apache.org/download.cgi.
要详细了解如何设置 Maven,请参阅链接 − Maven Environment 。
To get a more detailed view on how set up Maven, refer to the link − Maven Environment.
通过运行以下命令,确认已安装的 Maven 的版本 −
Confirm the version of the Maven installed by running the following command −
mvn –version它将显示以下内容 output :
It will show the following output −
Apache Maven 3.9.6 (bc0240f3c744dd6b6ec2920b3cd08dcc295161ae)
Maven home: /opt/homebrew/Cellar/maven/3.9.6/libexec
Java version: 21.0.1, vendor: Homebrew, runtime: /opt/homebrew/Cellar/openjdk/21.0.1/libexec/openjdk.jdk/Contents/Home
Default locale: en_IN, platform encoding: UTF-8
OS name: "mac os x", version: "14.0", arch: "aarch64", family: "mac"
所执行命令的输出表示系统中所安装的 Maven 版本是 Apache Maven 3.9.6。
The output of the command executed signified that the Maven version installed in the system is Apache Maven 3.9.6.
Step 2 − 从链接下载并安装代码编辑器 IntelliJ,用于编写和运行 Selenium 测试 − https://www.jetbrains.com/idea/ 。
Step 2 − Download and install the code editor IntelliJ from the link to write and run the Selenium test − https://www.jetbrains.com/idea/.
要详细了解如何设置 IntelliJ,请参阅链接 − Selenium IntelliJ 。
To get a more detailed view on how set up IntelliJ, refer to the link − Selenium IntelliJ.
Step 3 − 启动 IntelliJ 并单击新建项目按钮。
Step 3 − Launch IntelliJ and click on the New Project button.

Step 4 − 输入项目名称、位置,然后将语言选择为 Kotlin,将 Maven 作为构建系统。
Step 4 − Enter the Project Name, Location, and then select the the Language as Kotlin and Maven as the Build Systems.

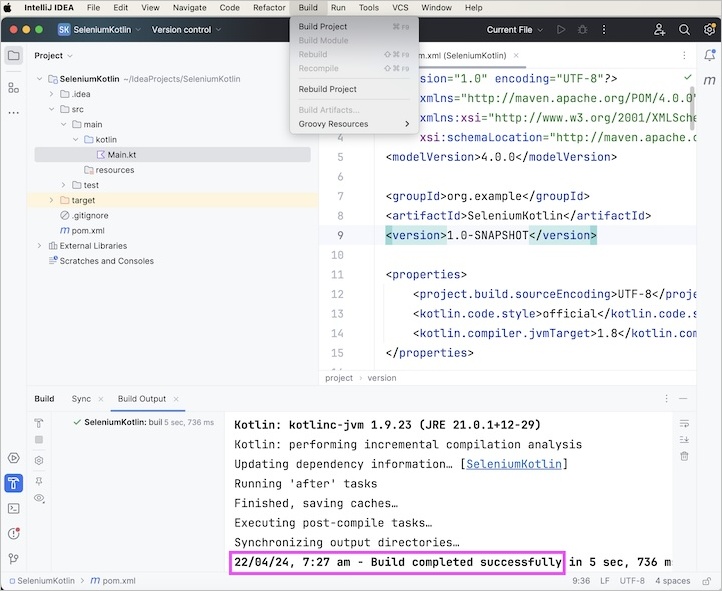
Step 5 − 从“构建”菜单构建项目。
Step 5 − Build the project from the Build menu.
Step 6 − 从链接添加 Selenium Maven 依赖项 − https://mvnrepository.com/artifact/ 。
Step 6 − Add the Selenium Maven dependencies from the link − https://mvnrepository.com/artifact/.
Step 7 − 保存包含所有依赖项的 pom.xml,并更新 maven 项目。
Step 7 − Save the pom.xml with all the dependencies and update the maven project.
Step 8 − 在 Maven 项目 SeleniumKotlin 中,右键单击测试文件夹中的 kotlin 文件夹,并创建一个包,比如 TestCases。
Step 8 − Within the Maven project SeleniumKotlin, right click on the kotlin folder within the test folder, and create a package, say TestCases.
Step 9 − 右键单击 TestCases 包,并选择新建菜单,然后单击 Kotlin 类/文件菜单。
Step 9 − Right click on the TestCases package, and select the New menu, then click on the Kotlin Class/File menu.
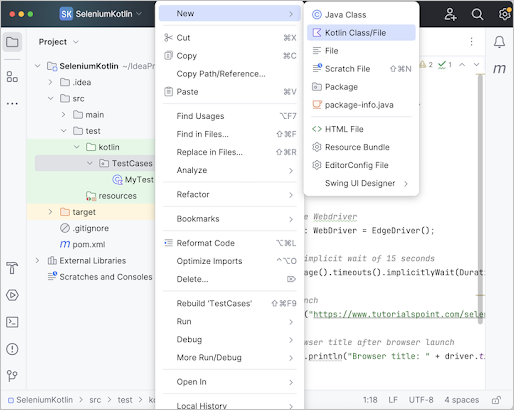
Step 10 − 在新建 Kotlin 类/文件字段中输入一个文件名称,比如 MyTest,然后按 Enter。
Step 10 − Enter a filename, say MyTest within the New Kotlin Class/File field and press Enter.

Step 11 − 在 MyTest.kt 文件中添加以下代码。
Step 11 − Add the below code in the MyTest.kt file.
package TestCases

import org.openqa.selenium.WebDriver
import org.openqa.selenium.edge.EdgeDriver
import java.time.Duration
import org.testng.annotations.Test

class MyTest {

   @Test
   fun launchBrow() {

      // Initiate Webdriver
      val driver: WebDriver = EdgeDriver();

      // adding implicit wait of 15 seconds
      driver.manage().timeouts().implicitlyWait(Duration.ofSeconds(15));

      // URL launch
      driver.get("https://www.tutorialspoint.com/selenium/practice/selenium_automation_practice.php");

      // get browser title after browser launch
      System.out.println("Browser title: " + driver.title);
   }
}
在 pom.xml 文件中添加的总依赖项−
Overall dependencies added in the pom.xml file −
<?xml version="1.0" encoding="UTF-8"?>
<project xmlns="http://maven.apache.org/POM/4.0.0"
   xmlns:xsi="http://www.w3.org/2001/XMLSchema-instance"
   xsi:schemaLocation="http://maven.apache.org/POM/4.0.0
   http://maven.apache.org/xsd/maven-4.0.0.xsd">

   <modelVersion>4.0.0</modelVersion>
   <groupId>org.example</groupId>
   <artifactId>SeleniumKotlin</artifactId>
   <version>1.0-SNAPSHOT</version>

   <properties>
      <project.build.sourceEncoding>UTF-8</project.build.sourceEncoding>
      <kotlin.code.style>official</kotlin.code.style>
      <kotlin.compiler.jvmTarget>1.8</kotlin.compiler.jvmTarget>
   </properties>

   <repositories>
      <repository>
         <id>mavenCentral</id>
         <url>https://repo1.maven.org/maven2/</url>
      </repository>
   </repositories>

   <build>
      <sourceDirectory>src/main/kotlin</sourceDirectory>
      <testSourceDirectory>src/test/kotlin</testSourceDirectory>
      <plugins>
         <plugin>
            <groupId>org.jetbrains.kotlin</groupId>
            <artifactId>kotlin-maven-plugin</artifactId>
            <version>1.9.23</version>
            <executions>
               <execution>
                  <id>compile</id>
                  <phase>compile</phase>
                  <goals>
                     <goal>compile</goal>
                  </goals>
               </execution>
               <execution>
                  <id>test-compile</id>
                  <phase>test-compile</phase>
                  <goals>
                     <goal>test-compile</goal>
                  </goals>
               </execution>
            </executions>
         </plugin>
         <plugin>
            <artifactId>maven-surefire-plugin</artifactId>
            <version>2.22.2</version>
         </plugin>
         <plugin>
            <artifactId>maven-failsafe-plugin</artifactId>
            <version>2.22.2</version>
         </plugin>
         <plugin>
            <groupId>org.codehaus.mojo</groupId>
            <artifactId>exec-maven-plugin</artifactId>
            <version>1.6.0</version>
            <configuration>
               <mainClass>MainKt</mainClass>
            </configuration>
         </plugin>
      </plugins>
   </build>

   <dependencies>
      <dependency>
         <groupId>org.jetbrains.kotlin</groupId>
         <artifactId>kotlin-test-junit5</artifactId>
         <version>1.9.23</version>
         <scope>test</scope>
      </dependency>

      <!-- https://mvnrepository.com/artifact/org.seleniumhq.selenium/selenium-java -->
      <dependency>
         <groupId>org.seleniumhq.selenium</groupId>
         <artifactId>selenium-java</artifactId>
         <version>4.19.0</version>
      </dependency>

      <!-- https://mvnrepository.com/artifact/org.testng/testng -->
      <dependency>
         <groupId>org.junit.jupiter</groupId>
         <artifactId>junit-jupiter-engine</artifactId>
         <version>5.10.0</version>
         <scope>test</scope>
      </dependency>
      <dependency>
         <groupId>org.jetbrains.kotlin</groupId>
         <artifactId>kotlin-stdlib</artifactId>
         <version>1.9.23</version>
      </dependency>
   </dependencies>
</project>
本例中遵循的项目结构 -
Project Structure followed in this example −
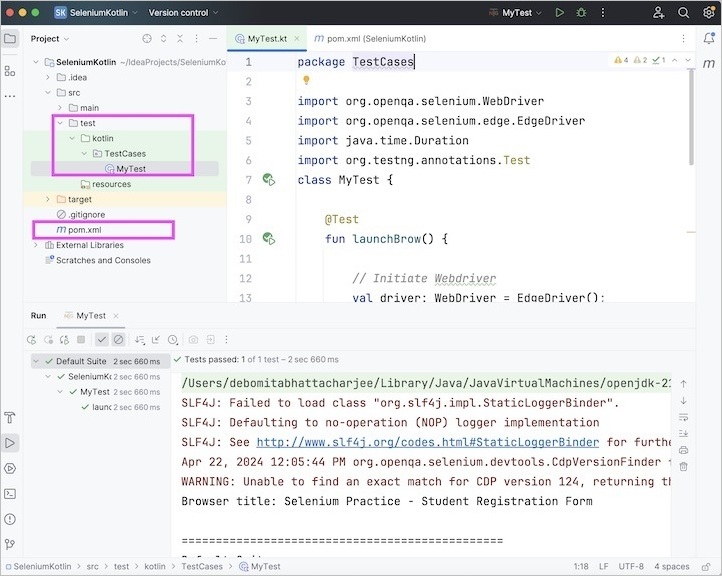
Step 12 − 右键单击并选择运行“MyRun”选项。等到运行完成。
Step 12 − Right click and select Run ‘MyRun’ option. Wait till the run is completed.
它将显示以下内容 output :
It will show the following output −
Browser title: Selenium Practice - Student Registration Form

===============================================
Default Suite
Total tests run: 1, Passes: 1, Failures: 0, Skips: 0
===============================================

Process finished with exit code 0
在上面的示例中,我们首先启动了 Edge 浏览器并启动了应用程序,然后检索浏览器标题,并在控制台中收到消息 - Browser title: Selenium Practice - Student Registration Form 。
In the above example, we had first launched the Edge browser and launched an application then retrieved the browser title and in the console received the message - Browser title: Selenium Practice - Student Registration Form.
控制台中的结果显示 Total tests run: 1 ,因为有一个带 @Test 注释的方法 - launchBrow()。
The result in the console shows Total tests run: 1, as there is one method with @Test annotations - launchBrow().
最后,收到消息 Passes: 1 和 Process finished with exit code 0 ,表示代码执行成功。
Finally, the message Passes: 1 and Process finished with exit code 0 was received, signifying successful execution of the code.
Identify Element and Check Its Functionality Using Selenium Kotlin
一旦我们导航到某个网页,我们必须与该页面中可用的 web 元素进行交互,比如点击链接/按钮、在编辑框中输入文本等,以完成我们的自动化测试用例。
Once we navigate to a webpage, we have to interact with the web elements available on the page like clicking a link/button, entering text within an edit box, and so on to complete our automation test case.
为此,我们的第一个工作应该是识别元素。我们可以使用链接的链接文本进行识别,并使用该方法 findElement(By.linkText("<链接文本的值>"))。通过此方法,应返回具有匹配值的链接文本的第一个元素。
For this, our first job should be to identify the element. We can use the link text for a link for its identification and utilize the method findElement(By.linkText("<value of link text>")). With this, the first element with the matching value of the link text should be returned.
如果没有与链接文本的匹配值相匹配的元素,则应抛出 NoSuchElementException 异常。
In case there is no element with the matching value of the link text, NoSuchElementException should be thrown.
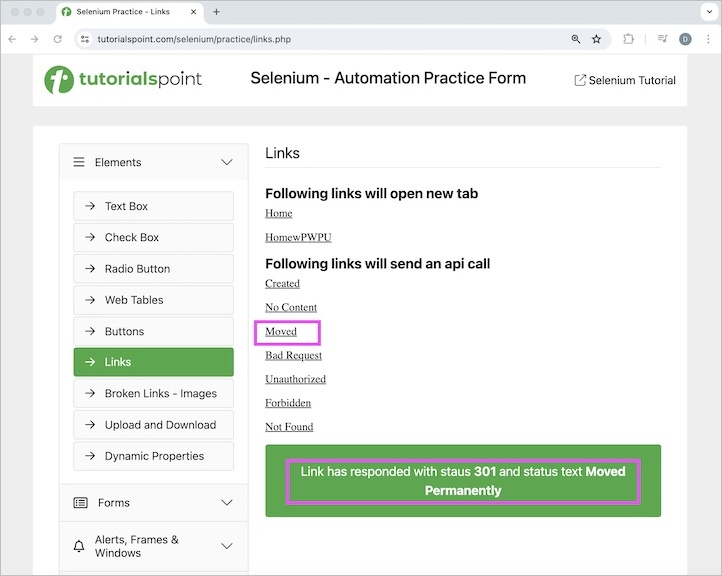
让我们来看看之前在下面图片中讨论的链接的 html 代码 −
Let us see the html code of the link as discussed before in the below image −
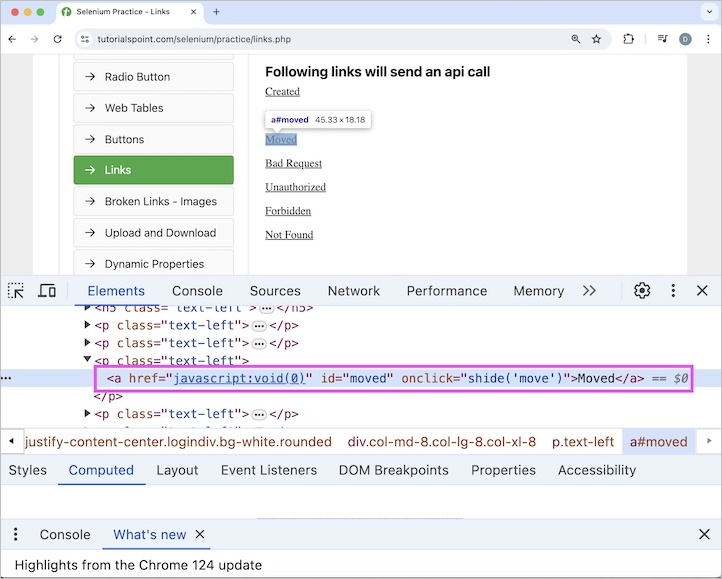
<a href="javascript:void(0)" id="moved" onclick="shide('move')">Moved</a>上图中突出显示的链接 - Moved 的链接文本值是 Moved。让我们在识别出来后单击它。单击 Moved 链接后,文本 - Link has responded with status 301 and status text Moved Permanently 将出现在网页上。最后,我们将退出浏览器。
The link - Moved highlighted in the above image has the link text value as Moved. Let us click on it after identifying it. The text - Link has responded with status 301 and status text Moved Permanently would appear on the web page on clicking the Moved link. Finally we would quit the browser.
Example
package TestCases

import org.openqa.selenium.By
import org.openqa.selenium.WebDriver
import org.openqa.selenium.edge.EdgeDriver
import java.time.Duration
import org.testng.annotations.Test

class MyTest {

   @Test
   fun accessLnkGetText() {

      // Initiate Webdriver
      val driver: WebDriver = EdgeDriver();

      // adding implicit wait of 15 seconds
      driver.manage().timeouts().implicitlyWait(Duration.ofSeconds(15));

      // URL launch
      driver.get("https://www.tutorialspoint.com/selenium/practice/links.php");

      // identify link then click
      val lnk = driver.findElement(By.linkText("Moved"));
      lnk.click();

      // identify text the get text
      val txt = driver.findElement(By.xpath("/html/body/main/div/div/div[2]/div[3]"));
      System.out.println("Text Obtained is: " + txt.text);

      // quit browser
      driver.quit()
   }
}
它将显示以下内容 output :
It will show the following output −
Text Obtained is: Link has responded with status 301 and status text Moved Permanently
===============================================
Default Suite
Total tests run: 1, Passes: 1, Failures: 0, Skips: 0
===============================================

Process finished with exit code 0
在上面的示例中,我们首先启动了 Edge 浏览器并启动了一个应用程序,然后单击了该链接。在单击该链接之后,我们获得了文本,并且在控制台中收到了消息 - Text Obtained is: Link has responded with status 301 and status text Moved Permanently 。
In the above example, we had first launched the Edge browser and launched an application then clicked on the link. After clicking the link, we had obtained the text and in the console received the message - Text Obtained is: Link has responded with status 301 and status text Moved Permanently.
控制台中的结果显示 Total tests run: 1 ,因为有一个带有 @Test 注解的方法 - accessLnkGetText() 。
The result in the console shows Total tests run: 1, as there is one method with @Test annotations - accessLnkGetText().
最后,收到消息 Passes: 1 和 Process finished with exit code 0 ,表示代码执行成功。
Finally, the message Passes: 1 and Process finished with exit code 0 was received, signifying successful execution of the code.
这总结了我们对 Selenium - Kotlin 教程的全面讲解。我们从描述如何使用 Kotlin 设置 Selenium 开始,如何使用 Selenium Kotlin 启动浏览器并退出会话,以及如何使用 Selenium Kotlin 识别元素并检查其功能。
This concludes our comprehensive take on the tutorial on Selenium - Kotlin Tutorial. We’ve started with describing how to set up Selenium with Kotlin, how to launch a browser and quit a session using the Selenium Kotlin, and how to identify an element and check its functionality using Selenium Kotlin.
这使你具备 Selenium - Kotlin 教程的深入知识。明智的做法是不断练习你所学的内容并探索其他与 Selenium 相关的知识,以加深你的理解并开阔你的视野。
This equips you with in-depth knowledge of the Selenium - Kotlin Tutorial. It is wise to keep practicing what you’ve learned and exploring others relevant to Selenium to deepen your understanding and expand your horizons.